Tools / Impact Wrenches
User Manual for Parkside 20V / 4Ah SMART BATTERY PAPS 204 B1
Quick guide for the Parkside 20V / 4Ah SMART BATTERY PAPS 204 B1. Includes charging instructions, LED status indicators, app connectivity, maintenance, and safety guidelines.
Table of contents
Manual images
Click an image to enlargeQuick guide from the manual
This manual provides essential information for the Parkside 20V / 4Ah SMART BATTERY (PAPS 204 B1). Key operations include charging the battery using a compatible Parkside X 20 V Team charger, checking the charge level via the integrated LEDs, and connecting the battery to the Parkside app via Bluetooth for smart features.
Intended Use
The product is compatible with all devices from the Parkside X 20 V Team series. It must only be charged using chargers from the Parkside X 20 V TEAM series. This product is not intended for commercial use.
Parts List
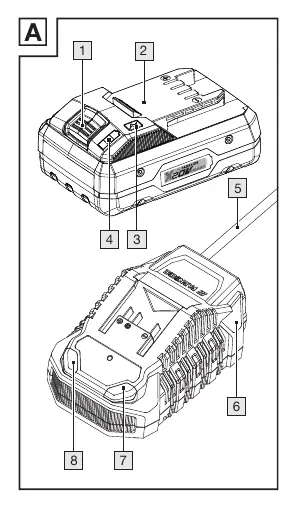
- [1] Release button for rechargeable battery
- [2] Rechargeable battery
- [3] Button (charging level)
- [4] Charging level LEDs (red/orange/green)
- [5] Mains cord with mains plug
- [6] Rapid battery charger (not included)
- [7] Charging control LED – red
- [8] Charging control LED – green
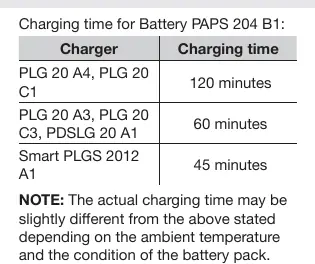
Charging the battery
The battery can be charged at any time without reducing its service life. Interrupting the charging process does not damage the battery. Charge the battery before use when it is at a medium or low charging level.
- Insert the rechargeable battery [2] into the charger [6].
- Connect the mains plug [5] to a socket-outlet.
- When fully charged, remove the battery from the charger and disconnect the mains plug.
Operation and LED Status
The charging control LEDs indicate the status of the charger and battery:
- Red LED [7] lights up: The battery is charging.
- Green LED [8] lights up: The battery is fully charged.
- Green and red LED flash: The battery is defective.
- Red LED flashes: The battery is too cold or too warm.
- Green LED lights up (without battery): The charger is ready for use.
To check the charge level, press the button [3]. The charging level LEDs [4] indicate the status: Red + orange + green (maximum), Red + orange (medium), Red (low).
Connecting to the Parkside App
Only Smart batteries can be connected to the Parkside app. Ensure Bluetooth is enabled on your mobile device, run the Parkside app, and select the battery from the list. If not listed, ensure the battery is paired and select '+' to add the device.
Maintenance and Storage
Clean dust and debris from vents and electrical contacts using a soft brush. Store the battery partially charged (40 to 60%, indicated by red and orange LEDs) if storing for extended periods. Check the charge level about every 3 months.
Disposal
Do not dispose of the battery with household waste. It must be recycled at a local collection point. Remove the battery from the product before disposal.
Practical help
Common problems
Battery not charging
Ensure the charger is compatible (Parkside X 20 V TEAM series) and the battery is within the recommended temperature range (+4 to +40 °C).
Red LED flashes on charger
The battery is too cold or too warm. Allow it to reach a suitable temperature.
Green and red LEDs flash
The battery is defective. Do not use it.
Before use
- Check the battery charge level using the button.
- Ensure the charger is compatible with the Parkside X 20 V TEAM series.
- Verify the battery is not damaged or modified.
- Download the Parkside app if you intend to use smart features.
- Ensure the battery is within the recommended temperature range.
Specs in practice
- Rated voltage
- 20V DC
- Energy value
- 80 Wh
- Frequency band
- 2400 - 2483.5 MHz (for Bluetooth)
Images and diagrams
- Figure A illustrates the battery components, including the release button, charging level button, and LED indicators.
Model compatibility
- Compatible with all devices from the Parkside X 20 V Team series.
- Must only be charged using chargers from the Parkside X 20 V TEAM series.

Manual page author
Michael Turner
Technical manual editor
Reviews PDF manuals for structure, safety notes, and practical product details so readers can find the right information quickly.