Tools / Impact Wrenches
User Manual for Parkside Performance PPDSSA 20-Li B2 Cordless Impact Wrench
Quick guide and user manual for the Parkside Performance PPDSSA 20-Li B2 cordless impact wrench. Includes setup, operation, wheel change instructions, and maintenance.
Quick answers from the manual
Quick answer
- The PPDSSA 20-Li B2 is a cordless impact wrench designed for tightening and loosening screws and nuts. It features multiple speed/torque levels and is part of the Parkside X 20 V TEAM series. p. 4, 5
Key actions
- Changing a wheel p. 10, 11
First start
- Insert the battery, select the speed level, and set the rotation direction. p. 9, 11
Problems and fixes
Battery overheated
Allow the battery to cool down before charging.
p. 10Technical specifications
| Parameter | Value | Meaning | Pages |
|---|---|---|---|
| Torque Level 1 | 120 Nm | Low torque setting | p. 5 |
| Torque Level 2 | 400 Nm | High torque setting | p. 5 |
Where to find it in the PDF
- Technical Data p. 5
- Wheel Change Instructions p. 10, 11
Table of contents
Manual images
Click an image to enlargeQuick guide from the manual
The Parkside Performance PPDSSA 20-Li B2 is a cordless impact wrench designed for tightening and loosening screws and nuts. It is part of the X 20 V TEAM series and is compatible with batteries and chargers from this series.

Product Description
The device features a 1/2" square drive, right/left rotation, and multiple operating modes for different tasks, including a precision mode (A) and a wood mode (B).
Operation
Speed/Torque Settings: Use the speed button to select between different levels:
- Level 1: Low speed impact mode (120 Nm)
- Level 2: High speed impact mode (400 Nm)
- Mode A (Precision): For loosening and tightening; stops for 1 second when the screw/nut is flush to allow controlled tightening.
- Mode B (Wood): Higher speed for soft materials like wood.
Wheel Change Instructions
Important: Wheel changes require technical knowledge. If unsure, have a professional perform the change.
- Loosening: Select Mode A, set rotation to left, and loosen nuts/bolts slightly.
- Lifting: Use a jack at the manufacturer-recommended point until the wheel is off the ground.
- Removal: Remove nuts/bolts completely and take off the wheel.
- Mounting: Place the new wheel, hand-tighten nuts/bolts, select Mode A, set rotation to right, and tighten.
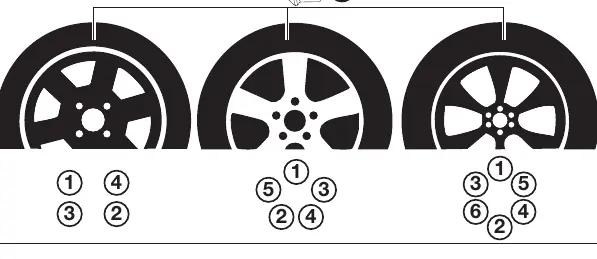
- Finalizing: Lower the vehicle and tighten all nuts/bolts crosswise with a torque wrench according to manufacturer specifications.
Maintenance and Storage
The device is maintenance-free. Store in a clean, dry, dust-free place, out of reach of children. Remove the battery before long-term storage.
Practical help
Common problems
Battery does not charge
Check if the battery is properly inserted, check the charger connection, or if the battery is overheated/defective.
Tool does not start
Check battery charge level, ensure the direction switch is not in the center (lock) position.
Before use
- Check battery charge level
- Ensure the correct socket is securely mounted
- Set the desired rotation direction
- Select the appropriate speed/torque mode
Images and diagrams
- Page 3 shows the tool components, battery, and charger.
- Page 106 shows the operation of the direction switch and the wheel nut tightening sequence.
Model compatibility
- Compatible with Parkside X 20 V TEAM series batteries and chargers.

Manual page author
Emily Carter
User documentation editor
Prepares concise manual descriptions and highlights the most useful setup, operation, and maintenance information for readers.