Tools / Impact Wrenches
User Manual for Parkside PASSK 20-Li B2 Cordless Vehicle Impact Wrench
Quick guide for the Parkside PASSK 20-Li B2 Cordless Vehicle Impact Wrench. Includes setup, operation, torque settings, battery charging, and maintenance instructions.
Quick answers from the manual
Quick answer
- The Parkside PASSK 20-Li B2 is a cordless impact wrench designed for tightening and loosening bolts and nuts. It features a 1/2" square drive and is part of the X 20 V TEAM series. p. 19, 20
Key actions
- Insert/replace tool p. 26
- Set direction of rotation p. 26
- Adjust torque p. 26
First start
- Insert a charged battery into the device until it clicks into place. p. 26
Problems and fixes
Device does not start
Check battery charge level and ensure it is properly inserted.
p. 26Technical specifications
| Parameter | Value | Meaning | Pages |
|---|---|---|---|
| Max. torque | 400 Nm | Maximum torque for hard screw-driving applications. | p. 20 |
Where to find it in the PDF
- Overview p. 3
Table of contents
Manual images
Click an image to enlargeIntroduction
Congratulations on the purchase of your new device. This cordless impact wrench is a high-quality tool designed for inserting and releasing bolts as well as tightening and releasing nuts. It is part of the Parkside X 20 V TEAM series.
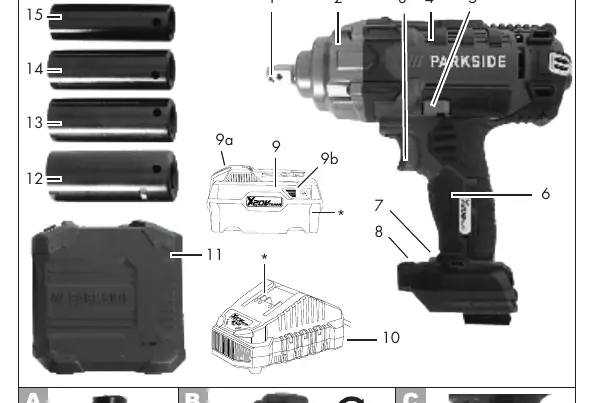
Overview
The device features a 1/2" square drive tool holder, a rotational direction switch, a torque button, and an LED work light. It is powered by a rechargeable battery from the X 20 V TEAM series.
Operation
Inserting/Replacing the Tool
Push the desired socket (17, 19, 21, or 23 mm) onto the tool holder. To remove it, pull the socket off.
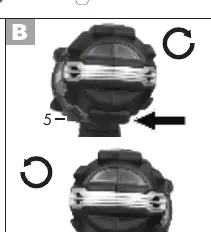
Setting the Direction of Rotation
Use the rotational direction switch to toggle between clockwise and counter-clockwise rotation. Note: Only change the direction when the device is at a complete standstill.
Adjusting the Torque
Press the torque button briefly to read the current torque on the display. Press it repeatedly to adjust the setting.
Battery and Charging
Insert the battery by sliding it along the guide rails until it clicks into place. To charge, remove the battery and slide it into the charger. Charge the battery when only the red LED on the charge level indicator is illuminated.
Working Instructions
- Tightening torque depends on the selected speed and impact duration.
- Use the impact wrench for pre-assembly only. Final tightening should be performed with a torque wrench set to the target torque.
- Always check the actual tightening torque with a torque wrench.
- After a wheel change, inspect wheel bolts or nuts with a torque wrench after 50 to 100 km.
Cleaning and Maintenance
Before any maintenance, turn off the device and remove the battery. Keep ventilation slots, the motor housing, and the handle clean using a damp cloth or brush. Do not use cleaning agents or solvents.
Storage
Clean the device before storage. Store it in the provided storage case in a dry place, out of reach of children.
Practical help
Common problems
Device does not start
Check if the battery is charged and properly inserted into the device.
Tightening torque is incorrect
The impact wrench is for pre-assembly only. Use a torque wrench to verify the final torque.
Before use
- Ensure the battery is fully charged.
- Select the correct socket size (17, 19, 21, or 23 mm).
- Set the rotational direction switch correctly.
- Ensure the workpiece is secure.
Specs in practice
- Idling speed
- 0-2300 min-1.
Images and diagrams
- Page 3: Overview of device components (1-16).
- Page 3: A - Attaching/removing the socket.
- Page 3: B - Setting the direction of rotation.
- Page 3: C - Inserting/removing the battery.
- Page 3: D - Attaching an extension.
Model compatibility
- Part of the Parkside X 20 V TEAM series.
- Compatible with batteries and chargers from the Parkside X 20 V TEAM series.

Manual page author
Michael Turner
Technical manual editor
Reviews PDF manuals for structure, safety notes, and practical product details so readers can find the right information quickly.