Industrial / Pumps & Motors
User Manual for Pedrollo TOP, RX, D, and DC Submersible Pumps
Official installation and operation guide for Pedrollo submersible pumps (TOP, RX, D, DC series). Includes safety, installation, maintenance, and troubleshooting.
Table of contents
Manual images
Click an image to enlargeQuick guide from the manual
This manual provides essential instructions for the installation, operation, and maintenance of Pedrollo submersible pumps, including the TOP, RX, D, and DC series. These pumps are designed for moving fresh water without abrasive particles. Always ensure the pump is installed vertically and that the power supply matches the nameplate specifications. Before any maintenance, disconnect the power supply.
Product Description
The manual covers the following series: TOP (1, 2, 3, 4, 5, GM, FLOOR), RX (1, 2, 3, 4, 5, GM), D (8, 10, 20, 30), and DC (10, 20, 30). These are submersible pumps with an open impeller to reduce clogging. TOP and RX series are cooled by the pumped liquid, while D and DC series are cooled by the liquid in the tank.
Safety
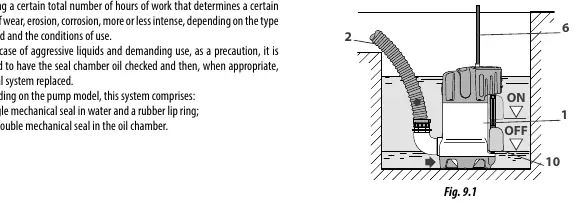
DANGER: Always disconnect the power supply before installation or maintenance. If connected to an inverter, wait 10 minutes after disconnection for residual voltage to discharge. Never lift the pump by the power or float cable. Ensure the power supply has efficient earthing and, for swimming pool or fountain use, a residual current device (RCD) with a rated operating residual current not exceeding 30mA.
Installation
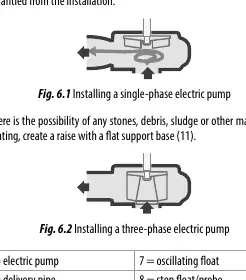
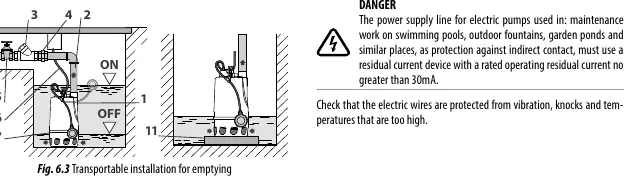
The pump must be installed in a vertical position. Ensure the installation site allows for proper starting and stopping frequency. For fixed installations, use a check valve and a shut-off valve to facilitate maintenance. For transportable installations, use a flexible pipe and ensure it does not bend or twist due to motor torque.
Electrical Connection
Check that the voltage and frequency match the nameplate. For single-phase pumps with a plug, connect to a socket with its own switch. For three-phase pumps, use a control panel with a three-pole circuit breaker and motor protection. Always connect the earth wire first and ensure it is the last to be disconnected.
Operation
Before starting, ensure the shut-off valve is fully open. If the pump is used in a movable installation, start it manually. If the pump does not prime, ensure the check valve is far enough from the delivery port (for TOP and D models) or check the vent valve (for RX models).
Maintenance
Routine Maintenance: Every 2000 operating hours or every 2 years, check the float/level switches, current draw, and the state of the power cable. Clean the pump and check the impeller for wear. For D and DC series, check the seal chamber oil.
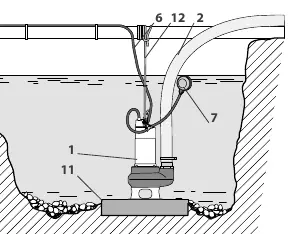
Special Maintenance: Must be performed by an Authorised Service Centre. This includes replacing mechanical seals or repairing the motor.
Troubleshooting
If the pump does not work, check the power supply, fuses, and thermal protection. If the pump vibrates or is noisy, check for low water levels causing air intake or worn components. If the pump starts too frequently, adjust the float switch or level sensors to increase the distance between start and stop levels.
Practical help
Common problems
Pump does not work
Check power supply, fuses, and thermal protection. Ensure the float switch is not jammed.
Flow rate is poor or null
Check for air in the pump, clogged valves, or incorrect rotation direction (three-phase).
Pump vibrates or is noisy
Check for low water level causing air intake or worn pump components.
Pump starts too frequently
Adjust the float switch or level sensors to increase the distance between start and stop levels.
Before use
- Verify voltage and frequency match the nameplate.
- Ensure the pump is installed in a vertical position.
- Check that the float switch or level sensors move freely.
- Ensure the delivery pipe is not bent or twisted.
- Verify the power supply line has efficient earthing.
- For swimming pool use, ensure a 30mA RCD is installed.
Specs in practice
- Max liquid temperature
- Maximum temperature of the pumped liquid (40°C or 50°C depending on the model).
- Max immersion depth
- Maximum depth the pump can be submerged below the water level.
- Min level of emptying
- Minimum water level required for the pump to operate.
Images and diagrams
- Fig 6.1/6.2: Fixed installation setup showing check valve and shut-off valve placement.
- Fig 6.3/6.4: Transportable installation setup using a flexible pipe.
- Fig 9.1: Procedure for accessing and cleaning the impeller.
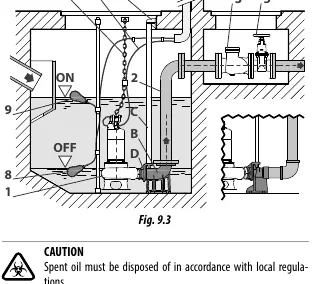
- Fig 9.2/9.3: Procedure for checking and changing seal chamber oil for D and DC models.
Model compatibility
- TOP and RX series are cooled by the pumped liquid.
- D and DC series are cooled by the liquid in the tank.
- Single-phase models have built-in thermal protection.
- D30, Dm 30, and all DC models are suitable for outdoor/pool use with 10m cables.

Manual page author
Emily Carter
User documentation editor
Prepares concise manual descriptions and highlights the most useful setup, operation, and maintenance information for readers.