Tools / Power Tools
User Manual for Truper 1-Capacitor Single-Phase Motor
Quick guide for the Truper 1-Capacitor Single-Phase Motor. Includes installation, wiring diagrams for 115V/230V, safety instructions, and troubleshooting.
Table of contents
Manual images
Click an image to enlargeQuick Guide from the Manual
This manual provides essential information for the installation, operation, and maintenance of the Truper 1-Capacitor Single-Phase Motor. Before operating, ensure the motor is properly grounded and the voltage matches the nameplate specifications. Always disconnect the power source before performing any installation or maintenance tasks.
Technical Data
- Models: MOE-1/2B (102303), MOE-1/4B (102301)
- Rated Power: 0.372 kW (1/2 Hp) / 0.186 kW (1/4 Hp)
- Voltage: 115 V / 230 V
- Frequency: 60 Hz
- Speed: 1725 RPM
- IP Grade: IP 21
- Frame: 56 (NEMA)
Safety Warnings
Failure to follow these instructions may result in electric shock, fire, or severe injury:
- Always disconnect the power source before installation or maintenance.
- Do not touch bare terminals or live lines.
- Ensure the equipment is properly grounded.
- Do not install in environments with high temperature, humidity, dust, or corrosive gases.
- Use only identical spare parts for repairs.
- Children and inexperienced persons should not operate the tool without supervision.
Installation and Mounting
Proper mounting is critical to reduce vibration and extend the motor's life:
- Remove the plastic cover from the shaft and rotate it by hand to ensure it moves freely.
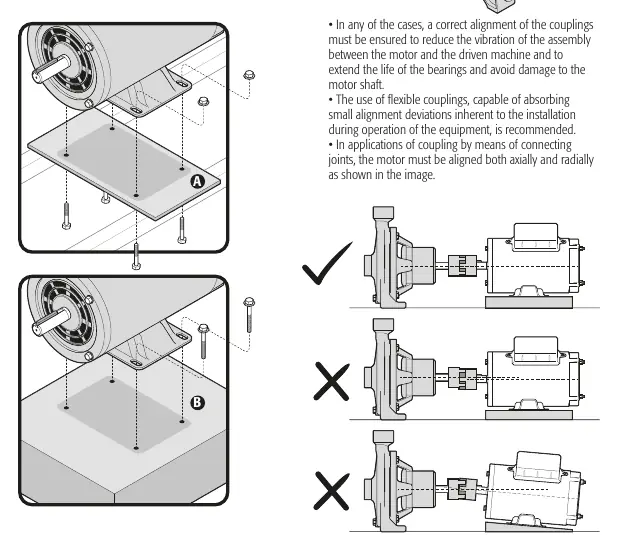
- Mount the motor on a flat, rigid surface using four 5/16" (8 mm) diameter screws or bolts.
- Use a level or laser to ensure the motor is perfectly level.
- For shaft coupling, ensure correct alignment to reduce vibration. Flexible couplings are recommended to absorb small alignment deviations.
- If mounting on a steel plate, the plate thickness should not be less than the bolt diameter.
Electrical Connections
Wiring must be performed by a qualified professional:
- Ensure the power lines are not energized before wiring.
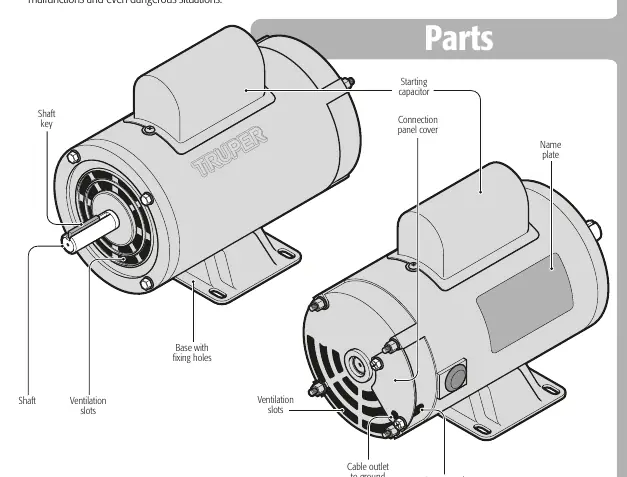
- Remove the rear cover to access the connection panel.
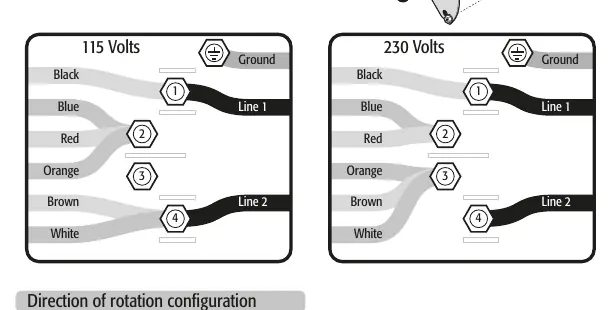
- Follow the specific wiring diagrams provided in the manual for either 115V or 230V configurations.
- Ensure the ground wire gauge is not smaller than the power supply wire gauge.
- To reverse the rotation direction, interchange the red and brown wires.
Troubleshooting
If the motor fails to operate correctly, check the following:
- Motor takes long to accelerate: Check for defective bearings, a faulty capacitor, or low voltage.
- Motor does not start: Inspect the fan guard, wiring, or check if the rotor is hitting the stator.
- Shaft rotates in the opposite direction: Rewire according to the configuration diagram.
- Overload protector trips: Check for excessive load, high ambient temperature, or a shorted winding.
Manufacturer information
TRUPER, S.A. DE C.V.
Practical help
Common problems
Motor takes long to accelerate
Check for defective bearings, a faulty capacitor, or low voltage.
Motor does not start after installation
Check if the fan guard is bent, the motor is damaged, or if the wiring is incorrect.
Shaft rotates in the opposite direction
Rewire the motor according to the configuration diagram on page 8.
Overload protector trips continuously
Check for excessive load, high ambient temperature, or a shorted winding.
Before use
- Ensure the motor shaft rotates freely by hand.
- Verify the voltage matches the nameplate.
- Ensure the motor is properly grounded.
- Check that the mounting surface is flat and level.
- Verify the load is not jammed.
Images and diagrams
- Wiring diagrams for 115V and 230V are provided on page 8.
- Mounting diagrams show proper alignment for belt/chain drives.
Model compatibility
- Designed for 60 Hz frequency.
- Operating temperature must be below 104°F (40°C).

Manual page author
Emily Carter
User documentation editor
Prepares concise manual descriptions and highlights the most useful setup, operation, and maintenance information for readers.