Electronics / Digital Signage
User Manual for Philips 10BDL4551T Signage Display
Comprehensive user guide for the Philips 10BDL4551T signage display. This manual covers installation, mounting options, Android setup, admin mode configuration, signage display settings, and troubleshooting.
Table of contents
Manual images
Click an image to enlargeQuick guide from the manual
The Philips 10BDL4551T is a professional signage display running on an Android platform. To get started, ensure the device is properly connected to power and network. Access the Admin mode by pressing Menu + Volume- on the rear keypad (default password is 1234). Use the setup wizard for initial configuration, including language, network, and signage display settings.
Safety instructions
- Keep the display away from direct sunlight, heat sources, and moisture.
- Ensure ventilation holes are not blocked.
- Always use the provided power cord.
- Avoid static images for extended periods to prevent "burn-in" or "ghost imaging".
- Do not apply excessive pressure to the LCD panel.
Installation and mounting
The display supports multiple mounting options:
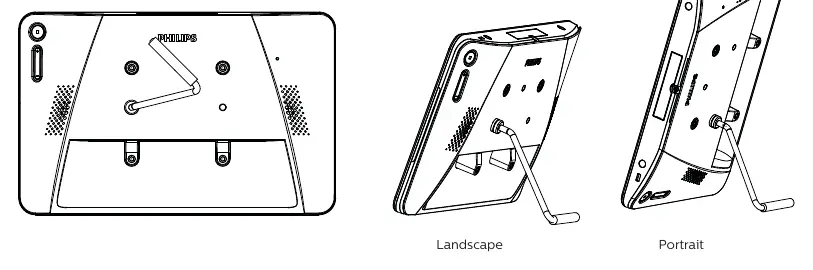
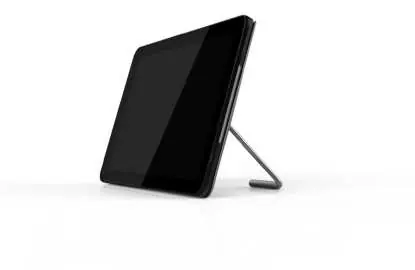
- Table Stand: Screw the supplied stand bar onto the rear screw hole.
- VESA Mount: Supports VESA MIS-D75 (75x75mm). Use M4x4mm screws.
- Back Cover: Detach the back cover, fix it to the wall using nails, and insert the display into the mounted cover.
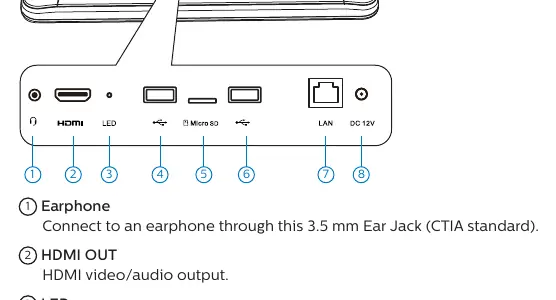
Physical view and features
The rear panel contains the physical controls:
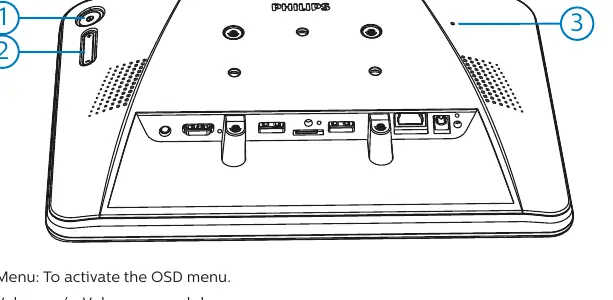
- Menu: Activates the OSD menu.
- Volume +/-: Adjusts volume.
- Reset Button: Performs a factory reset.
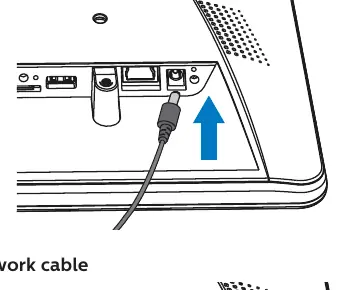
- I/O Terminals: Includes HDMI OUT, LAN (PoE+ supported), Micro USB, and Micro SD card slot.
Operation and setup
The device features an Android-based setup wizard that runs on the first boot or after a factory reset. Key operations include:
- Admin Mode: Access via Menu + Volume-. Allows configuration of settings, apps, network, and storage.
- Network: Configure Wi-Fi or Ethernet settings via the Settings menu.
- Custom APKs: Install custom applications using the file manager in Admin mode.
Signage display settings
Configure specific signage features:
- Boot Logo: Set custom boot animations via bootanimation.zip on external storage.
- Schedule: Set up to 7 independent playback schedules.
- Server Settings: Configure SMTP for email notifications and FTP for remote management.
- System Tools: Includes options for clearing storage, factory reset, auto-restart, and cloning media files.
Cleaning and troubleshooting
If you encounter issues:
- No picture: Check power connection and ensure the monitor is not in standby mode.
- Touch function not working: Enable via Menu + Menu + Volume+ + Volume- + Volume- + Volume+.
- Cleaning: Use a soft, lint-free cloth. Do not use volatile substances like alcohol or thinners.
Technical specifications
- Screen Size: 10.1 inches
- Resolution: 1280 x 800 pixels
- Power: 12V 2.0A DC or 802.3at PoE+
- Storage: 8GB eMMC with Micro SD expansion
Official resources from the manual
Manufacturer information
Philips
Practical help
Common problems
No picture is displayed
Ensure the power LED is green. If in standby, press 'Menu + Menu + Volume- + Volume-' to turn on the screen.
Touch function does not work
The touch function may be disabled. Press 'Menu + Menu + Volume+ + Volume- + Volume- + Volume+' to enable it.
Cannot detect USB device or SD card
Ensure the settings for USB/SD card are enabled in the menu.
HDMI output is abnormal
Check that the HDMI cable is attached firmly and the external device is functioning correctly.
Before use
- Verify all package contents (Monitor, cables, stand, power adapter).
- Ensure the installation surface is stable and suitable for the chosen mounting method.
- Check that the power outlet is easily accessible.
- Ensure the environment temperature is between 0-40°C.
- Remove any objects blocking ventilation holes.
Specs in practice
- PoE+ (Power over Ethernet)
- The device can be powered via the LAN cable (24W), eliminating the need for a separate power adapter.
- VESA MIS-D75
- Standard mounting pattern of 75mm x 75mm for wall or arm mounts.
- Admin Mode Password
- Default password is '1234'. Change this in Settings > Signage Display > System Tools.
Images and diagrams
- Rear View: Shows the location of the Menu, Volume, and Reset buttons.
- I/O Terminals: Identifies ports for Earphone, HDMI, USB, Micro SD, LAN, and DC power.
- Mounting: Illustrates the steps for VESA mounting and back cover installation.
Model compatibility
- Supports PoE+ (802.3at compliance).
- External storage devices must be named in English for the file manager to function correctly.
- The device supports custom APK installation via the file manager.

Manual page author
David Miller
Documentation analyst
Organizes user manual content into clear summaries, with attention to model details, product context, and everyday usability.