Lighting / Outdoor Lighting
Philips Hue Outdoor Appear 1746330P7 Wall Lamp Disassembly Guide
Technical disassembly and parts guide for the Philips Hue Outdoor Appear wall lamp (1746330P7). Includes an exploded view diagram, component list, and step-by-step instructions for safe dismantling.
Table of contents
Important Safety Information
Before performing any disassembly or maintenance on the Philips Hue Outdoor Appear wall lamp, you must adhere to the following safety precautions:
- Disconnect from mains: Always ensure the luminaire is completely detached from the mains socket.
- Disconnect DC power: Ensure the DC cable is detached from the power supply.
- Eye safety: Do not stare directly at the operating light source, as it may cause eye injury.
Exploded View and Parts List
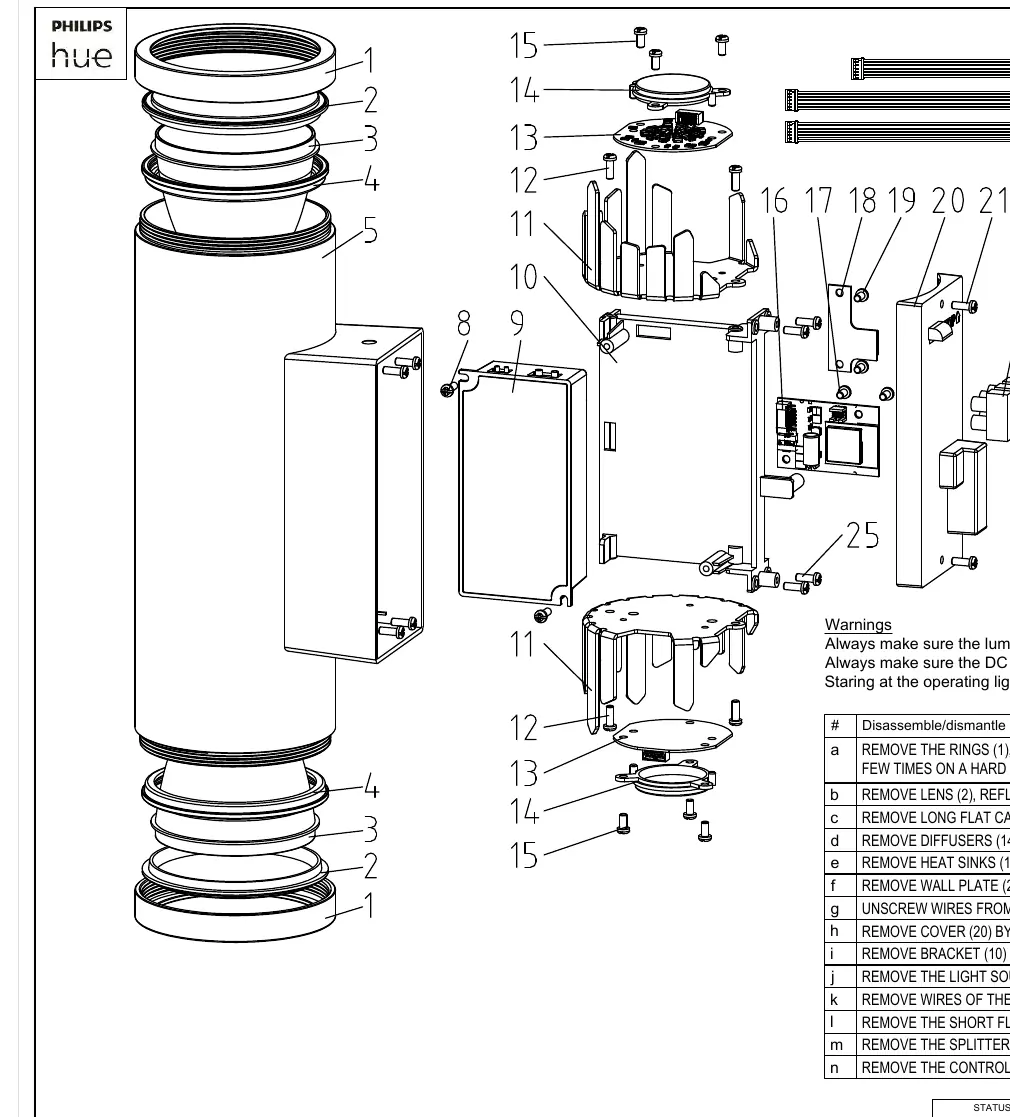
The device consists of 25 distinct components. Key parts include the rings, lenses, reflectors, gaskets, LED modules, heat sinks, and the control gear (PSU). Refer to the exploded diagram for the specific assembly order and identification of parts 1 through 25.
Tools Required for Disassembly
To properly dismantle the unit, you will need the following tools:
- Strap wrench or chain wrench (for the rings)
- Cross-head screwdriver
- Flat-head screwdriver
- Wago tool #2065 (for specific electrical connections)
Disassembly Procedure
Follow these steps in order to safely dismantle the wall lamp:
- Remove Rings: First, break the glue of the thread connection by knocking it a few times on a hard surface, then unscrew with a strap wrench or chain wrench.
- Remove Lens and Reflectors: Remove the lens (2), reflectors (3), and gaskets (4).
- Remove Cables: Disconnect the long flat cables (7) from the light source LED modules (13).
- Remove Diffusers and LED Modules: Unscrew the screws (15) to remove the diffusers (14) and light source LED modules (13).
- Remove Heat Sinks: Unscrew the screws (12) to remove the heat sinks (11).
- Remove Wall Plate: Unscrew the screws (23) to remove the wall plate (24).
- Disconnect Terminal Block: Unscrew wires from the terminal block (22) using a flat-head screwdriver.
- Remove Cover: Unscrew the screws (21) to remove the cover (20).
- Remove Bracket: Unscrew the screws (25) to remove the bracket (10) from the tube (5).
- Remove Hue Connect: Unscrew the screws (17) to remove the light source Hue Connect (16).
- Disconnect Control Gear: Remove wires of the control gear PSU (9) from the light source Hue Connect (16).
- Remove Short Flat Cable: Disconnect the short flat cable (6) from the light source Hue Connect (16).
- Remove Splitter: Unscrew the screws (19) to remove the splitter (18).
- Remove Control Gear: Unscrew the screws (8) to remove the control gear PSU (9).
Manufacturer information
Philips
Practical help
Common problems
Rings are stuck and cannot be unscrewed
Break the glue of the thread connection by knocking the ring a few times on a hard surface, then use a strap wrench or chain wrench to apply big torque.
Before use
- Ensure the luminaire is detached from the mains socket.
- Ensure the DC cable is detached from the power supply.
- Prepare a strap wrench or chain wrench for the ring removal.
- Prepare a cross-head screwdriver for most screw removals.
- Prepare a flat-head screwdriver for terminal block wires.
- Have a Wago tool #2065 available for specific electrical connections.
Images and diagrams
- The exploded view illustrates the assembly order of 25 components, showing how the rings, lenses, and internal electronics are layered within the tube structure.
Model compatibility
- This is a 24V system; ensure the power supply used is compatible with these voltage requirements.

Manual page author
Michael Turner
Technical manual editor
Reviews PDF manuals for structure, safety notes, and practical product details so readers can find the right information quickly.