Electronics / Monitors
Philips 242B1 and 242B1H Monitor Quick Start Guide
Quick start guide for Philips 242B1 and 242B1H monitors. Includes assembly instructions, connection diagrams, OSD menu navigation, and setup steps.
Quick answers from the manual
Quick answer
- This guide covers the assembly, connection, and basic OSD menu operation for the Philips 242B1 and 242B1H monitors. p. 1
Key actions
- Assemble the stand and attach it to the monitor. p. 1
- Connect the power cable and your preferred video input (HDMI, DP, DVI, or VGA). p. 1
- Connect the USB upstream cable to enable the monitor's USB hub. p. 1
First start
- Connect power and video cables, then power on the monitor using the front panel buttons. p. 1
Show 2 more answers Show less
Problems and fixes
No signal
Check cable connections and ensure the correct input source is selected in the OSD menu.
p. 1Where to find it in the PDF
- Quick Start Guide p. 1
Table of contents
Manual images
Click an image to enlargeQuick guide from the manual
This guide provides essential setup information for the Philips 242B1 and 242B1H monitors. It covers physical assembly, cable connections, and basic operation of the On-Screen Display (OSD) menu.
Assembly and Stand Adjustment
The monitor stand supports height, tilt, and swivel adjustments to ensure ergonomic viewing. To assemble, attach the stand base to the monitor arm as shown in the diagrams. The stand allows for:
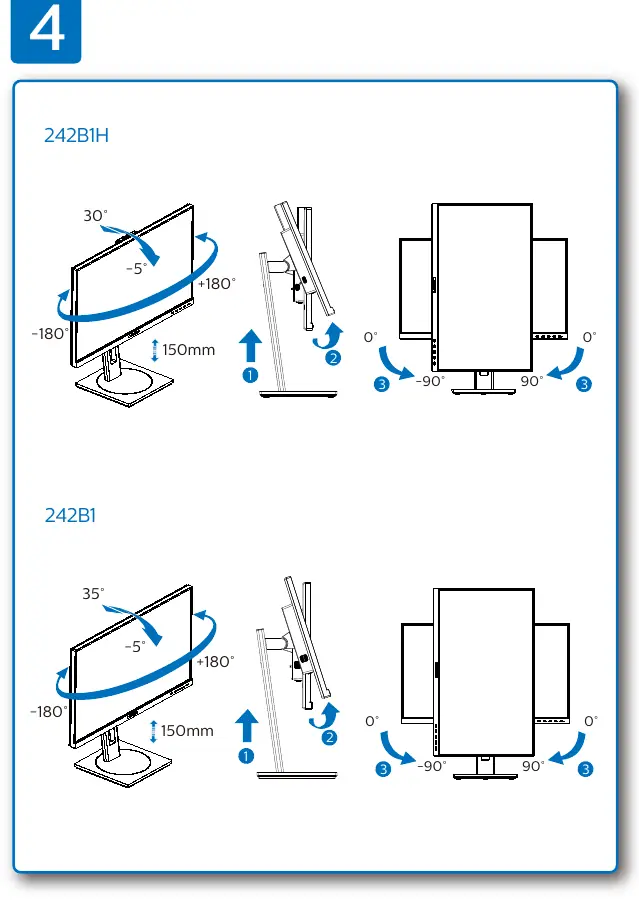
- Tilt: -5° to +30° (242B1H) or -5° to +35° (242B1).
- Swivel: -180° to +180°.
- Height Adjustment: Up to 150mm.
- Pivot: -90° to 90°.
Connecting the Monitor
Ensure all cables are connected before powering on the device. The monitor supports various input types:
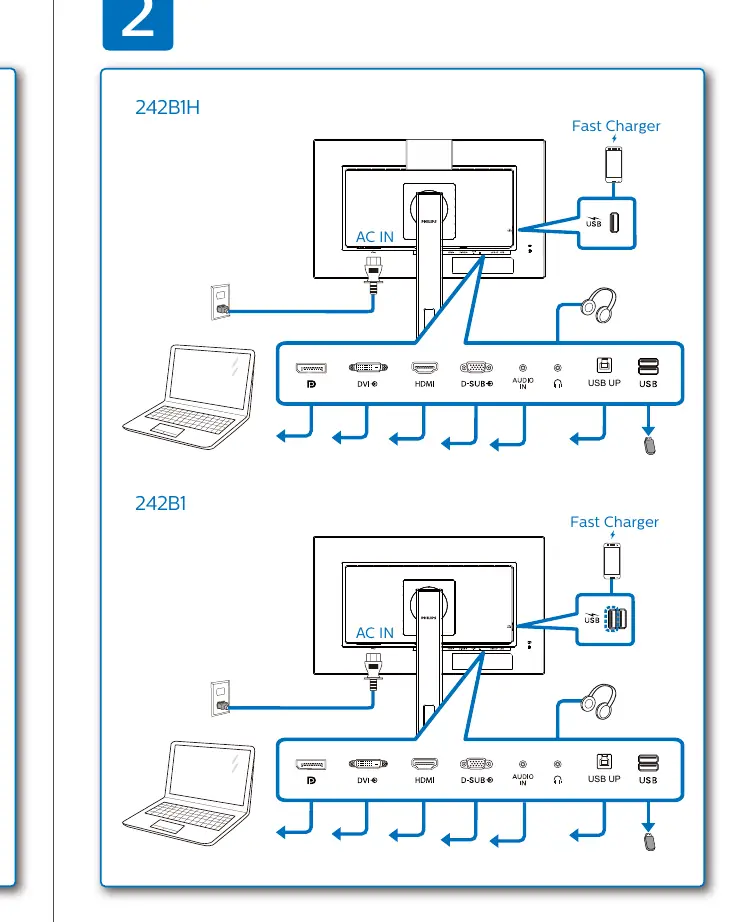
- Power: Connect the AC power cable to the AC IN port.
- Video Inputs: Connect your computer using HDMI, DisplayPort (DP), DVI, or VGA cables depending on your source device.
- USB Hub: Connect the USB upstream cable to enable the USB ports on the monitor.
- Audio: Use the audio cable for sound output if required.
OSD Menu and Controls
The monitor features an OSD menu for adjusting settings. Use the buttons on the front panel to navigate:
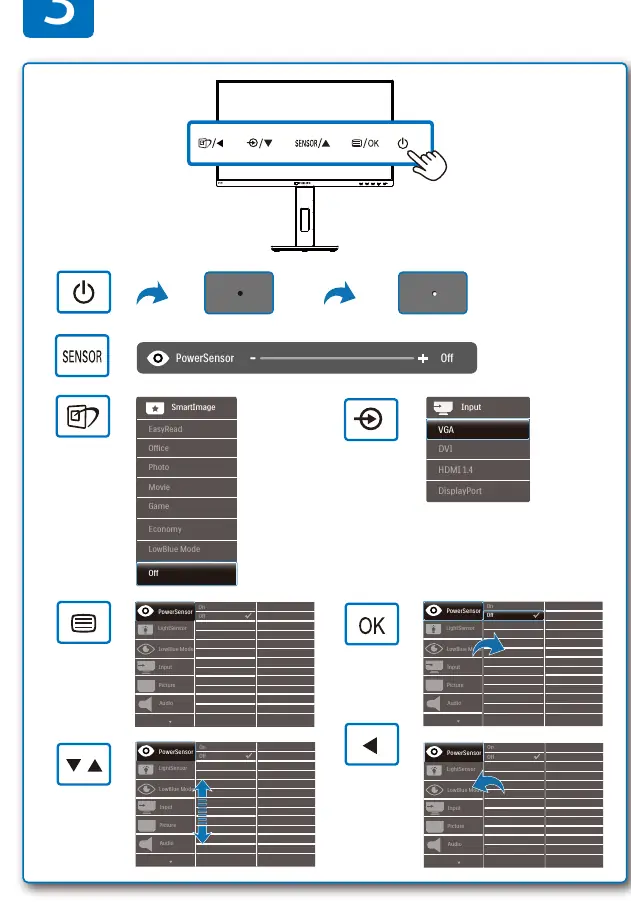
- PowerSensor: Automatically adjusts brightness to save energy based on user presence.
- SmartImage: Select from presets like EasyRead, Office, Photo, Movie, Game, Economy, and LowBlue Mode.
- Input: Switch between HDMI, DVI, DisplayPort, and VGA sources.
- Picture/Audio: Adjust specific display and sound parameters.
Manufacturer information
Philips
Practical help
Common problems
No image on screen
Check that the video cable (HDMI, DP, DVI, or VGA) is securely connected to both the monitor and the computer. Ensure the correct input source is selected in the OSD menu.
USB ports not functioning
Ensure the USB upstream cable is connected between the monitor and your computer.
Before use
- Verify all necessary cables are included (Power, HDMI, DP, DVI, VGA, USB, Audio).
- Ensure the monitor is placed on a stable, flat surface.
- Check the model number (242B1 or 242B1H) to confirm specific stand adjustment ranges.
- Ensure the power outlet is compatible with the monitor's requirements.
Show more Show less
Images and diagrams
- Diagram 4: Illustrates stand assembly and the range of motion for tilt, swivel, and height adjustment.
- Diagram 2: Shows the rear port layout, including AC power, HDMI, DP, DVI, VGA, and USB upstream connections.
- Diagram 3: Details the OSD menu button layout and navigation structure.
Model compatibility
- Display design and available ports may vary depending on the specific region.
- Ensure your computer supports the selected video output (HDMI, DP, DVI, or VGA).

Manual page author
Michael Turner
Technical manual editor