Garden / Pruning Tools
User Manual for BLACK+DECKER 18V Pruner BCPP18
Comprehensive user guide for the BLACK+DECKER 18V Pruner BCPP18. Includes setup, operation, blade maintenance, safety instructions, and technical specifications.
Quick answers from the manual
Quick answer
- The BCPP18 is an 18V cordless pruner for landscaping. It features a 25mm cutting capacity and requires a specific safety sequence (lock-off button + lock-off switch + trigger) to operate. p. 5, 11
Key actions
- Install battery p. 11
- Operate pruner p. 12
- Replace blade p. 12
First start
- Charge the battery fully before first use. p. 8
Problems and fixes
Tool times out
If the lock-off switch is held too long without triggering, the tool will time out. Release switches and start again.
p. 12Technical specifications
| Parameter | Value | Meaning | Pages |
|---|---|---|---|
| Voltage | 18V | Operating voltage | p. 5 |
| Cut capacity | 25mm | Maximum branch diameter | p. 5 |
Where to find it in the PDF
- Parts Diagram p. 3
- Operation & Maintenance p. 4, 12
Table of contents
Manual images
Click an image to enlargeQuick guide from the manual
The BLACK+DECKER BCPP18 is an 18V cordless pruner designed for landscaping applications, such as pruning hedges, shrubs, and branches. Before use, ensure the battery is fully charged and you are wearing appropriate personal protective equipment, including eye protection and gloves. Always check the shrub for foreign objects like wires or fences before cutting.
Description
The pruner consists of the following main components:
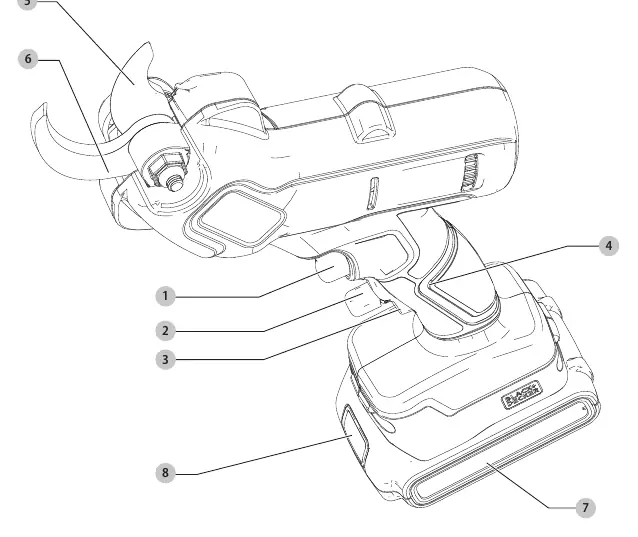
- Trigger switch
- Lock-off button and switch
- Main handle
- Cutting blade and fixed blade
- Battery and battery release button
Operation
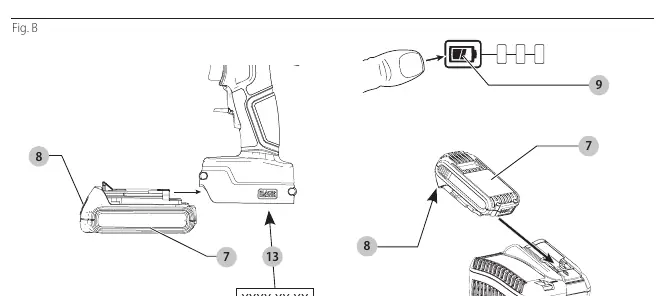
Inserting and Removing the Battery
To install the battery, align it with the rails inside the tool's handle and slide it in until it snaps into place. To remove, press the battery release button and pull the battery out.
Switching On
For safety, the tool requires a specific sequence to operate:
- Push the lock-off button down.
- Squeeze the lock-off switch.
- Squeeze the trigger switch to initiate the cutting cycle.
To make repeated cuts, keep the lock-off switch held down while squeezing the trigger switch as needed. Release both switches to turn the tool off.
Fuel Gauge
Some battery packs include a fuel gauge with three green LEDs. Press the fuel gauge button to check the remaining charge level.
Pruning Instructions
Maintain proper footing and balance. Position the branch between the cutting blade and the fixed blade. Do not use the tool to cut branches greater than 25 mm in diameter. Avoid wet conditions and never hold the tool by the blades.
Maintenance
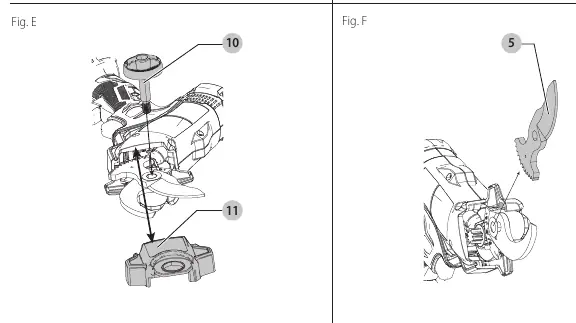
Blade Removal and Installation
If the blade needs replacement (requires BCPPRB1-XJ):
- Remove the battery.
- Remove the nut cap (turn counterclockwise; use a 5mm hex wrench if necessary).
- Slide out the blade cover.
- Remove the cutting blade.
- Install the new blade, ensuring the cutting edge faces the fixed blade.
- Reinstall the cover and tighten the nut cap.
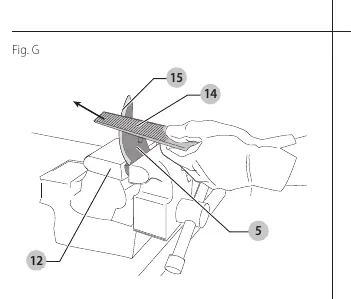
Blade Sharpening
If the blade hits hard objects like stones or wire, it may develop nicks. You can sharpen the cutting edge using a fine-tooth file or sharpening stone, maintaining the original angle. Inspect the fixed blade for burrs and remove them if necessary.
Storage
After use, remove the battery and store the tool in a dry location, away from the reach of children.
Practical help
Common problems
Tool will not start
Ensure the battery is fully charged and correctly seated. You must hold the lock-off switch down while squeezing the trigger switch.
Blade is dull or damaged
Sharpen the cutting edge with a fine-tooth file or sharpening stone, maintaining the original angle. If the blade is bent or severely damaged, replace it.
Battery not charging
Check the charger connection. If the charger indicates a problem (e.g., Hot/Cold Pack Delay), allow the battery to reach an appropriate temperature.
Before use
- Check the tool for any damage or loose parts.
- Ensure the battery pack is fully charged.
- Wear safety goggles, non-skid footwear, and gloves.
- Inspect the shrub for foreign objects like wires or fences.
- Ensure the work area is clear of bystanders.
Specs in practice
- Cut capacity
- Maximum branch diameter of 25mm.
Images and diagrams
- Fig A: Parts identification diagram.
- Fig B: Battery installation, removal, and date code location.
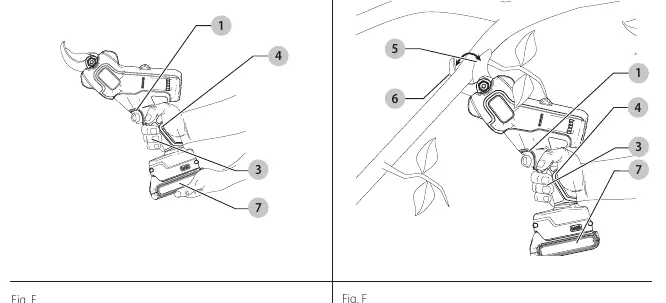
- Fig C/D: Proper hand position and operation technique.
- Fig E/F: Blade removal and installation procedure.
- Fig G: Blade sharpening technique.
Model compatibility
- Compatible with BLACK+DECKER 18V battery packs: BL1518, BL2018, BL2518, BL4018, BL5018.

Manual page author
Emily Carter
User documentation editor
Prepares concise manual descriptions and highlights the most useful setup, operation, and maintenance information for readers.