General / Other Manuals
RAB 115S-V-EX39-8CCT-BYP-3SP-INST High Bay LED Lamp Installation Guide
Quick installation and configuration guide for the RAB 115S-V-EX39-8CCT-BYP-3SP-INST LED lamp. Includes wiring bypass instructions, power and CCT selection, and safety requirements.
Table of contents
Quick guide from the manual
This document provides essential installation and configuration instructions for the RAB 115S-V-EX39-8CCT-BYP-3SP-INST LED lamp. Key requirements include bypassing existing ballasts, capacitors, and ignitors, as well as ensuring proper grounding. The lamp features selectable power (60W, 80W, 115W) and color temperature (3000K, 4000K, 5000K) settings.
Safety and Warnings
- Operating temperature range: -30°C to 60°C (-22°F to 140°F).
- Must be installed by a qualified electrician in accordance with the National Electrical Code.
- Not for use with standard dimmers or in enclosed fixtures.
- Do not use with emergency exits.
- Ensure power is disconnected before starting installation.
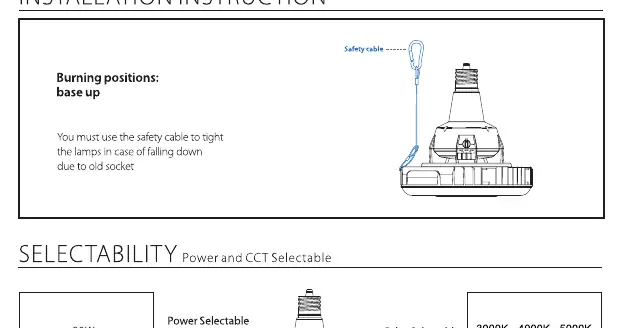
- Use the provided safety cable to prevent the lamp from falling due to old or worn sockets.
Installation
- Turn off the power supply.
- Remove the existing ballast, capacitor, and ignitor from the fixture.
- Connect the AC power wires directly to the lampholder.
- Select the desired power and CCT settings on the lamp.
- Screw the LED lamp into the socket and attach the provided retrofit label to the luminaire.
- Secure the safety cable to the main body structure.
Settings
The lamp allows for manual adjustment of output power and color temperature:
- Power Selectable Switch: Choose between 60W, 80W, or 115W.
- Color Selectable Switch: Choose between 3000K, 4000K, or 5000K.
Technical Support
For further assistance, visit rablighting.com, call 888-722-1000, or email [email protected].
Official resources from the manual
Practical help
Common problems
Lamp does not operate properly
Ensure the ballast, capacitor, and ignitor have been completely bypassed or removed. Verify that the lamp is not connected to a standard incandescent dimmer.
Risk of falling lamp
Always use the included safety cable to secure the lamp to the fixture structure, especially when using older sockets.
Before use
- Verify the fixture is not an enclosed type.
- Ensure the power supply is turned off at the breaker.
- Confirm the existing ballast, capacitor, and ignitor are removed.
- Check that the socket is in good condition.
- Select the desired power and CCT settings before final installation.
Specs in practice
- Power Selectable
- Allows adjustment between 60W, 80W, and 115W to match lighting needs.
- CCT Selectable
- Allows adjustment of color temperature between 3000K (warm), 4000K (neutral), and 5000K (cool).
- Operating Temperature
- The lamp is rated for environments between -30°C and 60°C.
Images and diagrams
- Figure 1 shows the wiring before modification (with ballast/capacitor).
- Figure 2 shows the required direct wiring to the lampholder after ballast removal.
- Figure 3 shows the final installation of the LED lamp into the socket.
Model compatibility
- Requires ballast bypass.
- Not compatible with standard dimmers.
- Not for use in enclosed fixtures.
- Not for use with emergency exit lighting.

Manual page author
David Miller
Documentation analyst
Organizes user manual content into clear summaries, with attention to model details, product context, and everyday usability.