Home Appliances / Irons
User Manual for Reliable Brio Pro 1000CC Steam Cleaning System
Comprehensive user manual for the Reliable Brio Pro 1000CC steam cleaner. Includes setup, operation, maintenance, trolley assembly, and troubleshooting guide.
Table of contents
Manual images
Click an image to enlargeQuick guide from the manual
The Reliable Brio Pro 1000CC is a professional steam cleaning system designed for household or commercial use. Before using the unit, ensure the water tank is filled with water (max 3L). The unit is grounded for safety; if an extension cord is required, use a 15-amp rated, grounded cord. Always test surfaces before cleaning to ensure they are heat and moisture resistant.
Description of the steam cleaner
The main unit features a main switch, water tank cap, carrying handle, and flexible hose connection. The main panel includes indicators for ready steam (A), low water (B), steam regulation (C, D), hot water injection (E), and a pressure gauge (F).

How to use your steam cleaner
Filling the tank: Remove the water tank cap and fill with up to 3L of water. Secure the cap tightly.
Operation: Connect the electrical cord to a power outlet. Attach the flexible steam hose to the unit (7) until it clicks. Turn the main power switch (1) to the 'I' position. The pump will buzz while the water heats. When the steam ready light (A) illuminates, the unit is ready for use.
Steam volume control: Use the dial on the hose handle to adjust steam volume. Positions 1-3 are for steam only (Low, Medium, High). Position 4 activates the hot water injection function for rinsing.
Using the accessories
The unit comes with various brushes and tools, including a large rectangular floor brush, triangular brush, and small round brushes (nylon, brass, stainless steel). Connect accessories to the hose by depressing the red button on the hose plug connector until it clicks.

Maintenance of the boiler
To maintain performance, clean the boiler once or twice a year depending on water hardness. Ensure the machine is depressurized, cool, and disconnected from power. Use a coin to remove the drainage cap at the bottom, unscrew the boiler brass drainage nut with a 20mm hexagonal key, and use a descaling powder mixed with warm water. Let it sit for 24 hours, rinse thoroughly, and reassemble.
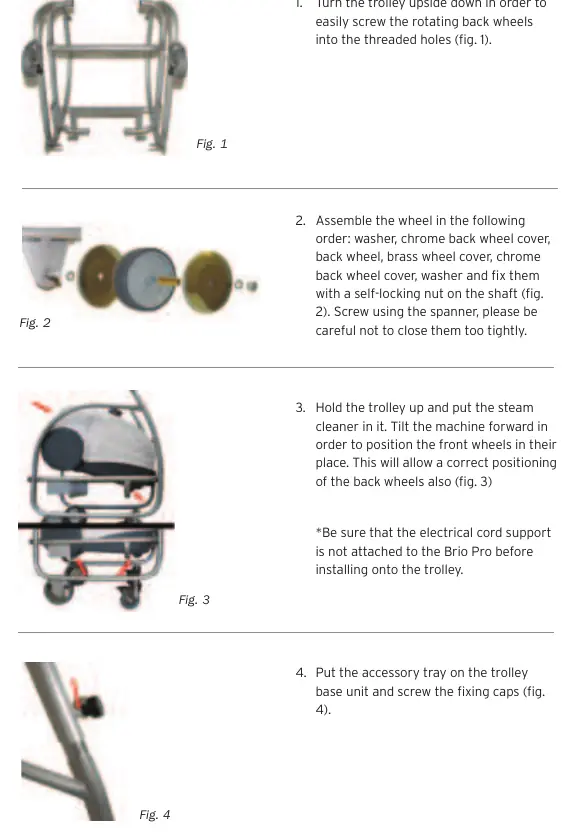
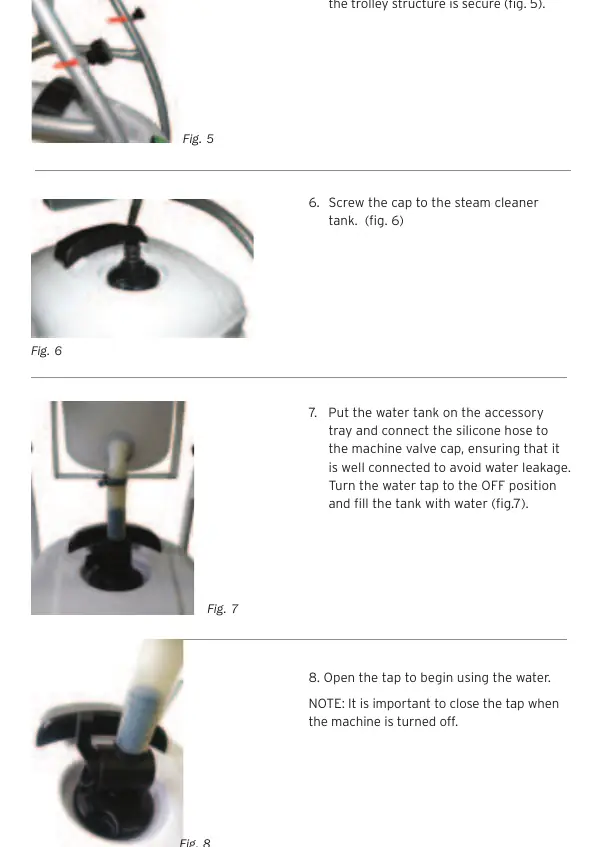
Trolley assembly
The 1000CC trolley assembly involves attaching the rotating back wheels and accessory tray to the base unit. The steam cleaner is then placed into the trolley, and the water bottle system is connected to the machine's valve cap.
Troubleshooting
If no steam is released, ensure the unit is turned on, the tank is full, and the generator is heated. If water leaks, the unit may not be fully heated. If the pump runs continuously, there may be air in the water line; press the trigger while turning the unit on to clear it.
Practical help
Common problems
No steam released
Ensure the unit is turned on, the water tank is not empty, and the generator has fully heated (wait for green light A).
Water leaks from attachments
The unit may not be fully heated or condensation has formed from non-use. Let water run through the system until steam appears.
Dirty water coming out
Scale buildup may have occurred. Follow the boiler cleaning instructions in the manual.
Pump runs continuously
There may be air in the water line. Press the trigger, turn the unit on, and keep the trigger pressed for 30 seconds.
Rapid drop in pressure
Too much water in the boiler. Turn the knob on the handle to position #4 to release excess water.
Before use
- Ensure the water tank is filled with up to 3L of water.
- Check that the power cord and plug are undamaged.
- Ensure the unit is on a stable surface.
- Connect the flexible steam hose securely until it clicks.
- Test surfaces in an inconspicuous area before full cleaning.
- Ensure the unit is plugged into a grounded outlet.
Specs in practice
- Working pressure
- 6 bar
- Boiler capacity
- 1.6L
- Cold water tank capacity
- 3.1L
Images and diagrams
- The main panel features a pressure gauge and indicator lights for steam readiness, low water, steam regulation levels, and hot water injection.
- The trolley assembly requires specific ordering of washers, wheel covers, and nuts to ensure stability.
Model compatibility
- Use normal tap water. If water hardness is high, mix 50% tap water with 50% distilled water.
- Do not add detergents, perfumes, or chemical substances to the water tank.
- The unit is intended for household or commercial use.

Manual page author
David Miller
Documentation analyst
Organizes user manual content into clear summaries, with attention to model details, product context, and everyday usability.