Home Appliances / Small Kitchen Appliances
User Manual for Create Steam Cleaner Mop
Quick guide for the Create Steam Cleaner Mop. Learn how to assemble, operate, adjust steam settings, clean, and maintain your steam mop safely.
Table of contents
Manual images
Click an image to enlargeQuick guide from the manual
The Create Steam Cleaner Mop is designed for cleaning solid wood, laminate, marble, floor tiles, and other hard floors. Important: Always use pure water in the tank. Do not add chemicals or detergents. The maximum water capacity is 0.25L. Ensure the device is unplugged before filling the water tank or changing accessories.
Safety precautions
- Do not immerse the unit, power cord, or plug in water.
- Do not share the power supply with other high-power appliances.
- Always unplug the unit before cleaning or servicing.
- Do not use the machine in water, such as a swimming pool.
- Keep the mop head on the tray when suspending cleaning to prevent steam damage to the floor.
- Do not aim steam at pets, plants, or other electrical appliances.
Parts list
The device consists of the following main components:
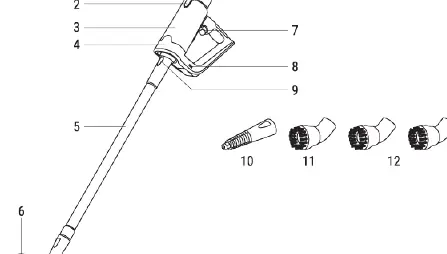
- Water tank and button
- Main body
- Indicator light
- Extension rod
- Mop head
- Steam switch and adjustment buttons
- Accessories: Powerful nozzle, Copper brush, Nylon brush
Setup and operation
- Filling the tank: Press the water tank button, pull the tank backward, remove the lid, and fill with pure water. Return the tank to the machine.
- Heating: Plug in the power supply. The indicator light will turn on. After approximately 25 seconds, the light will remain on, indicating the machine is ready.
- Steam adjustment: Press the steam switch. Use the "+" and "-" buttons on the control panel to adjust the steam intensity.
Using accessories
Jet nozzle installation: Align the powerful nozzle with the air outlet head at the front of the main unit and rotate until firmly attached.


Extension rod: For high places or mopping the floor, attach the extension rod to the main unit head, then rotate firmly to lock. The mop head can be connected to the extension rod.
Cleaning and maintenance
- Mop cleaning: If the mop is too wet or dirty, turn off the power before replacing it. Be careful not to touch the steam outlet to avoid burns.
- Storage: Unplug the power cord, wait for the machine to cool down completely (at least 15 minutes), and wipe it clean. Store in a dry, ventilated place.
Manufacturer information
Create
Practical help
Common problems
Machine does not heat up
Check that the switch is turned on and the power outlet is functioning.
Machine does not produce steam
Check if the water tank is empty or has insufficient water; refill if necessary.
Machine sprays too much water
The steam setting is likely too low or incorrectly configured. Use the +/- buttons to adjust the steam intensity.
Before use
- Ensure the water tank is filled with pure water.
- Check that the power supply is correct.
- Verify all accessories are present and undamaged.
- Ensure the mop head is correctly attached.
- Do not add chemicals or detergents to the tank.
Specs in practice
- Water tank capacity
- 0.25L maximum.
- Heating time
- Approximately 25 seconds until ready.
Images and diagrams
- The parts list diagram identifies the water tank, main body, extension rod, and nozzle attachments.
- Installation diagrams show the correct orientation for attaching the powerful nozzle and brushes to the main unit.
- Extension rod diagrams illustrate how to connect the rod to the main unit and the mop head.
Model compatibility
- Suitable for solid wood, laminate, marble, floor tiles, and other hard floors.
- Can be used for clothing fabric ironing.

Manual page author
Michael Turner
Technical manual editor
Reviews PDF manuals for structure, safety notes, and practical product details so readers can find the right information quickly.