Home Appliances / Irons
User Manual for Reliable Maven 125IS Home Ironing Station
Quick guide for the Reliable Maven 125IS Home Ironing Station. Learn how to set up, use, maintain, and troubleshoot your steam iron, including anti-scale cartridge replacement and self-cleaning procedures.
Table of contents
Manual images
Click an image to enlargeQuick Guide from the Manual
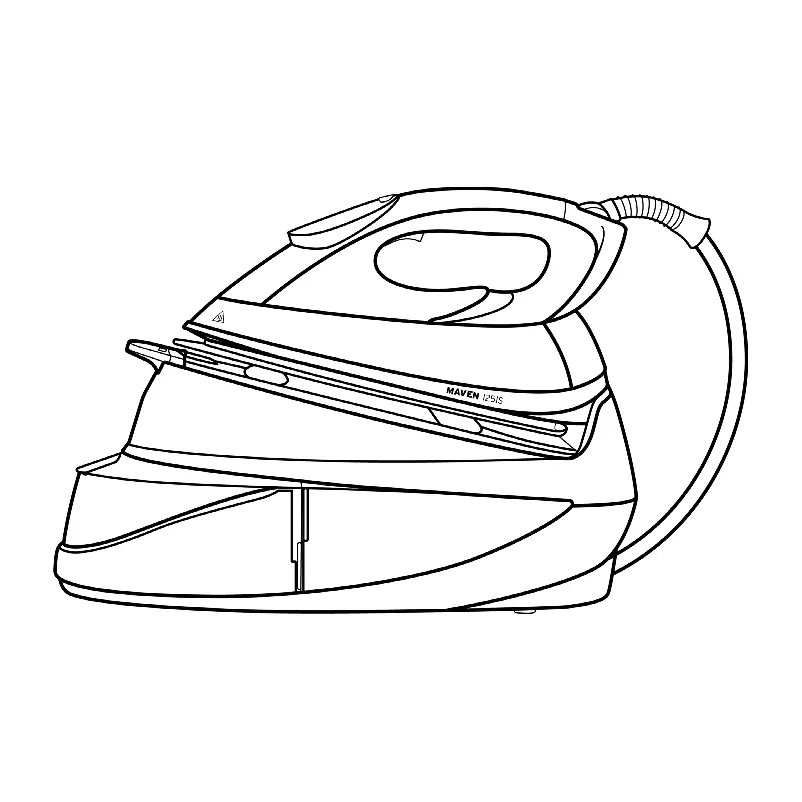
The Reliable Maven 125IS is a home ironing station designed for domestic use. It features a programmed temperature system, vertical steaming capabilities, and an anti-scale cartridge system to prolong the appliance's lifespan. Always handle with care as the appliance generates high-temperature steam.
Key Features
The ironing station consists of an iron unit and a base. Key components include the function button, control panel, anti-scale cartridge, carry lock, water inlet cover, water tank, steam trigger, steam hose, soleplate, and power cord.
Before First Use
Follow these steps to prepare your appliance:
- Remove all protective films or stickers.
- Unwind and straighten the power cord.
- Immerse the new anti-scale cartridge in water for 5 minutes to ensure it is fully soaked before insertion.
- Iron an old towel first to clear any residue from the steam function.
Operating Instructions
Filling the Water Tank: Disconnect the power cord, pull out the water tank, open the inlet cover, fill with tap water to the maximum level, and ensure it is firmly positioned back in place.
Ironing: Connect to a power outlet. Press the function button to turn on the appliance. Wait until the icons on the display panel stop flashing, indicating the required temperature has been reached. Always disconnect after use.
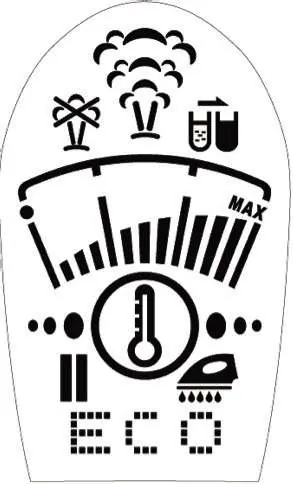
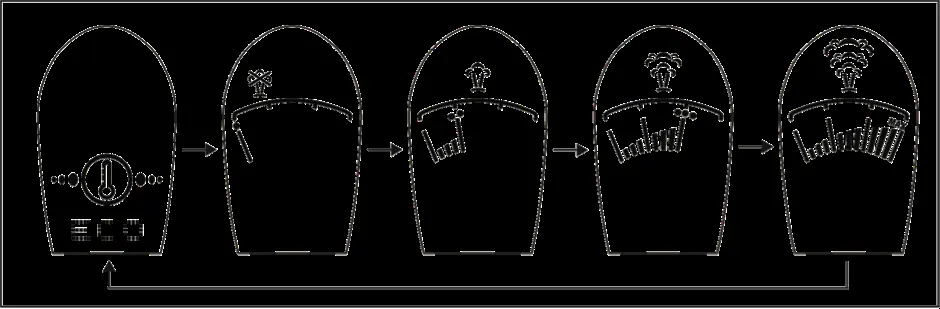
Temperature Settings
The appliance defaults to 'Auto Mode' for all ironable fabrics. To adjust, press the function button to cycle through: Auto Mode, Dot 1, Dot 2, Dot 3, Dot 4, and Max. The ECO indicator lights up when the lowest temperature is used.
Vertical Steaming
To remove wrinkles from hanging garments or curtains:
- Select the desired steam temperature setting.
- Hold the iron in a vertical position, 15 to 30 cm away from the fabric.
- Press the steam trigger.
Warning: Never apply steam to clothes or fabrics being worn by humans or pets.
Maintenance and Cleaning
Anti-Scale Cartridge: Replace the cartridge when the indicator lights up. Ensure the new cartridge is soaked in water for 5 minutes before installation.
Self-Cleaning: When the self-clean indicator lights up, fill the tank to max, plug in, and hold the function button and steam trigger for 3 seconds. Hold the iron 15 cm above a sink to release deposits through steam holes.
Troubleshooting
If the unit does not work, check if it is plugged in, wait for it to heat up, or ensure the anti-scale cartridge is installed correctly. If there is no steam, fill the water tank or select a higher temperature setting.
Practical help
Common problems
The unit does not work
Check if the unit is plugged in, wait for it to heat up, or ensure the anti-scale cartridge is installed properly.
No steam when pressing the trigger
Fill the water tank, wait for the unit to heat up, or select a higher temperature setting.
Soleplate does not heat well
Select a higher temperature setting using the function button.
Loud noise during initial use
This is normal; it is the water drawing into the unit.
Before use
- Remove all protective films or stickers.
- Unwind and straighten the power cord.
- Immerse the new anti-scale cartridge in water for 5 minutes.
- Ensure the filter is entirely wet through before inserting.
- Iron an old towel first to clear internal residue.
Specs in practice
- ECO Indicator
- Illuminates when the lowest temperature setting is active.
- Auto Shut-off
- Activates after 10 minutes of inactivity; press function button or steam trigger to reactivate.
Images and diagrams
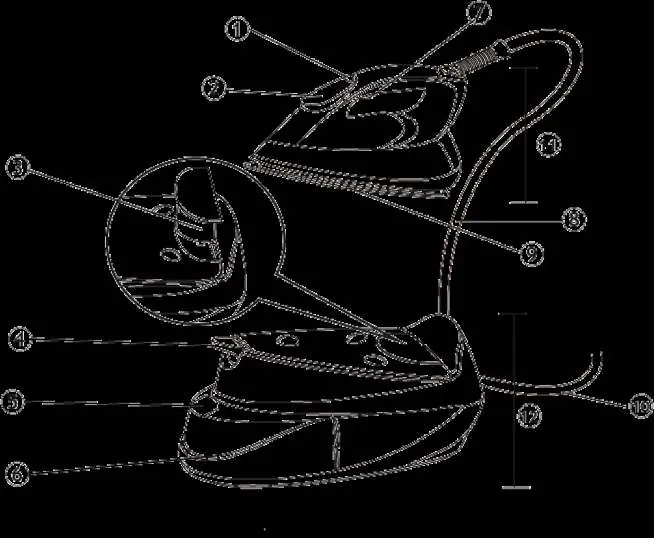
- Figure 1 (Page 10): Identifies key parts like the function button, steam trigger, and water tank.
- Figure 1 (Page 12): Shows the correct immersion method for the anti-scale cartridge.
- Figure 2-4 (Page 13): Illustrates the water tank removal and filling process.
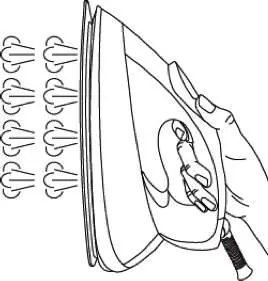
- Figure 7 (Page 17): Demonstrates the correct vertical steaming position.
Model compatibility
- Use normal tap water only; other liquids may damage the appliance.
- Do not add perfume, vinegar, or other additives to the water tank.
- Not suitable for non-ironable fabrics like Polypropylene, Elastane, and Acrylic.

Manual page author
David Miller
Documentation analyst
Organizes user manual content into clear summaries, with attention to model details, product context, and everyday usability.