Lighting / Outdoor Lighting
Installation Instructions for Resistex Trendy LED Floodlight
A comprehensive installation and maintenance guide for the Resistex Trendy LED floodlight. Includes step-by-step mounting instructions, wiring requirements, and motion sensor specifications.
Quick answers from the manual
Quick answer
- The Resistex Trendy LED floodlight requires professional installation. Ensure power is off, use H05RN-F cable, and mount at a height of 2.3-3m for optimal sensor performance. p. 1, 2
Key actions
- Mounting the floodlight p. 2
- Wiring the floodlight p. 2
First start
- Ensure power is off, install using H05RN-F cable, and mount at 2.3-3m height. p. 2
Show 4 more answers Show less
Problems and fixes
Sensor not detecting
Check installation height (2.3-3m) and ensure no obstructions.
p. 2Maintenance and reset
- Clean with a soft cloth; do not use chemicals or abrasives. p. 1
Technical specifications
| Parameter | Value | Meaning | Pages |
|---|---|---|---|
| Mounting Height | 2.3-3m | Recommended installation height for sensor. | p. 2 |
| Detection Range | 10±2m | Maximum sensor detection distance. | p. 2 |
| Detection Angle | 180° | Sensor field of view. | p. 2 |
Where to find it in the PDF
- Safety and Maintenance p. 1
- Installation and Specifications p. 2
Table of contents
Important Safety Information
Before beginning installation, please read the following safety notes carefully:
- Never work on the luminaire while it is under voltage.
- Installation must be performed by a professional installer in compliance with all relevant electrical standards and regulations.
- The device is sensitive to electrostatic discharges (ESD). Handle with necessary precautions.
- Do not use chemicals or abrasive products to clean the fixture.
- Keep these instructions for future maintenance or dismantling.
Installation
Follow these steps to install the Resistex Trendy LED floodlight:
- Ensure the power supply is turned off before starting.
- Mark and drill holes for the mounting bracket (using 6mm drill bit).
- Secure the mounting bracket to the wall.
- Prepare the wiring connection. Note: Use H05RN-F cable; U-1000 R2V is not recommended.
- Connect the wires according to the diagram (L, N, E).
- Ensure all seals and cable glands are tightened correctly to maintain the IP rating.
- Attach the floodlight to the bracket and secure it.
- Adjust the angle of the floodlight as needed.
- Restore power and test the operation.
Motion Sensor Specifications
The motion sensor features the following operational parameters:
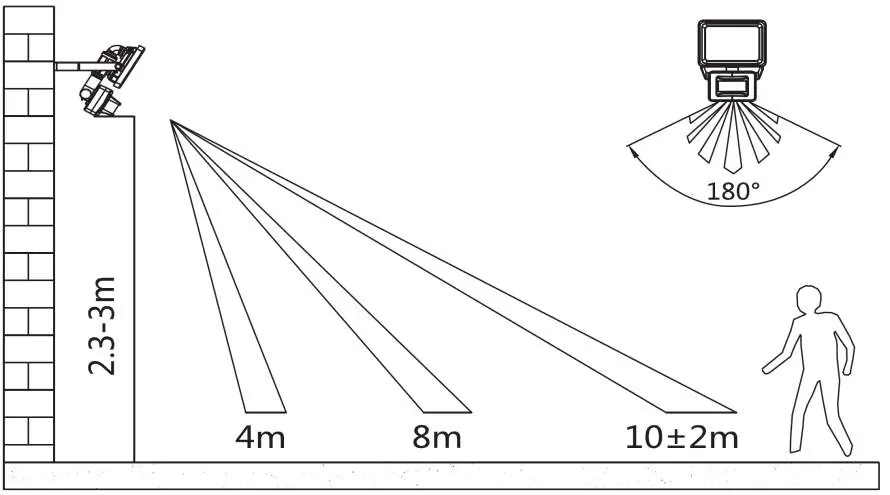
- Recommended Installation Height: 2.3 to 3 meters.
- Detection Range: 10 ± 2 meters.
- Detection Angle: 180 degrees.
Maintenance
To ensure the longevity of the product, clean the fixture periodically using a soft, non-abrasive cloth. Do not use chemical cleaners. Refer to the official Resistex website for additional support or maintenance information.
Practical help
Common problems
Light does not turn on
Verify that the power supply is connected and the circuit breaker is on. Ensure the wiring (L, N, E) is correctly connected.
Sensor not detecting motion
Check if the installation height is within the recommended 2.3-3m range and ensure the detection area is not obstructed.
Before use
- Ensure power is disconnected before installation
- Verify professional installer is performing the work
- Use H05RN-F cable for wiring
- Check mounting surface for stability
- Confirm installation height is between 2.3m and 3m
Show more Show less
Specs in practice
- Mounting Height
- The optimal height for the sensor to detect motion effectively is 2.3 to 3 meters.
- Detection Range
- The sensor can detect motion up to 10 meters (± 2m) away.
- Detection Angle
- The sensor covers a 180-degree field of view.
Images and diagrams
- The installation diagram illustrates the 10-step process for mounting and wiring.
- The sensor diagram shows the optimal height and detection range coverage.
Model compatibility
- Recommended cable type: H05RN-F
- Not recommended cable type: U-1000 R2V

Manual page author
Michael Turner
Technical manual editor