Lighting / Fixtures
Installation Guide for Resistex KOMET Ceiling/Wall Light
A comprehensive installation guide for the Resistex KOMET ceiling and wall light. This manual provides step-by-step mounting instructions, wiring diagrams, safety precautions, and maintenance guidelines to ensure proper installation and...
Quick answers from the manual
Quick answer
- The Resistex KOMET is a ceiling/wall light that requires professional installation. Ensure power is off, wire the L and N connections, and secure the cover with T10H screws. p. 1, 2
Key actions
- Turn off power before installation. p. 1, 2
- Secure cover with T10H screws. p. 2
Maintenance and reset
- Do not use chemicals or abrasives for cleaning. p. 1
Show 2 more answers Show less
Technical specifications
| Parameter | Value | Meaning | Pages |
|---|---|---|---|
| IP Rating | IP65 | Dust and water protection | p. 1 |
| Impact Resistance | IK10 | High impact protection | p. 1 |
Where to find it in the PDF
- Safety and Maintenance p. 1
- Installation Steps p. 2
Table of contents
Manual images
Click an image to enlargeQuick guide from the manual
This document provides essential installation and safety instructions for the Resistex KOMET ceiling and wall light. The installation must be performed by a professional installer in compliance with local electrical standards. Ensure the power is disconnected before starting any work.
Safety notes
- Electrical Safety: Never work on the luminaire while it is under voltage.
- Professional Installation: The installation must be performed by a professional installer in compliance with standards and regulations relating to electrical installations.
- ESD Protection: There is a risk of electrostatic discharges (ESD Norm). Handle the components with precautions.
Installation
Follow these steps to install the KOMET luminaire:
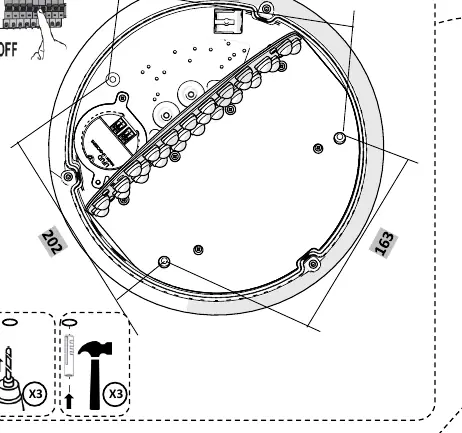
- Preparation: Ensure the power supply is turned off. Drill three holes in the mounting surface as indicated in the diagram.
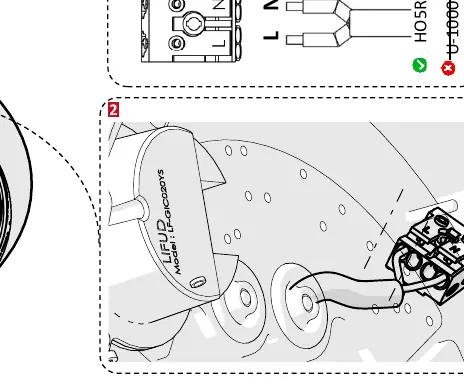
- Wiring: Connect the power supply wires to the terminal block. Ensure correct connection of Live (L) and Neutral (N) wires. Use appropriate cables (e.g., H05RN-F or U-1000 R2V).
- Mounting: Secure the base of the luminaire to the surface using the provided mounting points.
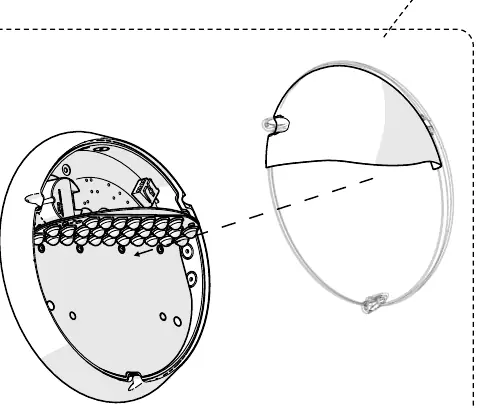
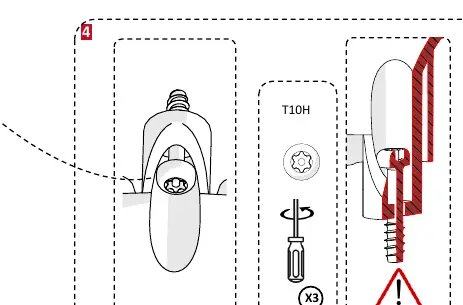
- Final Assembly: Attach the cover/diffuser to the base. Secure it using the three T10H screws.
Maintenance instructions
- Cleaning: Do not use chemicals or abrasive products to clean the fixture.
- Dismantling: Keep these instructions for future dismantling or maintenance.
Practical help
Common problems
Electrostatic discharge (ESD) risk
Handle components with precautions during installation to avoid damage.
Cleaning damage
Do not use chemicals or abrasive products; wipe with a soft, dry cloth.
Before use
- Ensure power supply is completely disconnected.
- Verify that a professional installer is performing the work.
- Have a T10H screwdriver ready for the final assembly.
- Check that the mounting surface is suitable for the fixture.
Show more Show less
Images and diagrams
- The diagram shows the drilling pattern for the three mounting holes.
- Wiring diagram illustrates the connection of L and N wires to the terminal block.
- The T10H screw icon indicates the specific tool required for securing the cover.
Model compatibility
- Compatible with H05RN-F and U-1000 R2V cable types.

Manual page author
Emily Carter
User documentation editor