Industrial / Vacuum Cleaners
RIDGID 1000RSDS Smart Submersible Sump Pump Installation Manual
Installation and operation guide for the RIDGID 1000RSDS Smart Submersible Sump Pump. Includes setup instructions, app connectivity, maintenance, and troubleshooting.
Table of contents
Manual images
Click an image to enlargeQuick guide from the manual
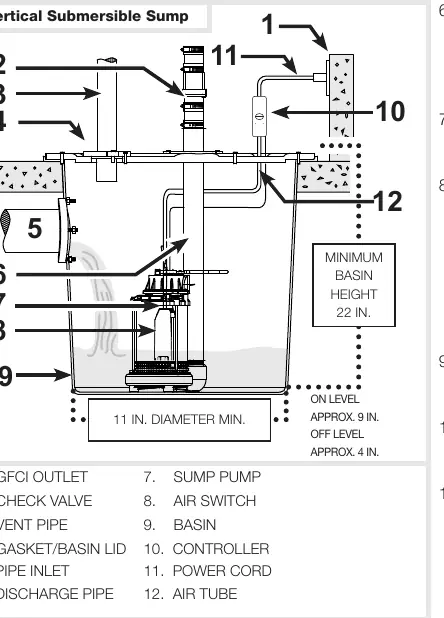
The RIDGID 1000RSDS Smart Submersible Sump Pump is designed for indoor basement drainage of clear ground water. It features an integrated air switch and Wi-Fi connectivity for status monitoring via the SmartSumpbyRIDGID app. Key installation requirements include a GFCI-protected outlet, rigid piping, and a check valve to prevent back-flow.
Installation
Ensure the installation complies with the National Electric Code and local ordinances. Use a basin large enough to accommodate the pump. Clean the basin of all debris before installation. Place the pump on a solid, level surface; do not place it directly on clay, earth, gravel, or sand. A brick or block should be used to provide a solid base. Rigid PVC pipe is required for discharge; do not use flexible hosing. A check valve must be installed to prevent back-flow. Test the pump operation for several cycles after installation.
Device Activation
To connect the pump to the app: Download the SmartSumpbyRIDGID app, open it, and select Add Device. Ensure the pump is plugged in and the status LED is blinking yellow. Use the app to scan the QR code on the front of the device. Follow the on-screen prompts to connect to your Wi-Fi network.
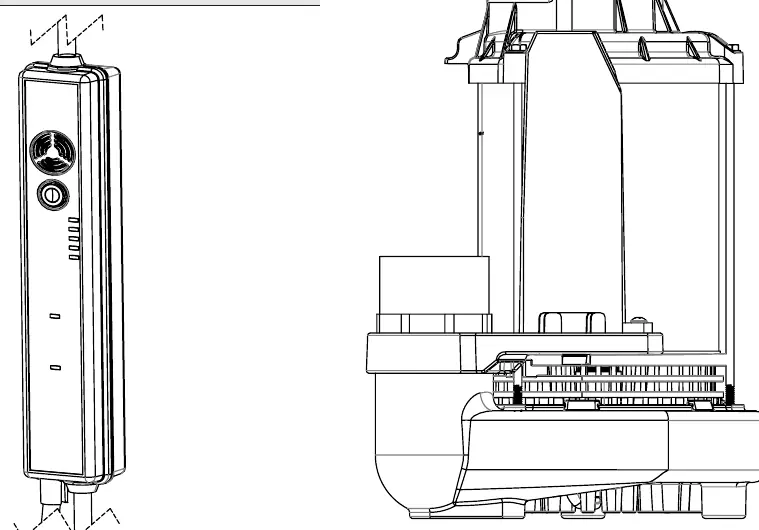
Using the Digital Controller
The controller features an LED display and a button for various functions:

- Mute Alarm: Short press (at least 1 second).
- System Test: Hold for 5 seconds (LED flashes blue).
- Reboot: Hold for 10 seconds (LED flashes green).
- Reset Wi-Fi: Hold for 15 seconds (LED flashes yellow), release, and short press to confirm.
- Factory Reset: Hold for 20 seconds (LED flashes red), release, and short press to confirm.
Maintenance
Inspect the pump 3-4 times per year for movement or debris buildup on the switch. Ensure the pump remains upright. Periodically pour a bucket of water into the pit to verify the pump starts automatically and drains quickly. Check the inlet screen and clear any debris.
Troubleshooting
If the pump fails to start, check the water level, fuse/circuit breaker, and ensure the air tube is not constricted. If the pump vibrates excessively, check for worn bearings or a broken impeller. If the pump runs too often, verify the check valve is functioning correctly and not leaking.
Manufacturer information
RIDGID
Practical help
Common problems
Pump will not start or run
Check if water level is high enough to activate the switch, check for blown fuse/tripped breaker, or ensure the air tube is not constricted.
Pump starts and stops too often
Check for back-flow from the discharge pipe and ensure the check valve is functioning properly.
Pump operates noisily or vibrates excessively
Inspect for worn bearings or a broken impeller. Ensure piping attachments are not too rigid or too loose.
Pump will not shut off
Check for switch obstructions or restricted discharge piping.
Before use
- Ensure the basin is clean and free of debris.
- Place the pump on a solid, level surface (use a brick or block if necessary).
- Install a check valve to prevent back-flow.
- Use rigid PVC piping for discharge.
- Connect to a GFCI-protected outlet.
- Verify the air tube is not pinched or constricted.
Specs in practice
- Power Supply
- 120 V, 60 Hz
Images and diagrams
- The installation diagram illustrates the correct placement of the pump in the basin, the connection of the discharge pipe with a check valve, and the positioning of the air tube and controller.
Model compatibility
- Intended for indoor use only.
- Designed for clear ground water only; do not use for sewage, salt water, or flammable fluids.
- Not designed for use with a portable generator.

Manual page author
Michael Turner
Technical manual editor
Reviews PDF manuals for structure, safety notes, and practical product details so readers can find the right information quickly.