Plumbing / Sump Pumps
User Manual for Ridgid 1000RV0 Pro Pack Plus Wet/Dry Vac
Quick guide for the Ridgid 1000RV0 Pro Pack Plus Wet/Dry Vac. Includes assembly instructions, operation steps, filter maintenance, and troubleshooting tips.
Table of contents
Manual images
Click an image to enlargeQuick Start Guide
The Ridgid 1000RV0 Pro Pack Plus is a wet/dry vacuum designed for household use. Before operating, ensure you have read all safety warnings. The unit is double-insulated and does not require grounding. Always unplug the unit before performing any maintenance or changing the filter.
Assembly
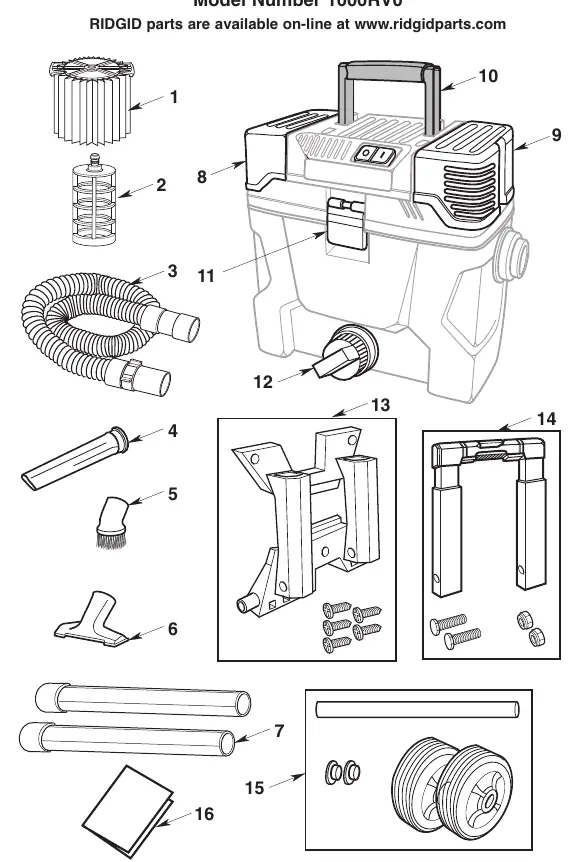
Installing the Handle: Slide the collapsible pull handle into the handle bracket slots. Secure it using the provided bolts and nuts. Do not overtighten, as this may damage the bracket.
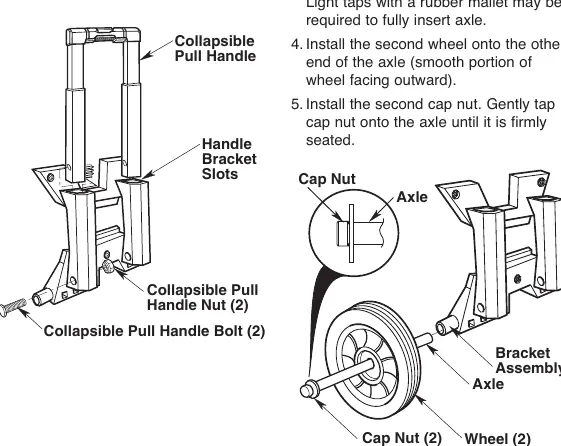
Installing Wheels and Axle: Locate the axle, two wheels, and two cap nuts. Install one cap nut on the axle, slide on a wheel, insert the axle through the bracket assembly, install the second wheel, and secure with the remaining cap nut using a rubber mallet.
Installing Handle Bracket: Align the bracket assembly to the back of the dust drum and secure it with the five supplied screws.
Operation
Vacuuming Dry Materials: Ensure the filter is correctly installed. For very fine dust, empty the drum and clean the filter frequently to maintain performance.
Vacuuming Liquids: For small amounts (2-4 inches), the filter may remain in place. For larger amounts (over 4 inches), remove the filter to prevent saturation. The unit features an automatic float mechanism that cuts off suction when the drum is full; turn off the unit immediately if you hear the motor pitch increase.
Blowing Feature: To use as a blower, raise the right cover and insert the locking end of the hose into the blowing port.
Maintenance
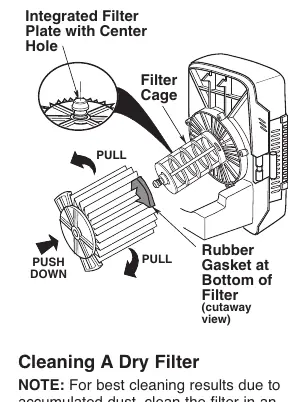
Filter Cleaning: Use the Qwik Lock system to remove the filter. Tap the filter against the inside of the drum to remove dry debris. For thorough cleaning, rinse with water and allow to dry completely before reinstalling. Replace the filter immediately if it has tears or holes.
Disinfecting: To disinfect the drum, use a solution of 1 gallon of water and 1 teaspoon of chlorine bleach. Let it stand for 20 minutes, then rinse thoroughly.
Troubleshooting
- Loss of Suction: Check for clogs in the hose or full drum. Ensure the filter is clean and properly seated.
- Motor Noise/High Pitch: The float has likely cut off suction due to a full drum. Turn off the unit and empty the drum.
- Static Shocks: Common in low humidity. Use a humidifier in the area to reduce static buildup.
Manufacturer information
RIDGID
Practical help
Common problems
Loss of suction
Check for clogs in the hose, ensure the drum is not full, and verify the filter is clean and properly seated.
Motor noise increases/High pitch
The float mechanism has likely cut off suction because the drum is full. Turn off the unit, unplug it, and empty the drum.
Static shocks
Static is common in low humidity. Use a humidifier in the room to reduce static charge on the hose or vacuum.
Before use
- Read and understand all safety labels and the manual.
- Ensure the filter is correctly installed.
- Check that the power cord is in good condition.
- Verify all parts are present and securely assembled.
- Ensure the drum is empty and clean.
Specs in practice
- Double Insulated
- The unit has two systems of insulation instead of grounding; no grounding means should be added.
- Weight Limit
- Do not stand or sit on the vacuum; it has a 50 lb weight limit.
Images and diagrams
- Page 6: Assembly of the collapsible handle and wheels.
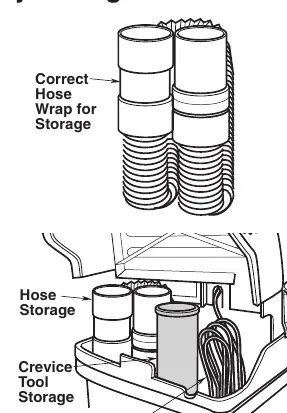
- Page 7: Correct storage method for the hose and power cord.
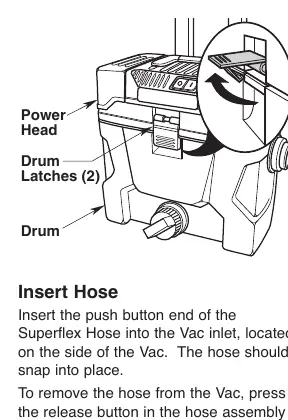
- Page 10: Emptying the drum and inserting the hose.
- Page 12: Qwik Lock filter removal and installation process.
Model compatibility
- Use only Ridgid recommended accessories.
- Use only identical replacement parts for servicing.
- Extension cords must be rated for outdoor use and at least 16 AWG.

Manual page author
Emily Carter
User documentation editor
Prepares concise manual descriptions and highlights the most useful setup, operation, and maintenance information for readers.