Tools / Power Tools
User Manual for Ronix 3161 115mm Mini Angle Grinder
Quick guide for the Ronix 3161 115mm Mini Angle Grinder. Includes setup, wheel installation, safety instructions, and operation tips.
Table of contents
Manual images
Click an image to enlargeQuick guide from the manual
The Ronix 3161 is a 115mm mini angle grinder designed for grinding and cutting tasks. Before use, ensure the tool is switched off and unplugged. Always wear appropriate personal protective equipment, including safety glasses, gloves, and long-sleeved clothing. The tool features a 6-level variable speed controller and a shaft lock for easy accessory changes.
Product Overview
The device consists of the following main components:
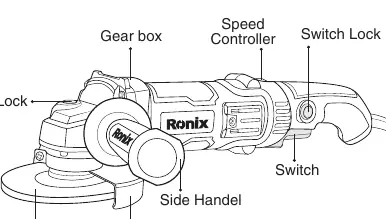
- Gear box
- Speed Controller: Dial to adjust the 6-level variable speed.
- Switch: Power trigger.
- Switch Lock: Locks the switch in the ON position.
- Shaft Lock: Used to lock the spindle when installing or removing accessories.
- Side Handle: Attachable for better control.
- Wheel Guard: Essential safety component.
Assembly
Always ensure the tool is switched off and unplugged before performing any assembly.
Installing Side Handle
Screw the side handle securely into the designated position on the tool housing.
Installing or Removing Wheel Guard
The wheel guard must be fitted so the closed side always points toward the operator. Align the protrusion on the wheel guard band with the notch on the bearing box, rotate 180 degrees, and tighten the screw securely.
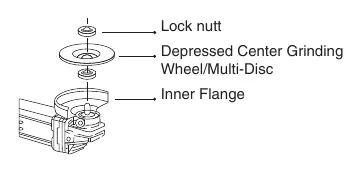
Installing Grinding Wheel
- Mount the inner flange onto the spindle.
- Place the grinding wheel/disc onto the inner flange.
- Screw the lock nut onto the spindle.
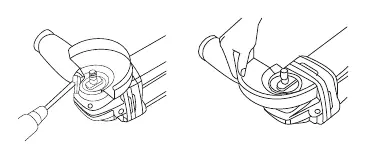
- Press the shaft lock firmly to prevent the spindle from rotating.
- Use the lock nut wrench to tighten the nut clockwise.
Operation
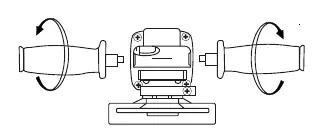
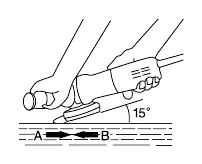
Grinding and Cutting: Hold the tool firmly with one hand on the housing and the other on the side handle. Keep the edge of the wheel at an angle of approximately 15 degrees to the workpiece surface. During the break-in period with a new wheel, avoid working in the 'B' direction to prevent cutting into the workpiece.
Speed Control: Use the speed controller to adjust the tool's speed across 6 levels to suit the material and task.
Safety
- General: Keep the work area clean and well-lit. Do not operate in explosive atmospheres.
- Electrical: Ensure the plug matches the outlet. Use an RCD-protected supply if working in damp locations.
- Usage: Never use wood-cutting blades or saw blades. Always use the supplied wheel guard.
- Maintenance: Check the wheel for cracks or damage before operation. Run the tool at no load for one minute to check for flaws.
Manufacturer information
Ronix Tools
Practical help
Common problems
Wheel vibration or wobbling
Indicates poor installation or an unbalanced wheel. Stop immediately, check installation, or replace the wheel.
Tool kicks back
Avoid bouncing or snagging the wheel on corners or sharp edges. Maintain a firm grip.
Overheating or loss of speed
Do not force the tool. The weight of the tool provides adequate pressure; excessive force can cause wheel breakage.
Before use
- Check the grinding wheel for cracks or damage.
- Ensure the switch is in the OFF position before plugging in.
- Verify the wheel guard is securely installed and positioned correctly.
- Ensure the side handle is securely attached.
- Wear appropriate PPE (safety glasses, gloves, long sleeves).
Specs in practice
- No-Load Speed
- 3000-11000 RPM, adjustable via the 6-level speed controller.
- Spindle Size
- M14 thread, standard for most 115mm accessories.
- Wheel Diameter
- 115mm maximum capacity.
Images and diagrams
- Shaft Lock: Located on the gear box, press to lock the spindle during accessory changes.
- Speed Controller: Dial located on the rear housing to adjust RPM.
- Wheel Guard: Must be positioned to protect the operator from debris.
Model compatibility
- Use only fiberglass-reinforced wheels.
- Do not use wood-cutting blades or saw blades.
- Ensure accessories are rated for at least the speed recommended on the tool warning label.

Manual page author
David Miller
Documentation analyst
Organizes user manual content into clear summaries, with attention to model details, product context, and everyday usability.