Tools / Drills
User Manual for Ronix 2110 Electric Drill
Quick guide for the Ronix 2110 Electric Drill. Learn about operation, variable speed settings, drilling techniques, and safety instructions.
Table of contents
Manual images
Click an image to enlargeQuick guide from the manual
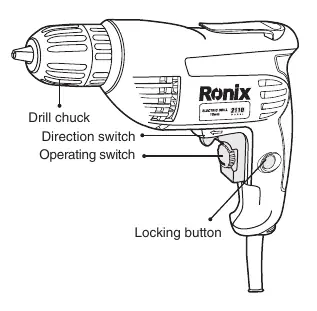
The Ronix 2110 is a 10mm electric drill designed for various drilling and fastening tasks. Before operating, ensure the drill bit is sharp, the workpiece is securely clamped, and the switch is in the OFF position before plugging the tool into a power source. Always wear eye protection and use appropriate safety gear.
Technical Specifications
- Model: 2110
- Power: 400W
- Voltage: 220-240V, 50-60Hz
- No load speed: 0-2900rpm
- Max Capacity (Steel): 10mm
- Max Capacity (Wood): 25mm
- Chuck Type: Keyless
- Net Weight: 1.5kg
Operating Instructions
Trigger Controlled Variable Speed: The drill speed is controlled by the pressure applied to the trigger. Apply more pressure to increase speed and release to decrease it.
Lock-On Button: Located on the left side of the trigger handle. To lock the trigger ON, squeeze the trigger, depress the button, and release the trigger. To unlock, squeeze the trigger and release it without pressing the button.
Reversing Switch: Located above the trigger. Move the button to the far left for forward rotation and to the far right for reverse rotation. Do not change direction while the chuck is rotating.
Drilling Techniques
Drilling Wood: Clamp the workpiece firmly. Apply pressure in a straight line with the drill bit. Use a back-up block of wood to prevent splintering.

Drilling Metal: Harder materials require more pressure and slower speeds. Lubricate the bit tip with cutting oil (except for soft metals like aluminum or copper). For large holes, drill a smaller pilot hole first.
Drilling Masonry: Use carbide-tipped bits. Apply sufficient pressure to keep the bit from spinning.
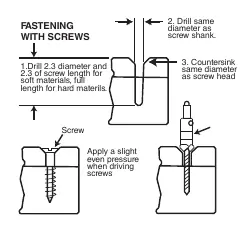
Fastening with Screws: For best results, drill a pilot hole (2/3 the diameter of the screw) and a clearance hole (same diameter as the screw shank) in the top piece. Use a countersink bit if using flat head screws.
Maintenance and Safety
Keep the tool clean and free from oil and grease. Regularly inspect for damaged parts or misalignment. If the drill bit binds, release the trigger immediately, reverse the rotation, and slowly back out the bit. Do not use the Lock-On feature when binding is likely (e.g., using hole saws or auger bits). Service should only be performed by a qualified repair person using identical replacement parts.
Manufacturer information
Ronix Tools
Practical help
Common problems
Drill bit binding in workpiece
Release the trigger immediately, reverse the direction of rotation, and slowly squeeze the trigger to back out the bit.
Tool stalling during operation
Reduce pressure on the tool. Ensure the drill bit is sharp and not damaged.
Excessive friction or heat
Apply steady, light pressure. Do not force the tool. Use cutting oil when drilling metal.
Before use
- Ensure the switch is in the OFF position before plugging in.
- Verify the drill bit is sharp and in good condition.
- Ensure the drill bit is securely tightened in the chuck.
- Remove any chuck keys or adjusting wrenches.
- Clamp or anchor the workpiece firmly.
- Wear appropriate safety equipment (eye protection, dust mask).
Specs in practice
- 10mm Steel Capacity
- Maximum diameter of hole that can be drilled in steel.
Images and diagrams
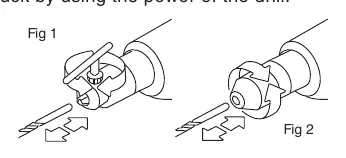
- Fig 1 & 2: Illustrates the method for tightening the chuck on keyless models.
- Fig 3: Shows the procedure for fastening with screws, including pilot hole drilling and countersinking.
Model compatibility
- Not recommended for running lag bolts.
- Use only accessories rated for the tool's maximum speed.
- Use carbide-tipped bits for masonry work.

Manual page author
Emily Carter
User documentation editor
Prepares concise manual descriptions and highlights the most useful setup, operation, and maintenance information for readers.