Tools / Drills
User Manual for Ronix 2115 Electric Drill
Quick guide for the Ronix 2115 Electric Drill. Includes technical specifications, safety instructions, operating procedures, and maintenance tips to ensure optimal performance.
Table of contents
Manual images
Click an image to enlargeQuick guide from the manual
This manual provides essential instructions for the safe and efficient operation of the Ronix 2115 Electric Drill. Always ensure the tool is disconnected from the power supply before performing any adjustments, such as changing drill bits or maintenance. The tool is designed for drilling applications and features variable speed control and a locking mechanism for continuous use.
Product overview
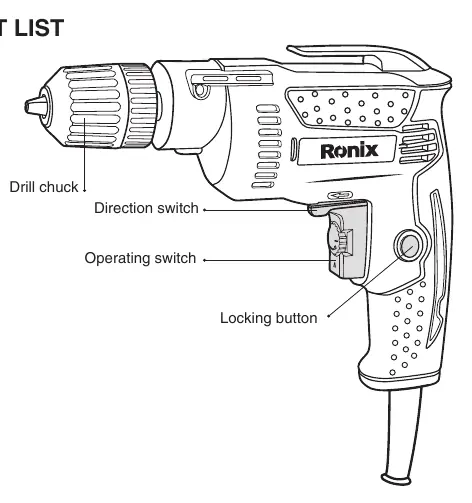
The Ronix 2115 features a keyless chuck for easy bit changes, an operating switch with variable speed control, a locking button for continuous operation, and a direction switch for forward/reverse motion.
Safety rules
- Always wear eye protection and appropriate personal protective equipment.
- Keep the work area clean, well-lit, and free from flammable materials.
- Do not operate the tool in explosive atmospheres.
- Keep children and bystanders away while operating the power tool.
- Ensure the switch is in the off-position before connecting to the power source.
- Hold the tool by insulated gripping surfaces when working near hidden wiring.
- Do not touch the bit or workpiece immediately after operation as they may be hot.
Operation
Inserting the drill bit
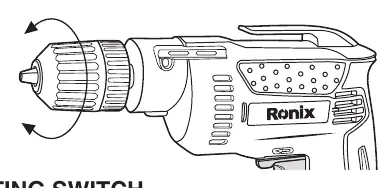
Ensure the machine is disconnected from the mains power supply. Turn the ring of the drill chuck until the clamping jaws are open wide enough to insert the drill bit. Insert the bit and tighten the chuck securely.
Using the drill
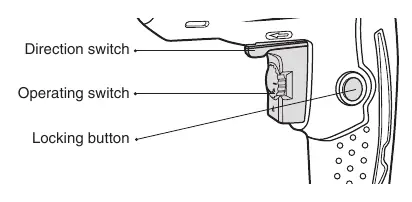
The operating switch controls the speed; the more it is pressed, the faster the drill rotates. To use continuous operation, press the locking button while the operating switch is pressed. To stop, press the operating switch again and release it. Use the direction switch to change the direction of motion. Never change the direction while the machine is running.
Maintenance and care
If the machine becomes too hot, allow it to run without a load for two minutes, then interrupt work for a short time. Keep ventilation slits clean and free from blockages. Clean the machine with a clean cloth and a brush. Ensure the tool is serviced by qualified personnel using identical replacement parts.
Technical specifications
- Power input: 420W
- Voltage: 220-240V, 50-60Hz
- No load speed: 0-4200 RPM
- Chuck Type: Keyless
- Chuck Size: 10mm
- Max Capacity in Wood: 25mm
- Max Capacity in Steel: 10mm
- Weight: 1.54kg
Manufacturer information
Ronix Tools
Practical help
Common problems
Drill bit jammed
Use the direction switch to reverse the rotation and remove the bit.
Tool overheating
Allow the machine to run without a load for two minutes, then stop working for a short time.
Tool not starting
Check that the power supply is connected and the switch is functioning correctly.
Before use
- Check that mains voltage matches the tool's rating on the type plate.
- Ensure the drill bit is correctly inserted and tightened in the chuck.
- Verify the direction switch is set to the desired direction.
- Wear appropriate personal protective equipment (eye protection, etc.).
- Ensure the work area is clean and well-lit.
- Check that ventilation slits are not blocked.
Specs in practice
- No load speed
- 0-4200 RPM - The rotational speed range without resistance.
- Max Capacity in Wood
- 25mm - Maximum drilling diameter in wood.
- Max Capacity in Steel
- 10mm - Maximum drilling diameter in steel.
Images and diagrams
- Part List diagram shows the drill chuck, operating switch, locking button, and direction switch.
- Inserting the drill diagram illustrates opening the chuck jaws.
Model compatibility
- Use only with 220-240V power supply.
- Ensure the drill bit type is appropriate for the material being drilled.

Manual page author
David Miller
Documentation analyst
Organizes user manual content into clear summaries, with attention to model details, product context, and everyday usability.