Tools / Drills
User Manual for Ronix 8105K and 8101K Cordless Drill/Drivers
Comprehensive user guide for the Ronix 8105K Cordless Hammer Drill/Driver and 8101K Cordless Screwdriver. Includes technical specifications, safety guidelines, operating instructions, and maintenance procedures.
Table of contents
Manual images
Click an image to enlargeQuick Guide
This manual covers the operation and safety of the Ronix 8105K and 8101K cordless tools. Key points for users include:
- Battery Care: Charge in temperatures between 10°C and 40°C. Do not overcharge. If the tool overheats during continuous use, let it cool for 15 minutes before continuing.
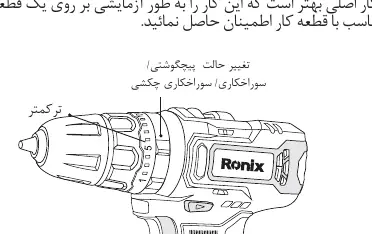
- Mode Selection: Use the mode selector ring to switch between drilling, hammer drilling (for walls), and screwdriving. Do not use hammer mode on wood or metal.
- Speed Control: Use the H/L switch to select high or low speed. Never change speed while the tool is running.
- Safety: Always remove the battery before changing accessories or performing maintenance.
Product Overview
The tools feature the following components:
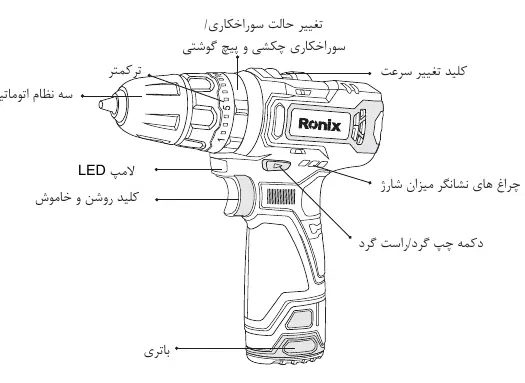
- Chuck: Automatic chuck for holding drill bits or screwdriver bits.
- Torque/Mode Ring: Adjustable ring for setting torque (1-21) and selecting operation mode (Drill, Hammer, Screw).
- Speed Switch: Located on top, allows switching between High (H) and Low (L) speeds.
- Forward/Reverse Switch: Controls rotation direction and locks the trigger in the center position.
- LED Light: Illuminates the work area when the trigger is pressed.
- Battery: Detachable battery pack with a release button.
Operation
Battery Installation
To remove the battery, press the lock buttons on both sides and pull it out. To install, align the battery tongue with the groove on the housing and push upward until it clicks into place.
Speed and Torque Adjustment
Speed: Set the switch to 'H' for high speed or 'L' for low speed. Ensure the tool is stopped before switching.
Torque: The torque can be adjusted using the ring (1-21 settings). Test on a scrap piece of material to find the appropriate setting for your screw size to prevent over-tightening.
Drilling and Screwing
Drilling: Set the mode ring to the drill icon. For metal or wood, it is recommended to drill a pilot hole first. Do not apply excessive force; let the tool do the work.
Hammer Drilling: Set the mode ring to the hammer icon for masonry/wall drilling.
Screwdriving: Set the mode ring to the screw icon. Start at a low speed and increase gradually. Release the trigger when the clutch engages.
Maintenance
- Keep the tool clean and free of oil or grease.
- Use only a dry cloth for cleaning; do not use water or harsh chemicals as they may damage the housing.
- If the tool malfunctions, contact an authorized Ronix service center. Do not attempt to repair internal components yourself.
- For service inquiries in Iran, visit www.ronix.ir or call 021-6497.
Official resources from the manual
Manufacturer information
Ronix Tools
Practical help
Common problems
Tool overheats during use
Stop usage immediately and allow the tool to cool down for 15 minutes before resuming.
Drill bit or screw stuck in workpiece
Switch the forward/reverse button to the opposite direction to reverse the rotation and release the bit.
Battery not holding charge
Ensure the battery is charged within the recommended 10-40°C temperature range and check that the charger is functioning.
Before use
- Ensure the battery is fully charged.
- Check that the forward/reverse switch is not in the center (locked) position.
- Select the appropriate speed (H/L) for the task.
- Set the torque/mode ring to the correct setting (Drill, Hammer, or Screw).
- Wear appropriate safety gear, including safety glasses and a mask if dust is generated.
Specs in practice
- Torque Settings (1-21)
- Adjustable clutch settings to control the force applied to screws, preventing damage to the workpiece.
Images and diagrams
- The parts diagram identifies the chuck, torque ring, speed switch, LED light, trigger, forward/reverse switch, and battery release button.
Model compatibility
- Use only Ronix-approved batteries and chargers.
- Do not use hammer mode on wood or metal surfaces.

Manual page author
David Miller
Documentation analyst
Organizes user manual content into clear summaries, with attention to model details, product context, and everyday usability.