Automotive / Interior Accessories
Installation Guide for Rugged Ridge 13462.XX Fold & Tumble Rear Seat
Step-by-step installation instructions for the Rugged Ridge 13462.XX Fold & Tumble Rear Seat. Learn how to mount front brackets and install the rear seat lock mechanism for CJ and YJ vehicles.
Table of contents
Quick Installation Overview
This guide covers the installation of the Rugged Ridge Fold & Tumble Rear Seat for 1976-1995 CJ and YJ vehicles. The process involves installing front seat brackets and setting up the rear seat lock mechanism. Please note that some early CJ models may require drilling additional holes.
Front Seat Brackets
1. Remove the existing seat mounting bolts from the floor.
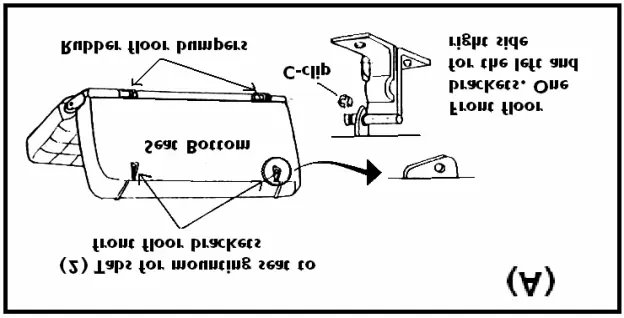
2. Install the front seat brackets through the seat mounting tabs as shown in the diagram.
3. Secure the bracket to the tab using the provided C-clip.
4. Align the mounting bracket over the holes in the floor and securely tighten the seat mounting bolts.
Note: If your vehicle is an early CJ model with only one mounting hole per side, you will need to drill a second hole. It is recommended to use Grade 5 or higher bolts and large washers (additional hardware supplied by the customer).
Rear Seat Lock
1. Remove the seat belt anchor bolt from the floor.
2. Position the lock underneath the seat belt and eyelets.
3. Reinstall the seat belt anchor bolt through the seat belt eyelets and the seat lock. Do not tighten the bolt yet.
4. Align the seat lock with the striker so that the seat locks correctly when pushed down into position.
5. Once aligned, tighten the seat belt anchor bolt.
Note: If desired, an additional hole can be drilled to secure the bracket with two bolts. Grade 5 or higher bolts and large washers are recommended for this purpose.
Practical help
Common problems
Missing mounting holes on early CJ models
Drilling of the second mounting hole is required for each side.
Seat lock misalignment
Do not fully tighten the seat belt anchor bolt until the seat lock is aligned with the striker.
Before use
- Verify vehicle compatibility (1976-1995 CJ or YJ).
- Check floor for existing seat mounting holes.
- Ensure you have Grade 5 or higher bolts and large washers if additional hardware is needed.
- Confirm you have the necessary tools for drilling if required.
Specs in practice
- Grade 5 or higher bolt
- Recommended hardware strength for secure and safe installation.
- Large washer
- Recommended for use with mounting bolts to ensure stability.
Images and diagrams
- Diagram A shows the installation of front floor brackets and the use of C-clips.
- Diagram B illustrates the positioning of the rear seat lock under the seat belt anchor.
Model compatibility
- Compatible with 1976-1995 CJ and YJ models.
- Some early CJ models may require custom drilling.

Manual page author
Michael Turner
Technical manual editor
Reviews PDF manuals for structure, safety notes, and practical product details so readers can find the right information quickly.