Home Appliances / Small Kitchen Appliances
User Manual for Russell Hobbs Distinctions 2-Slice Toaster 26432-56
Quick guide and user manual for the Russell Hobbs Distinctions 2-Slice Toaster (26432-56). Includes setup, toasting instructions, bun warmer usage, and maintenance.
Quick answers from the manual
Quick answer
- To toast bread, plug in the toaster, set the browning control (1-6), insert bread (max 25mm), and press the lever down. The countdown timer will show progress. p. 4
Key actions
- Curing new elements p. 4
- Using bun warmer p. 5
First start
- Set browning to max and operate empty to cure elements p. 4
Show 3 more answers Show less
Problems and fixes
Bread jammed
Unplug, cool, remove carefully without metal tools
p. 4Technical specifications
| Parameter | Value | Meaning | Pages |
|---|---|---|---|
| Max bread thickness | 25mm | Maximum thickness for toasting slots | p. 4 |
Where to find it in the PDF
- Parts and Setup p. 2, 4
- Toasting and Features p. 4, 5
Table of contents
Manual images
Click an image to enlargeQuick guide from the manual
This toaster is designed for household use. Before first use, operate the toaster empty on the maximum browning setting to cure the new heating elements. This may produce a slight odor, which is normal; ensure the room is well-ventilated.
Important safeguards
- Do not use the appliance near or below curtains or other combustible materials.
- Never leave the appliance unattended while in use.
- Do not connect via a timer or remote control system.
- Do not immerse in any liquid.
- If bread gets jammed, unplug the toaster, let it cool, and carefully remove the bread. Never use a knife, fork, or other metal implement.
Parts
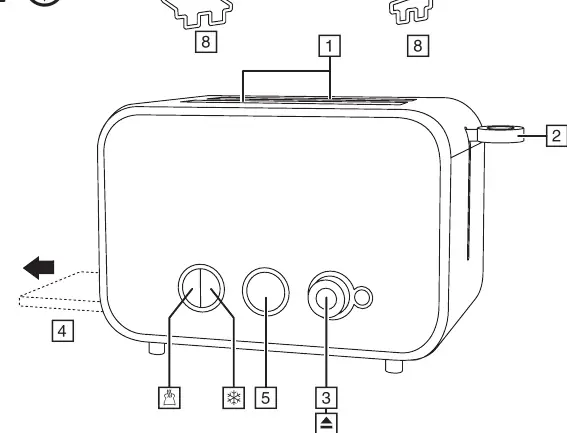
- 1. Toasting slots
- 2. Lever
- 3. Browning control
- 4. Crumb tray
- 5. Countdown timer lights
- 6. Bun warmer
- 7. Handle
- 8. Feet
Toasting bread
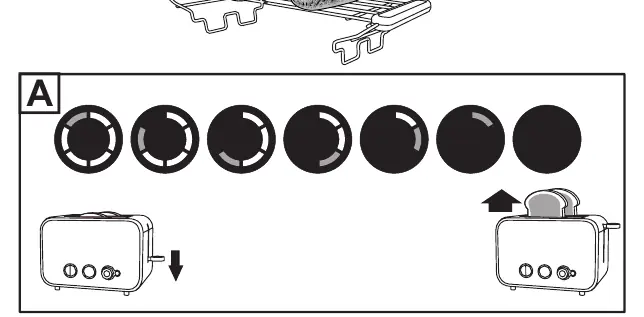
- Place the toaster on a firm, level, heat-resistant surface.
- Plug the toaster into the power socket.
- Turn the browning control to the desired setting (1 = light, 6 = dark).
- Insert bread into the toasting slots (maximum thickness 25mm).
- Press the lever down fully. It will not lock unless the toaster is connected to power.
- The countdown timer lights will show progress. When the segments go off, the toast will pop up.
- To stop toasting, press the cancel button.
Frozen bread
To toast frozen bread, leave the browning control at your preferred setting, insert the bread, lower the lever, and press the frozen bread button. The light will come on, and the toasting time will be adjusted automatically.
Reheating toast
To reheat toast, insert the bread, lower the lever, and press the reheat button. The light will come on, and the toast will receive a short burst of heat. Only reheat plain, unbuttered toast.
Bun warmer
- Place the bun warmer on top of the toaster with the feet inside the slots.
- Place buns on top of the bun warmer.
- Set the browning level to 1 and lower the lever.
- When the lever pops up, remove the warmed buns.
- Do not touch the bun warmer wires as they will be hot.
- Remove the bun warmer before using the toaster normally.
Care and maintenance
- Unplug the appliance and let it cool.
- Wipe outer surfaces with a damp cloth.
- Remove and empty the crumb tray regularly.
Recycling
To avoid environmental and health problems due to hazardous substances, appliances marked with the recycling symbol must not be disposed of with unsorted municipal waste. Always dispose of electrical and electronic products at an appropriate official recycling/collection point.
Manufacturer information
Russell Hobbs
Practical help
Common problems
Bread jammed in the toaster
Unplug the toaster, let it cool, and carefully remove the bread. Never use a knife, fork, or other metal implement.
Toaster smells during first use
This is normal as new elements cure. Operate the toaster empty in a well-ventilated room.
Before use
- Remove all packaging
- Place on a firm, level, heat-resistant surface
- Ensure the room is well-ventilated
- Operate empty on max setting to cure elements
Show more Show less
Specs in practice
- Browning control (1-6)
- 1 = light, 6 = dark
Images and diagrams
- Fig A: Shows the countdown timer lights and lever operation
Model compatibility
- Maximum bread thickness: 25mm
- Do not use bun warmer for frozen, buttered, coated, or filled items

Manual page author
David Miller
Documentation analyst