Home / Kitchen Storage
User Manual for Russell Hobbs 20L Compact Digital Microwave RHMO10
Quick guide for the Russell Hobbs 20L Compact Digital Microwave (RHMO10). Learn how to install, operate, clean, and troubleshoot your microwave safely.
Quick answers from the manual
Quick answer
- The Russell Hobbs RHMO10 is a 20L digital microwave. It features 5 power levels, 8 auto-cooking menus, defrost functions, and a child lock. Ensure it is placed on a flat surface with 30cm clearance above and 20cm on the sides. p. 1, 13, 15
Key actions
- Set the clock p. 13
- Use Quick Start p. 14
First start
- Unpack and install p. 9, 11, 12
Show 4 more answers Show less
Problems and fixes
Sparking
Clean burnt food debris, remove metal/foil, pierce non-porous skins.
p. 20Maintenance and reset
- Cleaning p. 18
Technical specifications
| Parameter | Value | Meaning | Pages |
|---|---|---|---|
| Power Levels | 10%, 30%, 50%, 80%, 100% | Adjustable cooking power. | p. 13, 14 |
Where to find it in the PDF
- Parts Diagram p. 10
- Turntable Assembly p. 12
Table of contents
Manual images
Click an image to enlargeQuick Guide
The Russell Hobbs RHMO10 is a 20L digital microwave designed for household use. Before first use, ensure all packaging is removed, the turntable is correctly assembled, and the unit is placed on a flat, stable surface with adequate ventilation. Always use microwave-safe containers and avoid metal or foil.
Parts and Components
The microwave consists of the following main parts:
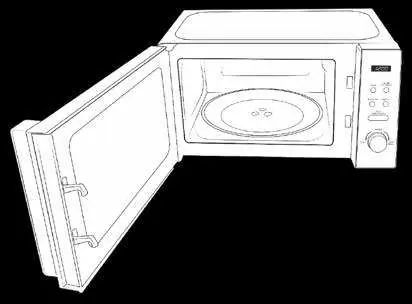
- Safety interlock latches
- Door assembly and window
- Glass turntable
- Oven cavity
- Plastic waveguide cover (do not remove)
- Screen display
- Control panel (buttons and dial)
- Turntable coupling and ring
Installation
Follow these requirements for safe installation:
- Surface: Place on a level surface capable of supporting 11.5kg.
- Clearance: Maintain at least 30cm of free space above the unit and 20cm from adjacent walls. One side must remain open.
- Environment: Do not install in a cabinet or over a heat-producing appliance (e.g., range cook-top).
- Power: Plug into a properly installed and grounded wall socket. Do not use extension cables.
Turntable Assembly
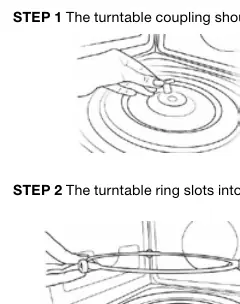
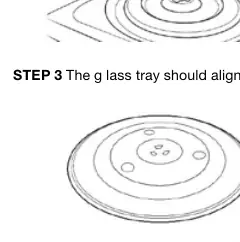
- Place the turntable coupling into the center of the microwave base.
- Slot the turntable ring into the indents in the microwave base.
- Align the glass tray with the turntable coupling.
Control Panel and Features
- Power: Sets cooking power level (10% to 100%).
- Weight/Time Defrost: Inputs weight or time for defrosting.
- Clock/Pre-Set: Sets the clock and pre-set cooking functions.
- Stop/Clear: Stops cooking or clears settings.
- Start/+30Sec/Confirm: Starts cooking or confirms settings.
- Timer/Weight/Auto Menu: Dial used to select auto menus, weight, or cooking time.
Operation
Setting the Clock
- Press the Clock/Pre-Set button.
- Turn the dial to set the hour, then press Clock/Pre-Set to confirm.
- Turn the dial to set the minutes, then press Clock/Pre-Set to confirm.
Microwave Cooking
- Press the Power button repeatedly to select the desired power level (P100, P80, P50, P30, P10).
- Turn the dial to set the cooking time.
- Press Start/+30Sec/Confirm to begin.
Auto Cooking
The microwave features 8 auto-cooking menus (A-1 to A-8) for items like Reheat, Vegetables, Fish, Meat, Pasta, Potato, Pizza, and Soup. Select the menu using the dial, then set the weight to automatically calculate the time.
Care and Cleaning
- Always unplug the appliance before cleaning.
- Wipe interior surfaces with a soft, damp cloth.
- Keep the waveguide cover clean; wipe with mild detergent and water.
- Wash the glass turntable and ring in warm, soapy water.
- Do not use harsh or abrasive cleaners.
- To remove odors, microwave 1 cup of water with lemon juice or white vinegar for 5 minutes at 100% power.
Troubleshooting
If the microwave does not work, check the power supply, plug, and fuse. If the door is not closed, the unit will not operate. For sparking, ensure no metal or foil is inside and clean any burnt food debris. If the turntable is not rotating, check that the coupling and ring are correctly fitted.
Manufacturer information
Russell Hobbs
Practical help
Common problems
Microwave does not work
Check if the plug is secure, the socket is working, or if a fuse has blown.
Sparking
Remove metal or foil, clean burnt food debris from the cavity, and pierce non-porous skins (e.g., potatoes).
Not heating
Ensure the power level and time are set correctly. If it still fails, the magnetron may be faulty.
Turntable not rotating
Check that the coupling and ring are correctly fitted and the glass tray is aligned.
Before use
- Remove all packaging and tape from the interior.
- Ensure the waveguide cover is in place (do not remove).
- Place on a flat, stable surface with 30cm clearance above and 20cm on sides.
- Check for visual damage to the door or cavity.
- Install the turntable ring and glass tray correctly.
Show more Show less
Specs in practice
- Power Levels
- 5 levels ranging from 10% to 100%.
- Max Cooking Time
- 95 minutes.
Images and diagrams
- Page 10: Parts diagram identifying the door, cavity, turntable, and control panel.
- Page 12: Step-by-step assembly guide for the turntable coupling, ring, and tray.
Model compatibility
- Use only microwave-safe containers.
- Do not use metal or foil.
- Do not use in a cabinet.
- Do not operate empty.

Manual page author
David Miller
Documentation analyst