Tools / Power Tools
Ryobi 18V Brushless Hole Auger User Manual
Quick guide for the Ryobi 18V Brushless Hole Auger (P2903). Includes assembly instructions, operation steps, safety warnings, maintenance, and troubleshooting.
Table of contents
Manual images
Jump to the sectionQuick guide from the manual
This document provides essential operating and safety instructions for the Ryobi 18V Brushless Hole Auger (P2903). Always read the full manual before use. Key safety requirements include wearing eye protection with side shields, heavy-duty gloves, and non-slip footwear. Never operate the tool near buried utility lines (electric, gas, water). Always maintain a firm, two-handed grip on the handles and keep the auger below waist level during operation.
Assembly
The tool requires assembly before first use:
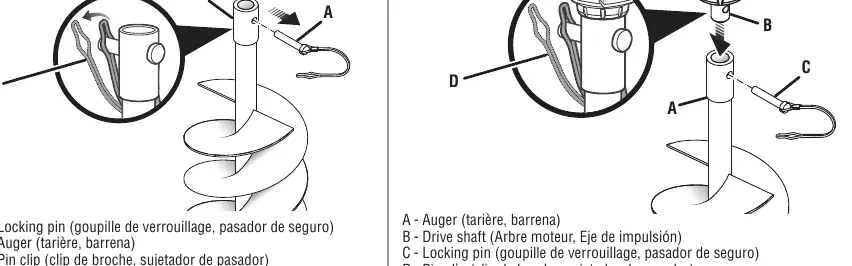
- Stand the auger bit upright with the tip pointing down.
- Remove the locking pin from the auger.
- Install the drive shaft into the auger.
- Align the holes on the auger and drive shaft.
- Insert the locking pin and secure it with the pin clip.
Operation
To operate the hole auger:
- Ensure the battery pack is fully seated in the battery port.
- To start, press and hold the lockout button, then squeeze the switch trigger.
- Hold the tool with both hands and keep the auger bit pointed downward at a 90-degree angle to the surface.
- Allow the auger to reach full speed (2-3 seconds) before lowering it into the material.
- If the hole fills with debris, lift the auger slowly while it is running to clear the material.
- Release the switch trigger to stop the tool.
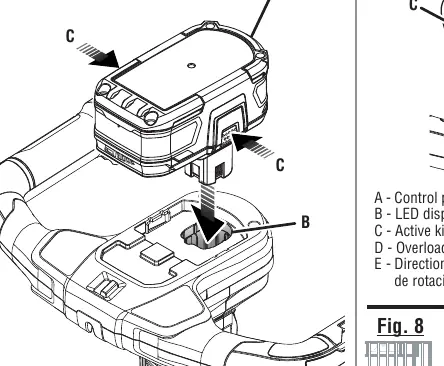
Settings and Indicators
The tool features a direction of rotation selector and an anti-kickback mechanism. The selector allows for forward or reverse rotation. The anti-kickback feature is active when green lights are flashing; if the tool detects tough soil, it will automatically stop to protect the user. If an overload occurs, the tool will stop and a red light will illuminate for 5 seconds.
Maintenance
Always remove the battery pack before performing any maintenance. Keep the tool clean by wiping it with a dry cloth; do not use water or liquid cleaners on the motor housing. Store the tool in a dry, well-ventilated area, inaccessible to children. Keep the auger bit sharp and inspect for damage before each use.
Troubleshooting
If the tool stops due to a kickback event, the green light will flash for 5 seconds; you must wait for this period to elapse before restarting. If an overload occurs, release the trigger, lift the tool from the hole, and consider digging in an alternate location if a large obstruction is present.
Manufacturer information
Ryobi
Practical help
Common problems
Tool stops during operation (Kickback)
Green light flashes for 5 seconds. Wait for the light to stop flashing, lift the tool from the hole, restart, and lower it gently back into the hole.
Tool stops during operation (Overload)
Red light illuminates for 5 seconds. Release the trigger, lift the tool from the hole, and check for large obstructions.
Before use
- Check that all fasteners and caps are tight.
- Ensure the auger bit is properly installed and secured with the locking pin and clip.
- Verify the work area is clear of buried utility lines.
- Wear eye protection (ANSI Z87.1), heavy-duty gloves, and non-slip footwear.
- Ensure the battery pack is fully seated.
Specs in practice
- Auger Bit Diameter
- 6 inches (150 mm).
- Maximum Hole Depth
- 31 inches (800 mm).
Images and diagrams
- Fig 1: Overview of the tool components including switch trigger, lock-out button, handles, and gear box.
- Fig 2-3: Assembly sequence for attaching the auger bit to the drive shaft using the locking pin and clip.
- Fig 4: Battery installation and removal.
- Fig 6: Switch positions for Forward (FWD), Reverse (REV), and Kickback Off.
- Fig 7: Control panel indicators for kickback, overload, and rotation direction.
Model compatibility
- Use only manufacturer-recommended replacement augers.
- Use only designated battery packs.
- Intended for outdoor use only.

Manual page author
Emily Carter
User documentation editor
Prepares concise manual descriptions and highlights the most useful setup, operation, and maintenance information for readers.