Tools / Saws
User Manual for Ryobi 10-inch Table Saw BTS21
Quick guide for the Ryobi 10-inch Table Saw BTS21. Includes assembly instructions, setup, operation, blade adjustments, maintenance, and troubleshooting.
Table of contents
Manual images
Click an image to enlargeQuick Guide from the Manual
This manual provides essential instructions for the safe operation and maintenance of the Ryobi 10-inch Table Saw BTS21. Always read the full safety rules before operating the tool. Key safety requirements include wearing eye protection, keeping hands away from the blade, using the blade guard and anti-kickback pawls for all through-sawing operations, and never performing freehand cuts.
Product Overview
The BTS21 is a 10-inch table saw featuring a sliding miter table, rip fence, and an adjustable leg stand. It is designed for cutting wood and wood composition products. The saw includes a switch assembly with a removable key to prevent unauthorized use.
Assembly
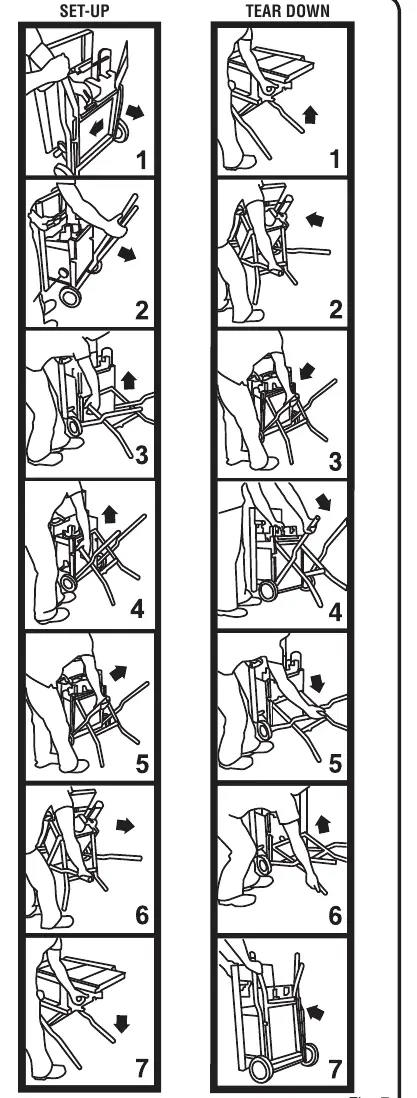
Leg Stand: The saw comes with a foldable leg stand. Follow the setup/tear down sequence carefully to lock the stand in place. If the saw rocks, adjust the leveling foot by turning it clockwise to lower or counterclockwise to raise.
Handle Assembly: Attach the height/bevel adjusting handwheel handle using the provided screw and washer.
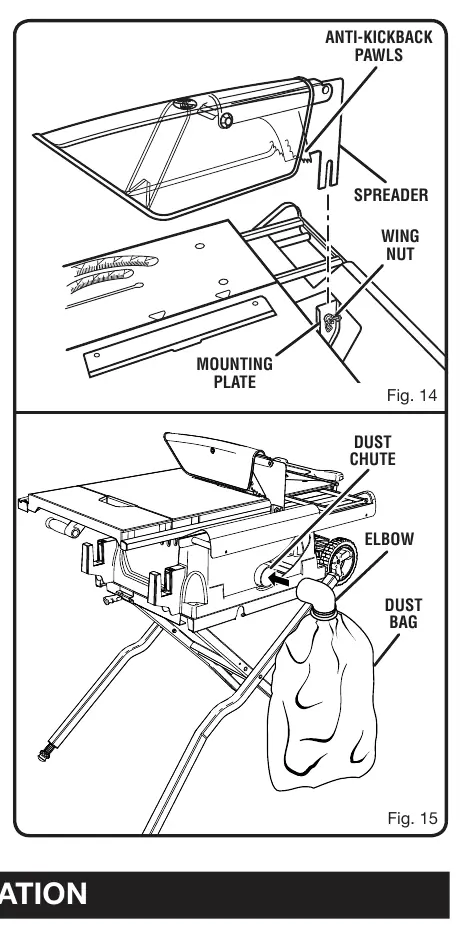
Blade Guard and Dust Bag: Install the blade guard assembly to the mounting plate using the wing nut. Slide the elbow into the dust chute and attach the dust bag.
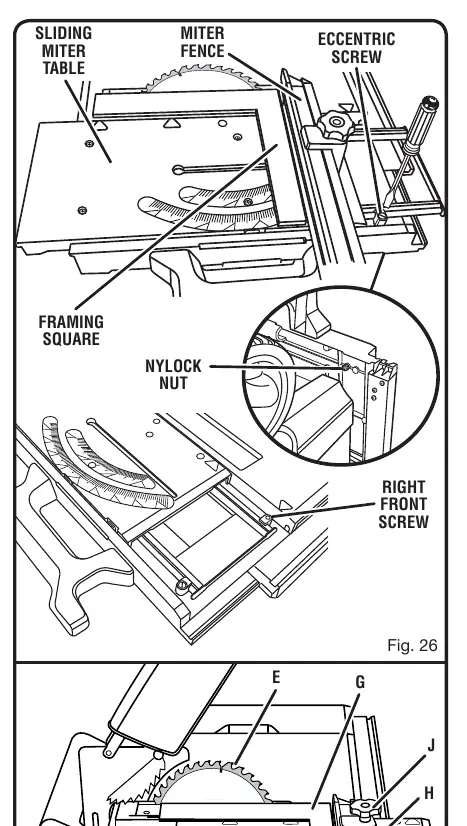
Miter Fence: Install the miter fence to the sliding miter table by aligning the locator pin with the holes in the table and securing it with the lock knob.
Operation
Blade Adjustments: Use the height/bevel adjusting handwheel to set blade depth and angle. Always lock the bevel locking lever after setting the angle.
Rip Fence: To use, place the rear lip on the table, lower the front onto the rail, and push the locking lever down to secure.
Sliding Miter Table: Use the slide bolt to lock or unlock the miter table. Always lock the table when not in use.
Outfeed Support and Table Extension: Pull the outfeed support or table extension to provide additional support for long or wide workpieces.
Adjustments
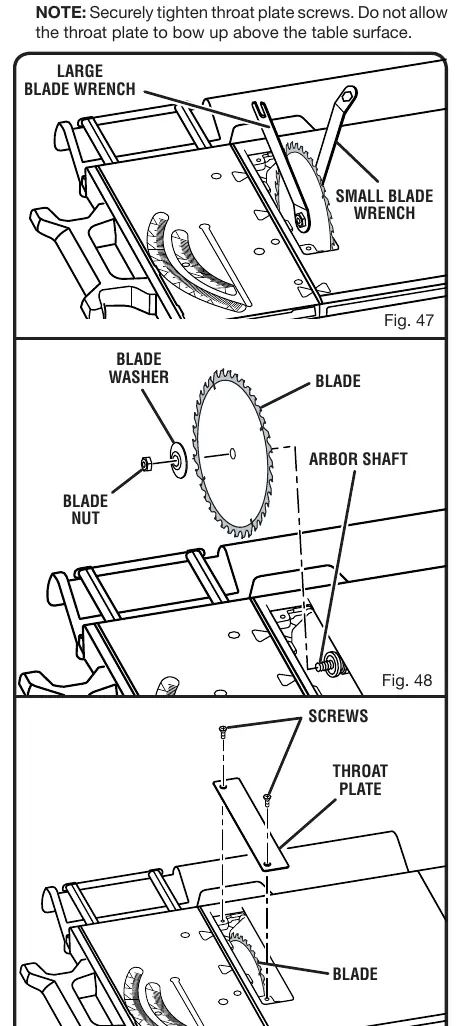
Blade Replacement: Unplug the saw. Use the provided wrenches to loosen the arbor nut (note: left-hand threads). Ensure the new blade teeth point toward the front of the saw.
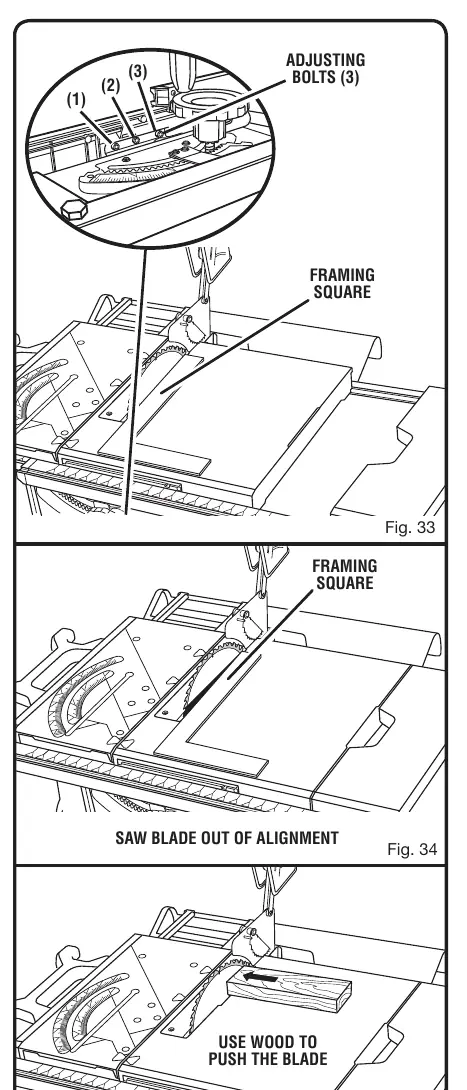
Spreader Alignment: If the spreader is not aligned with the blade, loosen the screws at the back of the saw and reposition the blade guard assembly.
Rip Fence Alignment: Use a framing square to check if the fence is parallel to the blade. If not, loosen the screws on the fence, align it, and retighten.
Maintenance
Periodically check all clamps, nuts, and bolts for tightness. Clean sawdust from underneath the table and blade teeth. Apply paste wax to table surfaces and rails for smooth operation. Do not use aerosol or petroleum solvents on plastic parts.
Troubleshooting
If the saw experiences excess vibration, check that it is securely mounted and the blade is not damaged. If the rip fence does not move smoothly, clean and wax the rails. If the saw does not start, check the power supply, circuit fuse, or circuit breaker.
Manufacturer information
Ryobi
Practical help
Common problems
Excess vibration
Tighten all hardware, ensure the saw is on a flat surface, and check if the blade is damaged or warped.
Rip fence does not move smoothly
Clean and wax the rails.
Cutting binds or burns work
Replace or sharpen the blade, slow the feed rate, or check if the wood is warped.
Saw does not start
Check if the motor cord is plugged in, the circuit fuse is blown, or the circuit breaker is tripped.
Before use
- Ensure the saw is securely mounted to a workbench or leg stand.
- Verify the blade guard, spreader, and anti-kickback pawls are installed.
- Check that the blade is sharp and properly set.
- Ensure the switch is in the OFF position before plugging in.
- Wear safety glasses with side shields.
Specs in practice
- Blade Diameter
- 10 in.
- No Load Speed
- 5,000 RPM
- Cutting Depth (0°)
- 3-1/2 in.
- Cutting Depth (45°)
- 2-1/2 in.
Images and diagrams
- Fig 2: Overview of table saw features including miter fence, rip fence, and switch assembly.
- Fig 7: Instructions for setting up and tearing down the leg stand.
- Fig 17: Overview of the six basic types of cuts.
- Fig 26: Adjusting the miter base using the eccentric screw.
Model compatibility
- Designed for wood and wood composition products only.
- Requires 120V, 60Hz, AC power supply.
- Do not use adjustable dado blades.

Manual page author
Michael Turner
Technical manual editor
Reviews PDF manuals for structure, safety notes, and practical product details so readers can find the right information quickly.