Electronics / USB Hubs & Docking
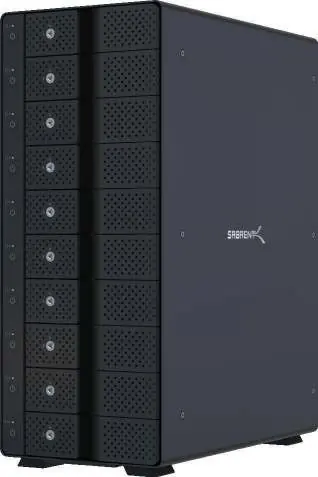
Sabrent 10-Bay 3.5" SATA III HDD Tray-Less Docking Station
Quick installation guide and user manual for the Sabrent 10-Bay 3.5" SATA III HDD Tray-Less Docking Station. Learn how to install hard drives, connect to your computer, and understand LED status indicators.
Table of contents
Manual images
Click an image to enlargeQuick Guide
The Sabrent 10-Bay 3.5" SATA III HDD Tray-Less Docking Station is a high-capacity storage solution designed for easy hard drive management. It features hot-swappable bays, independent power switches for each drive, and USB 3.2 Gen 2 connectivity. This device does not perform hardware RAID; RAID configurations must be managed via software on your computer.
Features
- USB 3.2 Gen 2 Type-C port with up to 10 Gbps transfer speed.
- 10 x SATA III 3.5" hard drive tray-less bays (backward compatible with SATA I and II).
- Hot-swappable design with 10 independent ON/OFF power switches.
- Built-in 120mm fans for cooling.
- Auto-switching internal power supply (AC 100 to 240 volts).
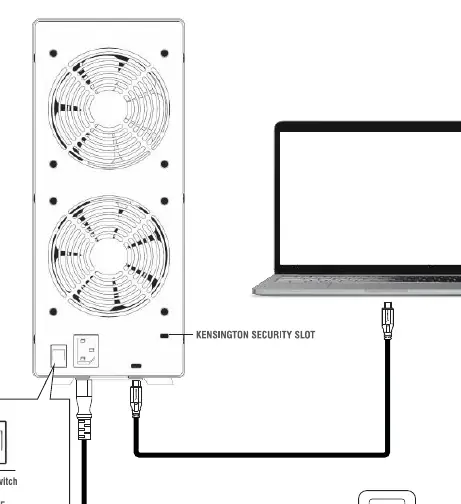
- Kensington security slot.
Package Contents
- 10-Bay Docking Station
- USB Type-C to Type-A cable
- USB Type-C to Type-C cable
- Power cable
- Locking key
- Quick installation guide
Front Panel Detail
The front panel provides access to each of the 10 hard drive slots. Each slot includes:
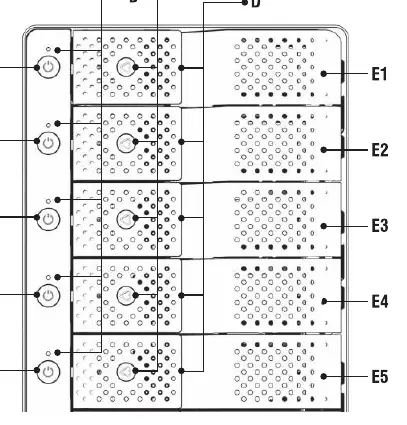
- Independent Power Switch: Turns the specific drive bay on or off.
- Status LED: Indicates the connection status of the drive.
- Door Lock: Used with the provided key to secure the drive bay.
- Door Handle: Used to open the bay for drive installation or removal.
HDD Installation Procedure
- Pull the door handle on the front panel to open the desired HDD bay.
- Carefully insert your 3.5" SATA hard drive into the slot.
- Close the slot door until it clicks into place. This action pushes the disk inward to connect to the internal SATA port. Use the locking key if you wish to secure the bay.
- Connect the docking station to your computer using the appropriate USB cable (Type-C to Type-A or Type-C to Type-C).
- Connect the power cable to the wall outlet and the docking station.
- Turn on the main power switch located on the back of the unit.
- Turn ON the individual power switches for each hard drive on the front panel.
LED Indicator Reference
- Blue: Corresponding disk is connected and online.
- Red: Disk is in SLEEP MODE or USB was ejected.
- LED OFF: Corresponding disk bay is turned off.
Important Notes
- Eject Before Removal: Always use your operating system's EJECT function before removing a disk, turning off the docking station, or opening any hard drive bay to prevent data loss.
- RAID: This device does not support hardware RAID. You can implement RAID arrays via software, such as Microsoft Storage Spaces.
- Compatibility: Compatible with Windows, Mac OS, and Linux.
Manufacturer information
Sabrent
Practical help
Common problems
Disk not recognized by computer
Ensure the drive is fully inserted, the bay door is closed, and the individual power switch for that specific bay is turned ON.
Cannot remove hard drive
Always use the operating system's 'Eject' function before attempting to remove a drive or turn off the bay to avoid data corruption.
RAID array not appearing
This device does not support hardware RAID. You must configure RAID arrays using software solutions like Microsoft Storage Spaces.
Before use
- Verify you have the correct USB cable for your computer (Type-C or Type-A).
- Ensure you have 3.5" SATA hard drives ready (not included).
- Check that the main power switch on the rear panel is set to 'I' (ON).
- Ensure your operating system is Windows, Mac OS, or Linux.
Specs in practice
- USB 3.2 Gen 2
- Provides high-speed data transfer up to 10 Gbps.
- Hot-Swappable
- Allows you to insert or remove drives while the unit is powered, provided the drive is safely ejected via software first.
Images and diagrams
- Front Panel: Shows the layout of the 10 bays, including power switches, status LEDs, and door locks.
- Rear Panel: Shows the main power switch, power input, USB port, and Kensington security slot.
Model compatibility
- Compatible with Windows, Mac OS, and Linux.
- Supports 3.5" SATA I, II, and III hard drives.
- Does not support hardware RAID.

Manual page author
Emily Carter
User documentation editor
Prepares concise manual descriptions and highlights the most useful setup, operation, and maintenance information for readers.