Home / Window Treatments
Installation Guide for SelectBlinds 2 Inch Value Privacy Faux Wood Blinds
Step-by-step installation instructions for SelectBlinds 2 Inch Value Privacy Faux Wood Blinds. This guide covers tools required, bracket placement for inside and outside mounts, valance and wand assembly, and operating instructions for...
Table of contents
Manual images
Click an image to enlargeQuick Guide for Installation
This guide provides instructions for installing SelectBlinds cordless faux wood blinds. Before beginning, ensure you have the necessary tools and verify your mounting type (inside or outside mount). Note that blinds wider than 37 inches require a center support bracket.
Tools Required
To install your blinds, you will need the following tools:
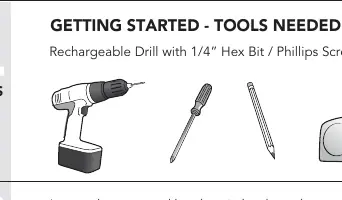
- Rechargeable drill with 1/4 inch hex bit
- Phillips screwdriver
- Pencil
- Tape measure
Unpacking and Preparation
Carefully unpack the hardware box and identify all components. The quantity of parts will vary based on the size of your blind. Ensure you have the following:
- Installation brackets
- Valance clips
- Center support bracket (only for blinds over 37 inches wide)
- End caps for hold-downs (if applicable)
- Hold-down brackets (if requested)
- Installation screws
Bracket Placement
Determine if you are performing an inside mount or an outside mount:
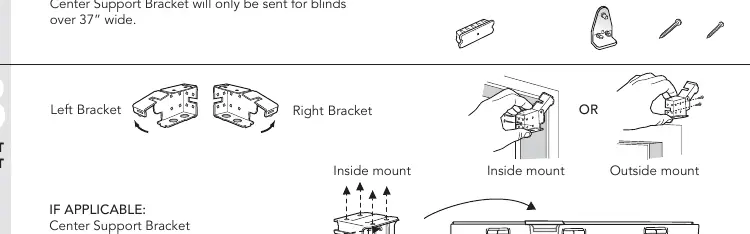
- Inside Mount: Attach brackets inside the window frame.
- Outside Mount: Attach brackets to the wall or window trim.
- Center Support: If your blind is over 37 inches wide, install the center support bracket to prevent sagging.
Valance and Wand Assembly
Prepare the valance and wand before final installation:
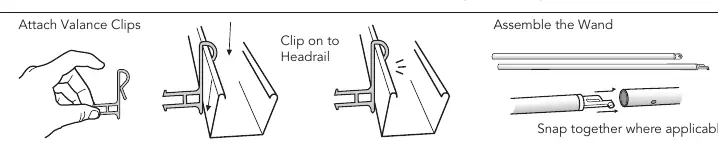
- Attach the valance clips to the headrail.
- Assemble the wand by snapping the pieces together where applicable.
Finishing Installation
Complete the installation by following these steps:
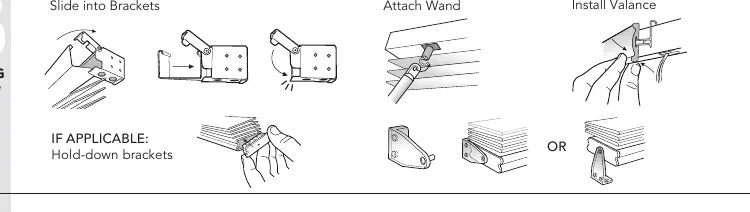
- Slide the headrail into the installed brackets.
- Attach the wand to the mechanism.
- Install the valance onto the headrail clips.
- If you have hold-down brackets, attach them to the bottom rail.
Operating Instructions
To operate your cordless blinds:
- Raise or Lower: Lift or lower the bottom rail to the desired height.
- Tilt Slats: Turn the wand to open or close the slats to the desired amount.
- Note on Height: This product is manufactured with up to 6 inches of additional height. Blinds over 84 inches may include up to 10 inches of additional height. This is normal and not considered a defect.
Practical help
Common problems
Blind height is longer than ordered
This is normal. The product is made with up to 6 inches of additional height, or up to 10 inches for blinds over 84 inches.
Before use
- Ensure you have a rechargeable drill with a 1/4 inch hex bit.
- Verify you have a Phillips screwdriver, pencil, and tape measure.
- Check if your blind is over 37 inches wide; if so, you must install the center support bracket.
- Confirm if you requested hold-down brackets, as they are only included if specified.
- Determine if you are doing an inside or outside mount before drilling.
Specs in practice
- Center Support Bracket
- Required for all blinds wider than 37 inches to provide necessary structural support.
- Hold-down brackets
- Optional hardware used to secure the bottom rail; only included if requested.
Images and diagrams
- The installation guide illustrates the difference between inside mount (brackets inside the frame) and outside mount (brackets on the wall/trim).
- Visuals show the specific orientation for attaching the wand and valance clips to the headrail.
Model compatibility
- This guide applies to cordless faux wood blinds.
- Center support is mandatory for widths exceeding 37 inches.

Manual page author
Michael Turner
Technical manual editor
Reviews PDF manuals for structure, safety notes, and practical product details so readers can find the right information quickly.