Home / Window Treatments
Installation Guide for Style Selections Drapery Rod
Quick installation guide for Style Selections drapery rods. Includes step-by-step mounting instructions, parts list, troubleshooting tips, and maintenance advice for models FSI 1457 and FSI 1172.
Table of contents
Manual images
Click an image to enlargeQuick Guide from the Manual
This guide provides instructions for installing Style Selections drapery rods. The estimated assembly time is 30 minutes. Ensure you have all parts listed in the package contents before beginning. If mounting to drywall, you will need a 3/16-inch drill bit for the wall anchors.
Preparation
Before starting, compare all parts with the package contents and hardware lists. Do not attempt to assemble if any parts are missing or damaged. Tools required (not included): drill, screwdriver, and a level.
Installation Steps
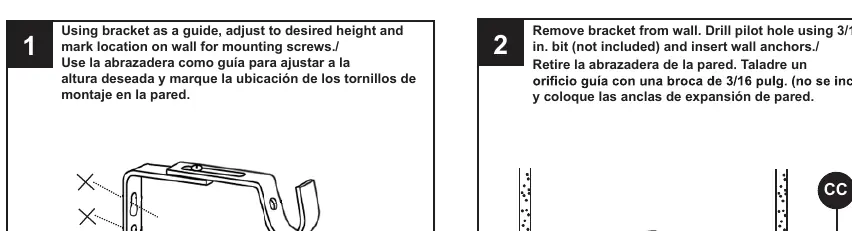
- Marking: Use the bracket as a guide to determine the desired height. Mark the location on the wall for the mounting screws.
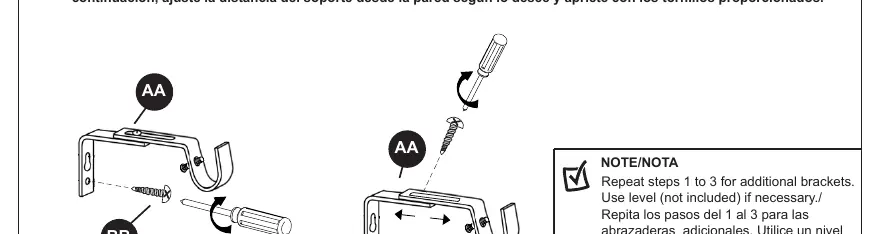
- Drilling: Remove the bracket from the wall. Drill a pilot hole using a 3/16-inch bit and insert the wall anchors. Note that anchors are not needed for all installation types (e.g., if mounting directly into wall studs).
- Mounting: Attach the adjustable bracket to the wall using the provided screws. Adjust the bracket distance from the wall as desired and tighten the screws. Repeat these steps for additional brackets.
- Fitting: Fit the rod with your drapes (not included) onto the mounting brackets. Position the finials as desired.
- Securing: Tighten the screws on each bracket to secure the rod in place.
Troubleshooting
- Drapery rod not level: Ensure the drapery hooks are installed correctly. Use a level during installation.
- Drapery rod hook is loose: Ensure the hooks are anchored correctly. Attach hooks to wall studs if possible; otherwise, use the supplied anchors and screws.
Care and Maintenance
Clean the rod with a soft cloth. Do not use abrasive cleaning agents, solvents, or polishes, as they may damage the finish.
Practical help
Common problems
Drapery rod is not level
Ensure the brackets are installed correctly and use a level during the installation process.
Drapery rod hook is loose
Ensure the hooks are anchored correctly. If possible, attach hooks directly to wall studs. If not, use the supplied anchors and screws.
Before use
- Verify all parts are present against the package contents list
- Ensure you have a 3/16-inch drill bit
- Have a screwdriver and level ready
- Determine if you are mounting into wall studs or drywall
- Check that the rod length matches your window requirements
Specs in practice
- Estimated Assembly Time
- Approximately 30 minutes
- Pilot Hole Size
- 3/16 inch for wall anchors
Images and diagrams
- Bracket mounting: Shows how to use the bracket as a template to mark screw locations on the wall.
- Rod assembly: Illustrates fitting the rod onto the brackets and securing it with screws.
Model compatibility
- Wall anchors are not required for all installation types, such as when mounting directly into wall studs.

Manual page author
Emily Carter
User documentation editor
Prepares concise manual descriptions and highlights the most useful setup, operation, and maintenance information for readers.