Lighting / Fixtures
User Manual for Allen + Roth 1-Inch Durable Cordless Light Filtering Mini Blind
Comprehensive user manual for the Allen + Roth 1-Inch Durable Cordless Light Filtering Mini Blind. Includes step-by-step installation instructions, operating procedures, maintenance tips, and troubleshooting information.
Table of contents
Manual images
Click an image to enlargeQuick Guide from the Manual
This guide provides essential information for installing and operating your Allen + Roth 1-Inch Durable Cordless Light Filtering Mini Blind. Before beginning, ensure you have all necessary parts and tools. The estimated assembly time is 30 minutes. If any parts are missing or damaged, do not attempt to install the product.
Package Contents
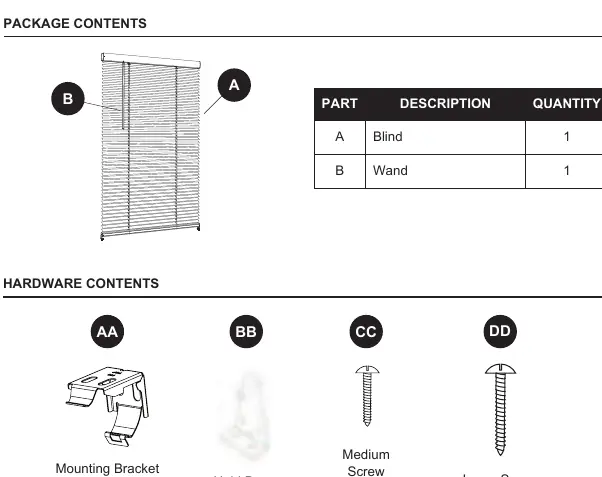
- A: Blind
- B: Wand
- AA: Mounting Bracket (Qty 2 for 23-47 in. blinds, Qty 3 for 48-72 in. blinds)
- BB: Hold Down Bracket (Qty 2)
- CC: Medium Screw (Qty 4)
- DD: Large Screw (Qty 4 for 23-47 in. blinds, Qty 6 for 48-72 in. blinds)
Assembly Instructions
1. Preparation and Measuring: Lay the closed blind on a flat surface. Measure 7 inches in from the left and right sides of the head rail and mark with a pencil. These are your mounting bracket (AA) locations. For blinds over 47 inches wide, a center bracket is required; measure and mark the center point.
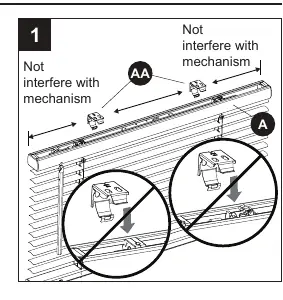
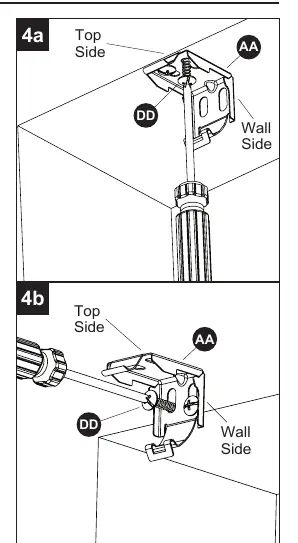
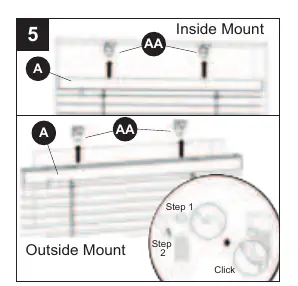
2. Mounting Brackets: Choose your mounting type (inside or outside mount). Position the blind in the mounting location and mark the mounting surface to align with the marks on the head rail. Line up the mounting brackets (AA) with your marks, pre-drill the screw holes, and secure the brackets to the wall or window molding using the large screws (DD).
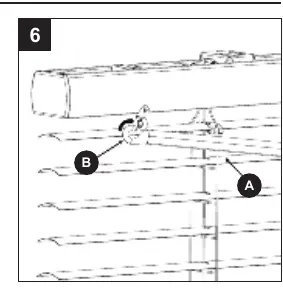
3. Installing the Blind: Lift the head rail into position. Slide the inner front edge of the head rail into the slot at the front of each mounting bracket (AA). Push the head rail upward until the flexible tab at the bottom of each bracket snaps onto the back of the head rail. Ensure it is securely in place.
4. Wand Installation: Hook the wand (B) into the loop on the left side of the head rail.
5. Hold Down Brackets (Optional): If using hold down brackets (BB), lower the blind to the desired position. Screw the brackets into the wall or window sill using medium screws (CC). Connect the brackets to the holes on the bottom rail.
Operating Instructions
Raising and Lowering: Grasp the bottom rail and raise or lower the blind to the desired height.
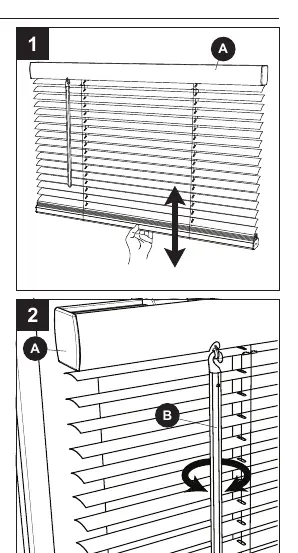
Tilting Slats: Grasp the wand (B) and turn it until the slats are opened or closed to the desired amount.
Care and Maintenance
Clean the blind using a damp cloth, a duster, or a vacuum cleaner with appropriate attachments.
Support
For questions, missing parts, or warranty service, contact customer service at 866-439-9800 (8 a.m. - 8 p.m. EST, Monday - Sunday) or via email at [email protected].
Manufacturer information
Allen + Roth
Practical help
Common problems
Blind is not level
Check that mounting brackets are aligned correctly and that the head rail is fully snapped into all brackets.
Missing parts
Do not attempt to install. Contact customer service at 866-439-9800 for assistance.
Difficulty snapping head rail into brackets
Ensure the inner front edge of the head rail is fully inserted into the slot at the front of the bracket before pushing upward.
Before use
- Verify all parts are present (Blind, Wand, Brackets, Screws).
- Gather required tools: Pencil, safety goggles, Phillips screwdriver, tape measure, level, drill, 1/16 in. bit.
- Have a step stool available for easier installation.
- Determine if you are performing an inside or outside mount.
- Measure the window area to ensure the blind size is appropriate.
Images and diagrams
- Mounting brackets (AA) must be installed 7 inches from each end of the head rail.
- Blinds wider than 47 inches require a center bracket for support.
- The flexible tab on the bottom of the mounting bracket must snap onto the back of the head rail to secure the blind.
Model compatibility
- Suitable for both inside and outside window mounts.
- Center bracket is mandatory for blinds over 47 inches in width.

Manual page author
Emily Carter
User documentation editor
Prepares concise manual descriptions and highlights the most useful setup, operation, and maintenance information for readers.