Home / Window Treatments
Installation and Operation Guide for Select Blinds Honeycomb Shades (Motorized Wand)
A complete installation and operation guide for Select Blinds Honeycomb Shades with Motorized Wand. Includes step-by-step mounting instructions, remote linking, motor limit adjustments, battery charging, and maintenance tips.
Table of contents
Manual images
Click an image to enlargeQuick Guide
This guide covers the installation and operation of Select Blinds Honeycomb Shades with a Motorized Wand. Before beginning, ensure you have all necessary tools: a pencil, measuring tape, Phillips screwdriver, carpenter's level, and a power drill. The installation process involves mounting brackets, attaching the headrail, and linking the remote. Regular maintenance includes charging the motor when operation slows and cleaning the fabric using gentle methods.
Installation
The installation brackets are compatible with both inside and outside mounts. Ensure all brackets are level and aligned for proper shade operation. Use the following bracket quantity guidelines based on shade width: up to 38" (2 brackets), 38-1/8" to 72" (3 brackets), and over 72-1/8" (4 brackets).

Inside Mount
For inside mounts, screw the installation brackets through the top two holes into the window sill. Ensure you account for any clearance depth required to avoid obstructions like window cranks or handles.
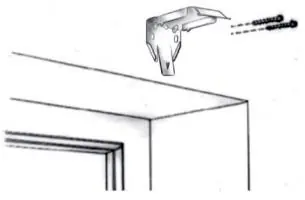
Outside Mount
For outside mounts, screw the standard installation brackets through the two back holes into the desired location. A minimum surface height of 1-1/2" is required.
Attaching the Wand and Headrail
Remove the wand hanger from the headrail by squeezing the bottom on both sides. Insert the post into the internal L hanger, then reattach to the headrail. Plug the control wire into the wand wire. To mount the headrail, tilt it slightly backward to angle the front inside lip into the brackets, then push back and upward until it snaps into place.
Operation
The shade is operated using the UP, DOWN, and STOP/FAVORITE buttons on the wand or remote. Tapping the buttons moves the shade in short steps; holding them for more than 2 seconds initiates standard speed.
Linking a Remote
If the shade is not linked, select the desired channel on the remote. Press the SETTING button on the motor until it beeps. Release the button, then press the CONFIRM button on the remote during the sequence of long beeps. The motor will respond with 3 fast beeps to confirm the link.
Adjusting Motor Limits
Limits are factory-set but can be adjusted. Press the SETTING button on the back of the wand until the motor stops beeping to clear existing limits. Use the UP/DOWN buttons to position the shade, then press the SETTING button to save the new upper or lower limit.
Maintenance
Charging the Motor
When the shade operates slowly or only beeps, charge the battery. Plug the 8.4v charger into the port on the wand and connect to an electrical outlet. A red light indicates charging; allow at least 1 hour of charging after the light turns green (typical cycle: 4-6 hours).
Cleaning
Honeycomb shades are made of anti-static, dust-resistant fabric. Use a feather duster or a hand-held vacuum with low suction for regular cleaning. For spot cleaning, use a cloth dampened with warm water and mild detergent; do not rub the fabric. Deep cleaning involves immersing the shade in warm water and mild detergent, but do not immerse Blackout fabrics, the headrail, or the wand.
Safety
Inner or exposed cords pose a strangulation hazard to young children. Always keep cords out of reach and move cribs, playpens, and furniture away from window coverings. Do not remove permanent warning labels from the bottom rail.

Practical help
Common problems
Motor does not work or runs slowly
Recharge the battery using the 8.4v charger.
Shade moves in the opposite direction of control buttons
Press and hold the SETTING button, then press and hold the STOP button until the motor jogs (approx. 10 seconds).
Remote control range is short or indicator light does not shine
Replace the battery in the remote (CR2430 lithium).
Limit setting is incorrect
Reset the limits by clearing the factory settings (press SETTING button until motor stops beeping) and following the limit adjustment procedure.
Before use
- Pencil or Marker
- Measuring Tape
- Phillips Screwdriver
- Carpenter's Level
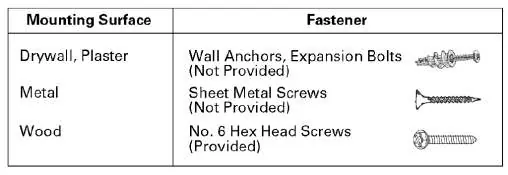
- Mounting Fasteners (appropriate for your surface)
Specs in practice
- Remote Battery
- CR2430 lithium battery.
- Bottom Rail Adjustment
- Half a revolution of the adjustment screw equals 1/4" of movement (max 1/2").
Images and diagrams
- Bracket mounting: Shows how to secure brackets for inside vs. outside mounts.
- Wand attachment: Illustrates the correct way to insert the hanger post and connect wires.
- Bottom rail adjustment: Shows using a screwdriver or dime to level the shade.
Model compatibility
- Not for commercial orders.
- Blackout fabrics require special care: do not immerse in water.
- Do not immerse the headrail, any fabric-wrapped rail, or the wand in water.

Manual page author
David Miller
Documentation analyst
Organizes user manual content into clear summaries, with attention to model details, product context, and everyday usability.