Electronics / Radio Antennas
802.1X Configuration Guide for Sennheiser TeamConnect Ceiling 2/M
A comprehensive guide for configuring 802.1X network authentication on Sennheiser TeamConnect Ceiling 2 and M microphone arrays. Includes instructions for SSH connection, authentication methods (EAP-TLS, EAP-PEAP), and file management.
Quick answers from the manual
Quick answer
- To configure 802.1X, connect via SSH using the 'pnac' username and the provided SSH key pair. Use the command-line menu to set the system time, select an authentication method (EAP-TLS or EAP-PEAP), and upload the required certificates via SCP. p. 3, 4, 6, 9
Key actions
- Connect via SSH p. 4, 5, 6
- Set System Time p. 9
- Configure 802.1X p. 9, 10, 11
First start
- Connect via SSH, set a new password, and verify system time before proceeding with 802.1X configuration. p. 5, 8, 9
Problems and fixes
SSH connection issues
Check key permissions (chmod 600) and ensure correct key file is used.
p. 6Maintenance and reset
- To erase 802.1X configuration, press the physical reset button on the device for 5 seconds. p. 8, 12
Where to find it in the PDF
- Prerequisites and Connection p. 3
- SSH Configuration (PuTTY) p. 4, 5
- SSH Configuration (Command Line) p. 6
- 802.1X Configuration Steps p. 8, 9, 10, 11
Table of contents
Manual images
Click an image to enlargeQuick Guide: 802.1X Configuration
The 802.1X configuration for the TeamConnect Ceiling 2 (TCC2) and TeamConnect Ceiling M (TCCM) requires an SSH connection to the device. You must perform two parallel tasks: configuring the settings via the SSH interface and transferring necessary files (certificates/keys) via SCP.
- SSH Client: PuTTY or standard command line SSH.
- SCP Client: PuTTY PSCP or standard command line SCP.
- SSH Keys: Must be downloaded from the official Sennheiser website.
- Default Username: pnac
SSH Connection
To begin, establish a secure shell session. The device uses auto-IP mode (DHCP or 169.254.0.0/16). You can use the Sennheiser Control Cockpit software to discover the IP address.
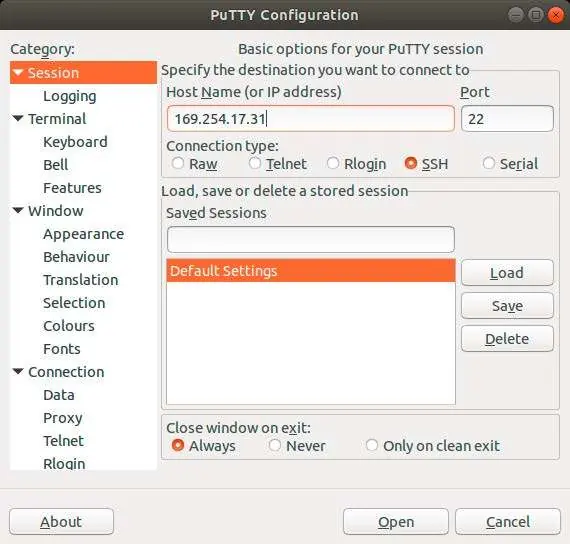
Using PuTTY:
- Under Session, enter the device IP address and set the port to 22 (SSH).
- Under Connection > SSH > Auth, browse for the pnac_key.ppk file.
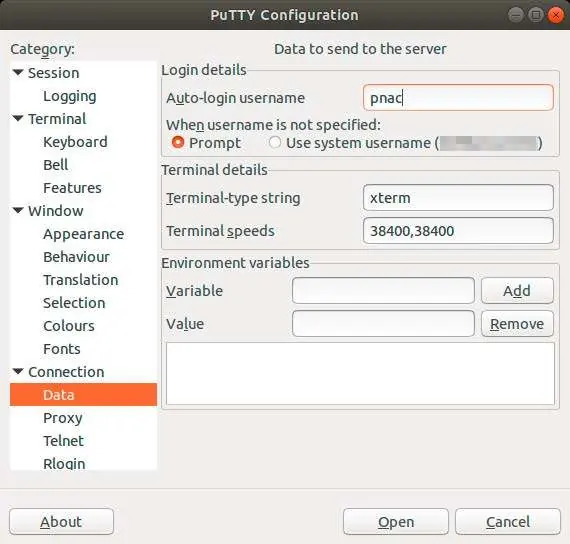
- Under Connection > Data, enter pnac as the Auto-login username.
- Press Open to connect.
Using Command Line:
Use the command: ssh -i identity_file pnac@hostname. Ensure the key file permissions are set to 600 if the connection fails due to security warnings.
Configuring 802.1X
Upon the first connection, you will be prompted to set a password. Once logged in, you will see the configuration menu with the following commands:
- p: Print current configuration.
- c: Step-by-step configuration.
- r: Remove and deactivate configuration.
- d: Set date and time.
- w: Change password.
- q: Quit.
Important: Always set the system time (command d) first, as certificates have validity periods that require accurate time.
Authentication Methods
The device supports two methods:
- EAP-TLS: Requires a client certificate, private key, and a Certificate Authority (CA) list.
- EAP-PEAP (PEAPv0/EAP-MSCHAPv2): Requires a username, password, and a CA list.
Use the c command to start the wizard and follow the on-screen prompts to upload the required files via SCP and enter the necessary credentials.
Removing Configuration
If you need to remove the 802.1X configuration, use the r command in the SSH menu. This will delete all certificates and keys. Note that this action cannot be undone and requires a reboot to take effect.
Factory Reset Note
Performing a factory reset via the Control Cockpit will not remove the 802.1X configuration. To erase the 802.1X configuration and password, you must press the physical reset button on the device for 5 seconds.
Manufacturer information
Sennheiser
Practical help
Common problems
SSH connection fails or is refused
Ensure you are using the correct SSH key pair and that file permissions are set to 600 (on Linux/macOS). Verify the device IP address.
File upload via SCP fails
Ensure you are using the specific SCP key (pnac-ft_key) and not the SSH connection key. The device differentiates between these two keys.
Configuration wizard fails due to certificate errors
Ensure the system time is set correctly using the 'd' command. Certificates have validity periods that will cause errors if the device time is incorrect.
Before use
- Download the required SSH key pair from the Sennheiser website (tcc2 or tccm pages).
- Install an SSH client (e.g., PuTTY) and an SCP client (e.g., PSCP).
- Identify the device IP address using DHCP logs or Sennheiser Control Cockpit.
- Verify network connectivity by pinging the device IP.
Images and diagrams
- PuTTY Session configuration screen showing IP and port settings.
- PuTTY SSH Authentication screen showing where to load the private key file.
- PuTTY Data screen showing where to enter the 'pnac' username.
Model compatibility
- PFX or PKCS#12 certificate formats are not supported and must be converted before use.
- WinSCP is not supported; use standard SCP or PuTTY PSCP.

Manual page author
Emily Carter
User documentation editor
Prepares concise manual descriptions and highlights the most useful setup, operation, and maintenance information for readers.