Optics / Digital Binoculars
User Manual for Sharper Image 12X Zoom Digital Camera Binoculars
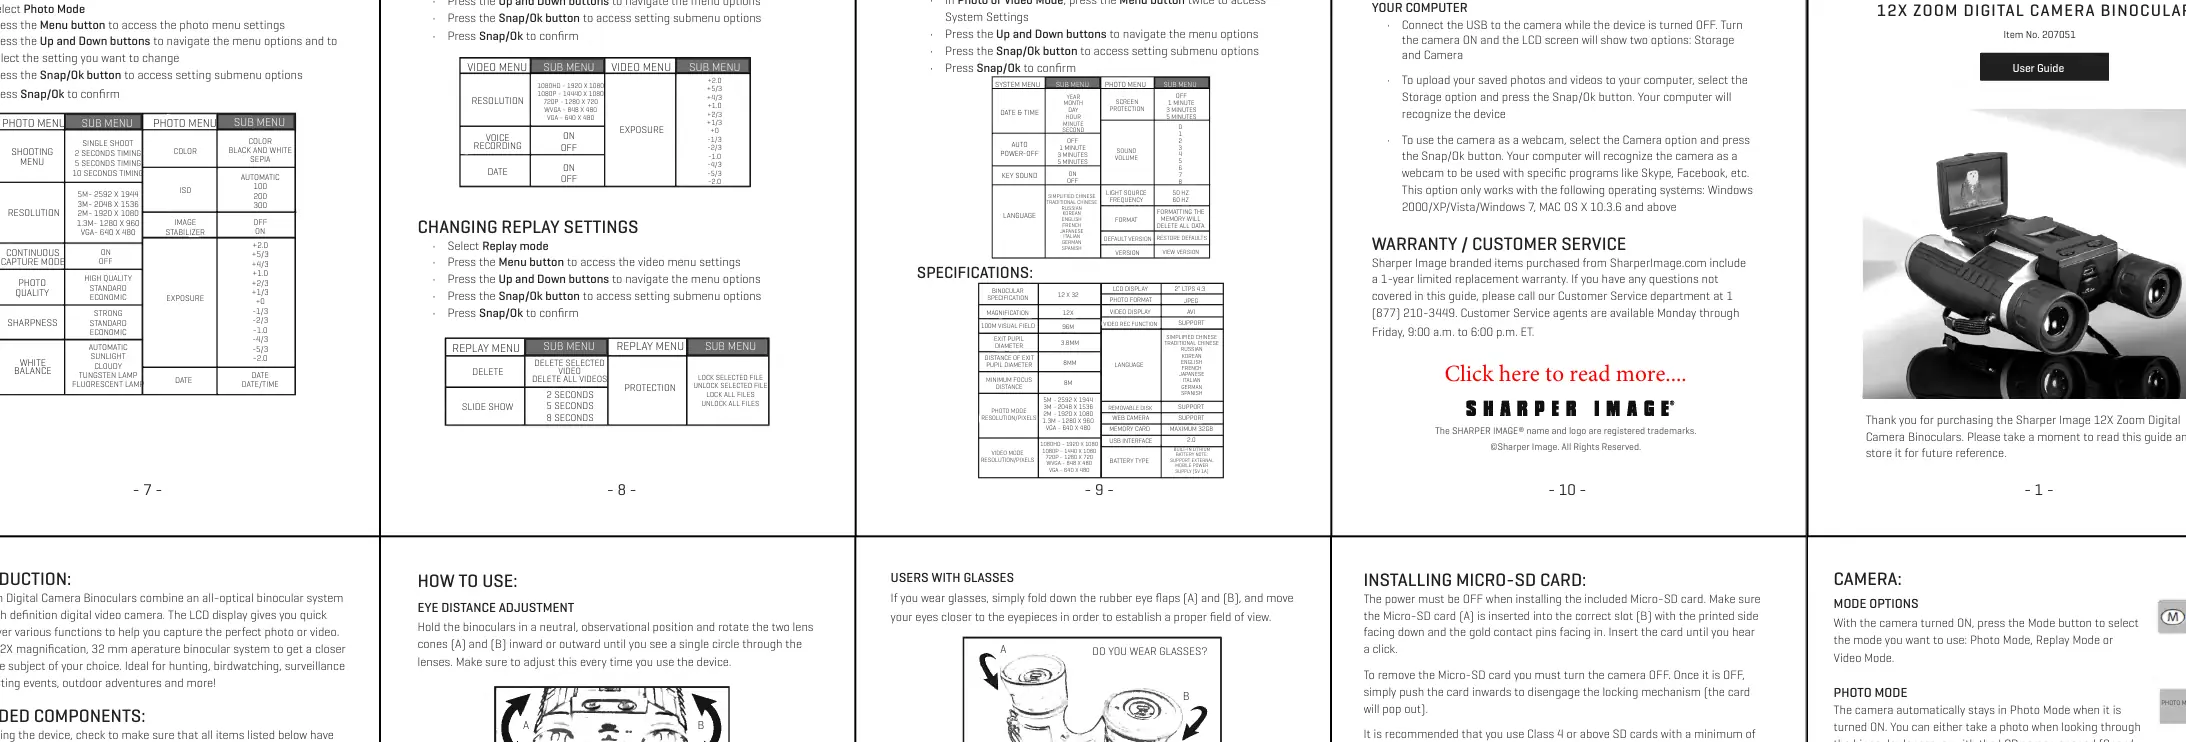
Quick guide for the Sharper Image 12X Zoom Digital Camera Binoculars (Item No. 207051). Learn how to adjust focus, install a Micro-SD card, navigate camera modes, and connect to a computer.
Table of contents
Quick guide from the manual
This guide covers the operation of the Sharper Image 12X Zoom Digital Camera Binoculars. Before use, ensure the device is charged via USB and a Micro-SD card (Class 4 or higher) is installed. The device features three main modes: Photo, Video, and Replay, which can be navigated using the Mode button.
Device Overview and Components
The package includes the binoculars, USB cable, neck strap, lens cloth, and Micro-SD card slot. Key controls include the Power button, Menu button, Up/Down navigation buttons, Snap/Ok button, and Mode button. The device also features a tripod connector for stable recording.
Getting Started
Eye Distance Adjustment
Hold the binoculars in a neutral position. Rotate the two lens cones (A) and (B) inward or outward until you see a single circle through the lenses. This should be adjusted every time you use the device.
Focusing
1. Close your right eye and observe with your left eye. Rotate the central focusing knob (A) until the image is clear.
2. Close your left eye and observe with your right eye. Rotate the right adjustable eyepiece (B) until the image becomes clear.
3. Once set, you only need to use the central focusing knob to focus on targets.
Users with Glasses
If you wear glasses, fold down the rubber eye flaps (A) and (B) to move your eyes closer to the eyepieces for a proper field of view.
Installing Micro-SD Card
The power must be OFF when installing the card. Insert the Micro-SD card into the slot with the printed side facing down and the gold contact pins facing in until you hear a click. To remove, turn the power OFF and push the card inwards to disengage the locking mechanism.
Camera Operation
- Photo Mode: The camera defaults to this mode when turned on. You can take photos while looking through the lenses or using the LCD screen.
- Video Mode: Press the Mode button to switch to video mode, then press the Snap/Ok button to start recording. Press again to stop.
- Replay Mode: Press the Mode button to switch to Replay Mode. Use the Up and Down buttons to select photos or videos, and press Snap/Ok to play or review.
Settings and Menus
To access settings, select the desired mode (Photo, Video, or Replay) and press the Menu button. For System Settings, press the Menu button twice while in Photo or Video mode. Use the Up/Down buttons to navigate and Snap/Ok to confirm selections.
PC and Mac Connection
Connect the USB cable to the camera while it is turned OFF. Turn the camera ON; the LCD will show 'Storage' and 'Camera' options.
- Storage: Select this to upload photos and videos to your computer.
- Camera: Select this to use the device as a webcam (compatible with Skype, Facebook, etc.).
Maintenance and Battery
The device has a built-in rechargeable Lithium battery that charges via USB. When the battery is low, the LCD displays 'Battery Low' and a red indicator light turns on. Clean lenses using a clean microfiber cloth and recommended liquid cleaning products. Do not clean the inside of the device.
Manufacturer information
Sharper Image
Practical help
Common problems
LCD displays 'Battery Low' and red light
Connect the device to a computer via USB cable to recharge the built-in battery.
Video quality is poor or recording fails
Ensure you are using a Class 4 or higher SD card. Low-speed cards do not support 1080p recording.
Image is blurry
Perform the two-step focusing process: adjust the central knob for the left eye, then the right eyepiece for the right eye.
Before use
- Check that all components (USB cable, strap, lens cloth) are included.
- Charge the built-in battery using the USB cable.
- Insert a Micro-SD card (Class 4 or higher, max 32GB).
- Adjust eye distance by rotating lens cones.
- Perform the focusing procedure for both eyes.
Specs in practice
- Magnification
- 12X optical zoom capability.
Images and diagrams
- Eye distance adjustment: Rotate lens cones (A) and (B) until a single circle is visible.
- Focusing: Close right eye, rotate central knob (A). Close left eye, rotate right eyepiece (B).
- Micro-SD installation: Insert with printed side down and pins facing in until it clicks.
Model compatibility
- Webcam mode is compatible with Windows 2000, XP, Vista, 7, and MAC OS X 10.3.6 and above.

Manual page author
Michael Turner
Technical manual editor
Reviews PDF manuals for structure, safety notes, and practical product details so readers can find the right information quickly.