Optics / Digital Binoculars
User Manual for Vivitar 10x25 Digital Camera Binoculars
Quick guide for the Vivitar 10x25 Digital Camera Binoculars. Learn how to install batteries, operate camera modes, install software, and download photos to your computer.
Table of contents
Manual images
Click an image to enlargeQuick Guide from the Manual
This document provides instructions for the Vivitar 10x25 Digital Camera Binoculars. Key operations include installing two AAA batteries, using the mode button to navigate settings, and connecting the device to a PC via USB to download photos. Important: Do not connect the camera to your computer before installing the provided software.
What Your Camera Includes
- One digital 10x25 camera binoculars
- One USB connection cable
- One software and driver CD
- One product manual
Minimum System Requirements
To use the camera software, your computer must meet the following requirements:
- Windows 2000/XP: Pentium III or equivalent, 128MB RAM, 150MB free disk space, CD/DVD ROM drive, USB port, 1024x768 resolution.
- Windows Vista (32-bit): 1GHz or higher processor, 512MB RAM, 150MB free disk space, CD/DVD ROM drive, USB port, DirectX 9 capable graphics card, 1024x768 resolution.
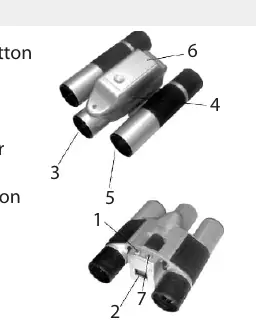
Camera Overview
The camera features a startup/mode button, LCD display, optical shooting lens, USB socket, telescope viewfinder, battery compartment, and a shutter/OK button.
Getting Started
Battery Installation: Slide open the battery compartment at the bottom. Insert two AAA alkaline batteries according to the polarity (+/-) markings. Close the compartment. If the LCD displays "Lo" or flashes, replace the batteries immediately. Warning: Download photos before opening the battery compartment, as removing batteries will erase stored photos.
Operating the Camera
Starting: Press and hold the mode button for about 2 seconds to turn the camera on. The camera will beep when ready.
Taking Photos: Compose your shot using the viewfinder, hold steady, and press the shutter button. The camera beeps when a photo is taken. If the camera fails to beep or displays "0", the memory is full.
Camera Modes: Use the mode button to cycle through settings on the LCD:
- OFF: Turns the camera off.
- St: Self-timer (10 seconds).
- Ct: Continuous shooting mode.
- CP/nP: Compression settings (CP = high compression, nP = no compression).
- AI: Record video.
- CL/CA: Clear last photo / Clear all photos.
- Hr/Lr: High/Low resolution.
- F5/F6: Light frequency (50Hz/60Hz).
Light Frequency: Set this according to your region to avoid distortion. Use 60Hz for the United States and Asia, and 50Hz for Japan and Europe.
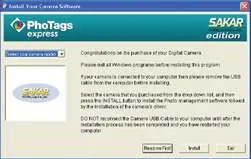
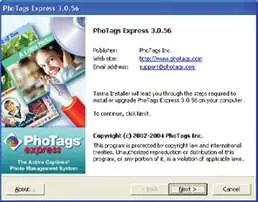
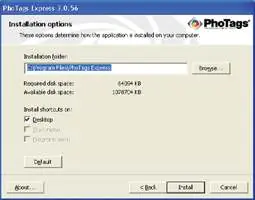
Software Installation
Important: Ensure the camera is NOT connected to the computer during installation. Insert the CD, select your camera model from the dropdown list, and click "Install" to set up PhoTags Express and the camera driver. Follow the on-screen prompts and restart your computer if required.
Downloading Photos
- Connect the camera to your computer using the USB cable.
- Turn the camera on.
- Launch the "PhoTags Express" program from your desktop.
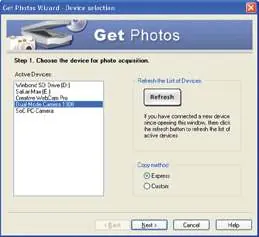
- Click the "Get Photos" button.
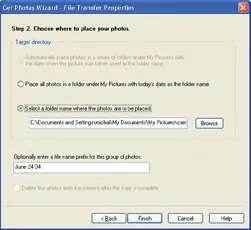
- Follow the wizard to select your device and transfer photos to your computer.
Practical help
Common problems
Camera fails to beep or '0' appears on LCD
The memory is full. Download or clear existing photos from the camera.
LCD flashes or displays 'Lo'
Batteries are low. Replace with two new AAA alkaline batteries.
Photos or videos appear distorted
Incorrect light frequency setting. Set to 60Hz for US/Asia or 50Hz for Japan/Europe.
Software installation fails
Ensure the camera is not connected to the computer via USB before starting the installation process.
Before use
- Insert two AAA alkaline batteries.
- Verify computer meets minimum system requirements (Windows 2000/XP/Vista).
- Ensure camera is disconnected from PC before installing software.
- Set the correct light frequency (50Hz or 60Hz) for your region.
Specs in practice
- Internal Memory
- 16Mbit SDRAM storage.
- Exposure Speed
- 1/60 to 1/1500 seconds.
- Imaging Speed
- 12 pictures per second.
Images and diagrams
- 1: Startup/Mode Button
- 2: LCD Display Screen
- 3: Optical Shooting Lens
- 4: USB Socket
- 5: Telescope and Viewfinder
Model compatibility
- Requires Windows 2000, XP, or Vista (32-bit only).

Manual page author
David Miller
Documentation analyst
Organizes user manual content into clear summaries, with attention to model details, product context, and everyday usability.