Lighting / Fixtures
Signature Hardware Bankloft 1-Light Semi-Flush Mount Light
Installation and safety guide for the Bankloft 1-Light semi-flush mount fixture, providing step-by-step instructions for electrical connection and assembly.
Table of contents
Manual images
Jump to the sectionProduct Overview
The Bankloft 1-Light semi-flush mount light is a stylish and functional lighting fixture designed for indoor ceiling installation. This manual provides all necessary steps to ensure a safe and secure setup of your new lighting fixture. Before beginning the installation, please ensure that you have all the required tools and materials on hand, and inspect the product for any potential shipping damage.
Safety Precautions
Safety is the most important aspect of any electrical installation. Always ensure that the electricity to the wires you are working on is completely shut off at the circuit breaker or by removing the fuse before starting. Never attempt to hang a fixture directly from house electrical wires. Additionally, do not install this fixture on a ceiling that contains a radiant heating system. If you are unfamiliar with electrical wiring or unsure about any part of the installation process, it is highly recommended that you consult a qualified electrician.
Installation Process
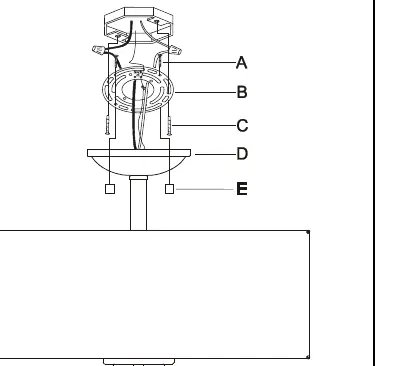
The installation is divided into two main phases: mounting the fixture to the ceiling and assembling the decorative components. First, secure the circular mounting strap to your outlet box using the provided screws. Carefully connect the fixture wires to the corresponding wires in the outlet box, ensuring that white connects to white and black connects to black. Secure these connections with wire connectors and electrical tape. Always connect the copper ground wires from both the fixture and the outlet box to the ground screw on the mounting bar. Once the wiring is complete, tuck the wires neatly into the outlet box, raise the canopy, and secure it with the ball nuts.
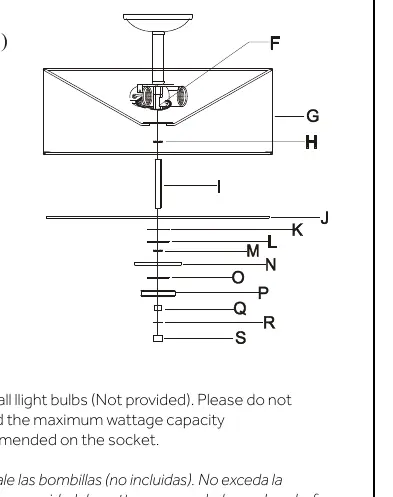
After the fixture is mounted, proceed to assemble the decorative elements. Thread the nipple through the shade saddle and into the coupling. Install the light bulb, ensuring you do not exceed the maximum wattage capacity recommended on the socket. Finally, slide the glass, washers, and decorative crystal components onto the nipple in the specified order and secure them with the final nut and finial.
Maintenance and Care
To keep your fixture looking its best, clean it periodically with a soft, dry cloth. Avoid using harsh chemicals or abrasive cleaners, as these can damage the finish. If you encounter any issues with the fixture, such as flickering or failure to light, first check the bulb connection and ensure the power is properly connected. For further assistance, contact the Signature Hardware customer support team.
Manufacturer information
Signature Hardware
Practical help
Common problems
Fixture does not light up
Check that the light bulb is properly installed and not burnt out. Ensure the circuit breaker is on and all wire connections are secure.
Fixture is loose or wobbling
Verify that the mounting screws and ball nuts are tightened securely against the canopy.
Before use
- Shut off electricity at the circuit breaker or fuse box.
- Gather required tools: Phillips screwdriver, flathead screwdriver, wire strippers, wire cutters, step ladder, safety glasses, and electrical tape.
- Inspect the product for any shipping damage.
- Verify the ceiling does not have a radiant heating system.
- Ensure you have an A19 light bulb (100W max).
Specs in practice
- A19 100W Max
- The maximum wattage allowed for the light bulb to prevent overheating of the socket.
Images and diagrams
- FIG. 1 illustrates the assembly order of the glass, washers, and decorative components onto the central nipple.
- FIG. 2 shows the mounting strap installation and the correct wiring connections to the outlet box.
Model compatibility
- Not suitable for ceilings with radiant heating systems.
- Requires a standard electrical outlet box for mounting.

Manual page author
Michael Turner
Technical manual editor
Reviews PDF manuals for structure, safety notes, and practical product details so readers can find the right information quickly.