Lighting / Fixtures
Simply Retrofits Slim Flood Light LED Installation Manual
Comprehensive installation and safety guide for the Simply Retrofits Slim Flood Light LED. Learn about mounting, wiring, and operating conditions for this high-performance outdoor lighting solution.
Table of contents
Product Overview
The Simply Retrofits Slim Flood Light LED is a high-quality lighting solution designed for durability and efficiency. Featuring a robust die-cast aluminum heat sink and a tempered glass lens with a 120-degree beam angle, this fixture is engineered for demanding environments. It is suitable for a wide range of applications, including parking areas, street lighting, workshops, warehouses, highway toll stations, supermarkets, exhibition buildings, and gymnasiums.
Safety and Installation Precautions
Before beginning the installation process, it is essential to read the manual thoroughly to ensure safe and proper operation. The installation should only be performed by a qualified professional or a certified installation company. Always verify that the local voltage range matches the working voltage of the light fixture before connecting it to the power supply. Inspect the product carefully upon opening the carton; if any damage is detected, do not proceed with installation and contact the supplier immediately. Ensure that the power supply is completely disconnected before performing any maintenance or installation tasks. Once installation is complete, verify that the power cord is correctly connected before turning the power on. Maintain a well-ventilated environment around the lamp and keep it away from fire, electrical shock hazards, or excessive vibration.
Technical Specifications and Usage Conditions
The Slim Flood Light LED is built to withstand harsh conditions, boasting an IP65 rating for dust and water resistance, along with IK08/IK10 impact protection. The unit supports a wide input voltage range of AC 100-277V/347V, making it versatile for various electrical infrastructures. The fixture is designed to operate reliably in temperatures ranging from -40 degrees Celsius to +50 degrees Celsius and can handle relative air humidity levels up to 100 percent.
Installation and Wiring
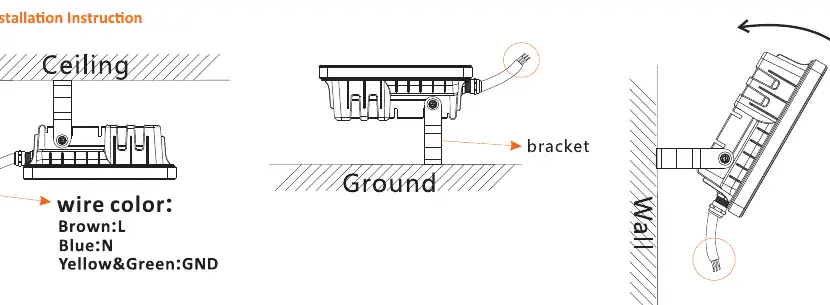
The fixture is designed for flexible mounting using the integrated bracket system. It can be installed on ceilings, ground surfaces, or walls, allowing for precise directional lighting. When wiring the unit, follow the standard color-coding: connect the Brown wire to the Live (L) terminal, the Blue wire to the Neutral (N) terminal, and the Yellow/Green wire to the Ground (GND) terminal. Ensure all connections are secure and properly insulated to prevent short circuits or electrical faults. Proper mounting ensures the longevity of the heat sink and optimal thermal management for the LED driver and chips.
Manufacturer information
Simply Retrofits
Practical help
Common problems
Fixture does not turn on after installation
Verify that the power supply is connected, check that the local voltage matches the fixture requirements, and ensure all wiring connections (L, N, GND) are secure.
Product damage upon arrival
Do not attempt to install or power the unit. Contact the supplier immediately for a replacement.
Before use
- Inspect the product for any physical damage after opening the carton.
- Confirm that the local voltage range matches the fixture's working voltage.
- Ensure the power supply is completely cut off.
- Verify that the installation location provides good ventilation.
- Confirm the mounting surface can support the weight of the fixture.
Specs in practice
- Operating Temperature
- The fixture is rated to function between -40C and +50C.
Images and diagrams
- The wiring diagram shows the Brown wire as Live (L), Blue as Neutral (N), and Yellow/Green as Ground (GND).
- The bracket allows for adjustable positioning on ceilings, walls, or ground mounts.
- Ensure the cable entry point is oriented correctly to maintain the IP rating.
Model compatibility
- Suitable for indoor and outdoor use in workshops, warehouses, and public areas.
- Requires professional installation to ensure safety and compliance.

Manual page author
Michael Turner
Technical manual editor
Reviews PDF manuals for structure, safety notes, and practical product details so readers can find the right information quickly.