Electronics / Video Lighting
User Manual for SmallRig RC 100B COB LED Video Light
Get the most out of your SmallRig RC 100B COB LED Video Light with this comprehensive user guide. Learn about power options, mounting, lighting modes, and safety precautions.
Table of contents
Quick Guide from the Manual
Before using your SmallRig RC 100B, please note these critical requirements:
- Remove the silicone cover from the COB chip board before turning on the light.
- Power Requirements: To achieve full 100% brightness, use a power source of 100W or above (e.g., 98Wh+ V-mount battery, 100W+ USB-C PD power supply). Using lower wattage power sources will limit the maximum brightness output.
- Safety: The light generates heat. Do not block cooling holes, do not touch the COB chip or front glass during or immediately after use, and allow the unit to cool before storage.
- Low Battery: If the external battery voltage drops below 12V, a low battery alert will trigger.
Product Overview
The RC 100B features a control panel with the following interface elements:
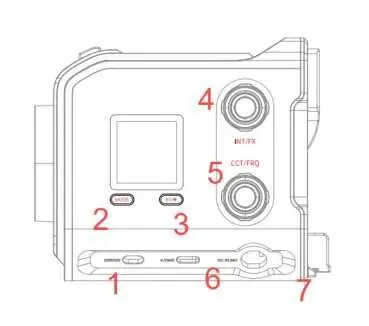
- ON/OFF Switch: Power the unit on or off.
- Mode Button: Cycles between CCT (Color Temperature) and FX (Special Effects) modes.
- Bluetooth/Mute Button: Controls wireless connectivity and fan modes.
- INT/FX Knob: Adjusts intensity or special effect parameters.
- CCT/FRQ Knob: Adjusts color temperature or frequency.
- Power Interfaces: Includes USB-C (PD 3.1), Mini XLR, and BP interface for V-Mount/NP-F batteries.
Operation
Modes and Settings
- CCT Mode: Rotate the INT/FX knob to adjust brightness. Rotate the CCT/FRQ knob to adjust color temperature (3200K/4300K/5600K presets available via clicking).
- FX Mode: Use the INT/FX knob to adjust effect intensity and the CCT/FRQ knob to adjust frequency.
- Presets: Long-press the Mode button for 2 seconds to store current parameters into one of four preset slots.
- Bluetooth: Long-press the Bluetooth/Mute button to reset the connection. Use the SmallGoGo app for remote control.
- Fan Modes: Double-click the Bluetooth/Mute button to cycle through modes: Normal (unrestricted), Silent (30% brightness limit), and Low Noise (70% brightness limit).
Installation
- Silicone Cover: Always remove before use.
- Modifiers: Align the modifier with the mini-mount port on the front cover, rotate counter-clockwise to install, and use the release button to remove.
- Mounting: Use the 1/4" threaded hole on the bottom to attach the light to a light stand adapter or other accessories like magic arms.
- Umbrellas: Insert the umbrella handle into the hole on the light stand adapter and tighten the knob.
Power Supply
The RC 100B supports multiple power solutions:
- USB-C: Supports PD 3.1 (up to 140W). Use a PD 3.1 compliant cable for full performance.
- Mini XLR: Supports AC to DC adapters (optional) for continuous wall power.
- Battery: Supports V-Mount batteries (via BP interface) or NP-F batteries (via plate). Note that using batteries below the recommended specifications may result in reduced brightness or abnormal operation.
Safety and Maintenance
- Overheating Protection: The unit has built-in protection. If the COB chip exceeds 100°C, the light will activate protection mode.
- Sensor Error: If the screen displays "Sensor error," the temperature sensor has malfunctioned; contact your dealer for repair.
- Cleaning: Use a dry, soft cloth. Disconnect all power cables before cleaning.
Manufacturer information
SmallRig
Practical help
Common problems
Low brightness output
Ensure the power source is 100W or higher. USB-C power sources under 100W (e.g., 45W) will limit brightness output.
Sensor error on screen
This indicates a temperature sensor malfunction. The device will stop working; contact the dealer for repair.
Bluetooth connection issues
Long-press the Bluetooth/Mute button to reset the connection. Ensure the SmallGoGo app is installed.
Before use
- Remove the silicone protective cover from the COB chip.
- Ensure the power source (battery or adapter) is compatible and provides sufficient wattage.
- Check that the light is securely mounted to a stand or accessory.
- Verify that the power cable is properly connected and not near heat sources.
- Ensure the environment is cool, dry, and clean.
Specs in practice
- Active Cooling
- The unit uses a built-in fan to manage heat and prevent overheating.
Images and diagrams
- Controls: 1. ON/OFF, 2. Mode, 3. Bluetooth/Mute, 4. INT/FX knob, 5. CCT/FRQ knob, 6. USB-C/DMX, 7. Mini XLR.
- Mounting: 8. V-Mount Lock, 9. Release Button, 10. BP Input.
Model compatibility
- Supports USB-C PD 3.1 (up to 140W).
- Supports V-Mount and NP-F batteries (via adapter).
- Requires 100W+ power for full 100% brightness.
- Operating temperature: -10°C to 45°C.

Manual page author
Michael Turner
Technical manual editor
Reviews PDF manuals for structure, safety notes, and practical product details so readers can find the right information quickly.