Electronics / Camera Accessories
SmallRig 5226 V-Mount Battery Mount Plate Kit User Manual
Quick guide for the SmallRig 5226 V-Mount Battery Mount Plate Kit. Learn how to install the 15mm rod clamp, mount the battery, adjust the LCD screen protector, and understand the power indicator lights.
Table of contents
Manual images
Click an image to enlargeQuick Guide
The SmallRig V-Mount Battery Mount Plate Kit is designed for 15mm LWS rod systems. It provides power distribution via D-Tap and USB-C ports and includes an adjustable LCD screen protector. Ensure your V-mount battery is within the 11.0V to 16.8V range before use.
In the Box
- V-Mount Battery Mount Plate
- 15mm Dual Rod Clamp
- LCD Screen Protector
- Allen Wrench
- Operating Instruction
- User Manual
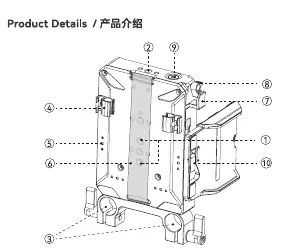
Product Overview
The device features multiple mounting points including 1/4-20 threaded and locating holes. It includes a cable clip, elastic velcro strap, and a trigger safety lever for secure battery mounting. The LCD screen protector has a dedicated locking lever for width adjustment.
Installation
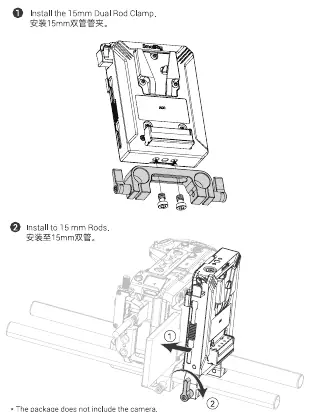

- Install the 15mm Dual Rod Clamp: Attach the clamp to the bottom of the plate using the provided screws and Allen wrench.
- Install to 15mm Rods: Slide the assembly onto your 15mm rod system and tighten the locking levers.
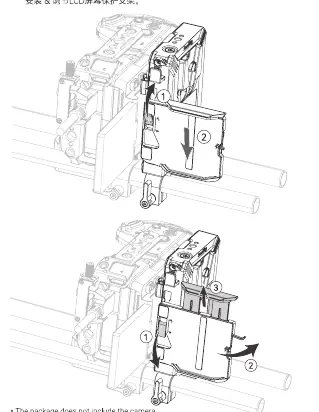
- Install and adjust the LCD Screen Protector: Attach the protector to the plate. Adjust the width to fit your screen (maximum width 80mm) and secure it using the locking lever.
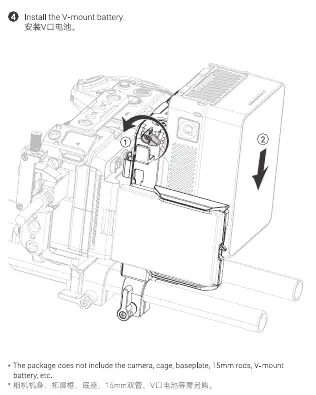
- Install the V-mount battery: Align the battery with the V-mount plate and slide it down until it clicks into place.
Operation
To turn on the device, single press the power switch button. To turn off the output function, press and hold the power switch button for 3 seconds. Always remove the battery or power off the device when not in use for long periods.
Indicator Lights
- Power indicator always on: Power-on status.
- Power indicator off: Battery depleted or not connected.
- Power indicator flashes slowly: Low battery power.
- Power indicator flashes rapidly: Battery depleted, overloaded, or temperature too high.
- USB-C indicator red: USB-C port is working.
- USB-C indicator green: V-Mount battery fully charged.
- USB-C indicator flashes red and green: USB-C port abnormalities (overcurrent, overvoltage, etc.).
Specifications
- Battery Compatibility: V-Mount Battery (11.0V - 16.8V).
- D-TAP Output: Max 8A per port, total 18A for three ports.
- USB-C: Supports PD3.0, QC2.0/3.0, AFC, DCP, PPS, Apple 2.4A.
- Operating Temperature: Discharge: -15°C to 60°C; Charge: 0°C to 45°C.
- Material: Aluminum Alloy, Stainless Steel, Silicone, PC + Fiberglass.
Warranty
SmallRig provides a 2-year warranty for V-mount batteries and 1-year for other electronic products. Warranty does not cover damage caused by unauthorized modification, improper use, or failure to follow instructions. For service, contact [email protected].
Manufacturer information
SmallRig
Practical help
Common problems
Power indicator flashes slowly
The battery power is low. Please recharge the battery.
Power indicator flashes rapidly
The battery is about to run out of power, is overloaded, or the temperature is too high.
USB-C indicator flashes red and green simultaneously
There is a USB-C port abnormality such as overcurrent or overvoltage.
Before use
- Ensure you have 15mm rods available for mounting.
- Check that your V-mount battery voltage is between 11.0V and 16.8V.
- Verify the battery capacity is between 3500mAh and 20000mAh.
- Ensure the LCD screen protector is adjusted to fit your screen width (max 80mm).
Specs in practice
- D-TAP Output
- Provides power to accessories; max 8A per port, total 18A for three ports.
- Discharge Cut-off
- 11.2V; protects the battery from over-discharge.
- USB-C Support
- Supports various fast charging protocols including PD3.0, QC3.0, and PPS.
Images and diagrams
- 1/4-20 Threaded/Locating Holes: Used for mounting additional accessories.
- Trigger Safety Lever: Secures the V-mount battery to the plate.
- LCD Screen Protector Locking Lever: Adjusts and secures the screen protector width.
Model compatibility
- Compatible with 15mm LWS rod systems.
- LCD screen protector maximum compatible width is 80mm.

Manual page author
Emily Carter
User documentation editor
Prepares concise manual descriptions and highlights the most useful setup, operation, and maintenance information for readers.