Electronics / Camera Accessories
User Manual for ProMaster 12x12' Heavy Duty Background Support System
Quick guide for the ProMaster 12x12' Heavy Duty Background Support System. Learn how to set up the stands, configure the crossbar, mount your background, and safely adjust height.
Table of contents
Manual images
Click an image to enlargeQuick guide from the manual
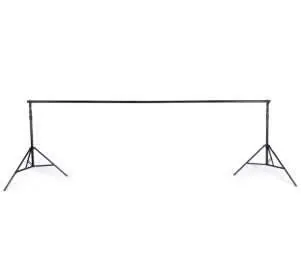
The ProMaster Heavy Duty Background Support Kit is designed to hold backdrops up to 12' wide and reach a height of 12'. The kit includes two air-cushioned stands, a 4-section crossbar, and a fabric carrying case. Proper setup requires ensuring the stands are on level ground and that all locking knobs are tightened before use. For heavy backgrounds, it is recommended to work with a partner.
Parts Diagram
The kit consists of the following components:
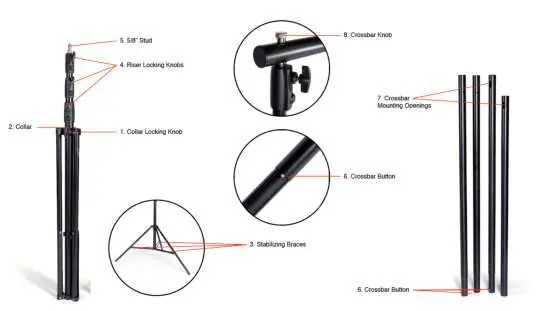
- Collar Locking Knob: Secures the stand base.
- Collar: Adjusts the leg spread.
- Stabilizing Braces: Should be parallel to the floor for maximum stability.
- Riser Locking Knobs: Secure the height of the stand sections.
- 5/8” Stud: Mounting point for the crossbar.
- Crossbar Button: Used to lock crossbar sections together.
- Crossbar Mounting Openings: Connects the crossbar to the stands.
- Crossbar Knob: Secures the crossbar to the stand stud.
Setting up the Stands
The two stands are identical. Follow these steps to set them up:
- Loosen the Collar Locking Knob.
- Pull outward on each leg slightly to release them from the storage position.
- Push the Collar down the center pole until the legs spread out.
- When the Stabilizing Braces are parallel to the ground, tighten the Collar Locking Knob.
Note: Setting the central pole closer to the ground creates a narrower stance, which is useful in small spaces, but never raise the collar so high that the braces angle upward, as this reduces stability.
Preparing the Crossbar
The crossbar is composed of four sections, which can be configured based on your needs:
- 2 sections: Supports backdrops up to 5' wide.
- 3 sections: Supports backdrops up to 9' wide.
- 4 sections: Supports backdrops up to 12' wide.
To connect sections, align the exposed notches with the inner notches of the receiving end and depress the Crossbar Button while sliding the sections together until they snap into place. Pull on the sections to ensure they are secure.
Mounting the Crossbar and Installing Your Background
- Position the stands to match the length of the crossbar and set them to their lowest height.
- Remove the Crossbar Knobs from the top of each 5/8” Stud.
- Place the Crossbar Mounting Opening over the stand's 5/8” Stud.
- Secure the crossbar by tightening the Crossbar Knob onto the threaded post.
- Install your background to the crossbar before connecting the second stand.
- Repeat the mounting process for the remaining stand.
Raising and Lowering the Stands
If working alone, raise the crossbar gradually by making small adjustments to one stand at a time. If working with a partner, synchronize your movements.
- To raise, loosen the Riser Locking Knob, extend the section, and tighten the knob. Start with the top riser section.
- To lower, adjust the risers in the opposite order (start with the bottom).
Note: These stands are air-cushioned. While this helps prevent accidents, always grasp the riser section before loosening the knob to control the speed of descent.
Safety Precautions
- Only use stands on solid, level surfaces.
- Double-check that all knobs are securely tightened before use.
- Do not attempt to install large, heavy backgrounds alone.
- Keep the crossbar parallel to the ground when raising or lowering to prevent tipping.
- Use weight bags to secure each stand once the desired height is reached.
Practical help
Common problems
Stand feels unstable
Ensure the stabilizing braces are parallel to the floor. Do not raise the collar to a point where the braces angle upward.
Crossbar sections won't connect
Align the exposed notches with the inner notches of the receiving end and depress the crossbar button while sliding the sections together.
Difficulty controlling riser descent
Grasp the riser section firmly before loosening the locking knob to guide the speed of descent, even though the stand is air-cushioned.
Before use
- Verify the surface is solid and level.
- Ensure all knobs are securely tightened.
- Check that crossbar sections are locked together via the buttons.
- Have a partner ready if installing a heavy background.
- Ensure the crossbar is parallel to the ground during adjustment.
Images and diagrams
- The parts diagram identifies the collar locking knob, riser locking knobs, and crossbar buttons.
- Figures 1 and 2 illustrate the configuration of the crossbar using 2 or 4 sections.
Model compatibility
- Supports backdrops up to 12' wide.
- Maximum height is 12'.

Manual page author
David Miller
Documentation analyst
Organizes user manual content into clear summaries, with attention to model details, product context, and everyday usability.