Industrial / Electrical
ECO-WORTHY 12V/24V 30A PWM Solar Charge Controller User Guide
Quick start guide for the ECO-WORTHY 12V/24V 30A PWM Solar Charge Controller. Includes installation steps, wiring instructions, parameter settings, and troubleshooting fault codes.
Table of contents
Manual images
Jump to the sectionQuick guide from the manual
This document provides essential instructions for the ECO-WORTHY 12V/24V 30A PWM Solar Charge Controller. It is designed for intelligent charging management of 12V/24V AGM, GEL, and LiFePO4 batteries. Key operations include parameter monitoring via LCD, mobile app connectivity, and configurable load modes.
Installation
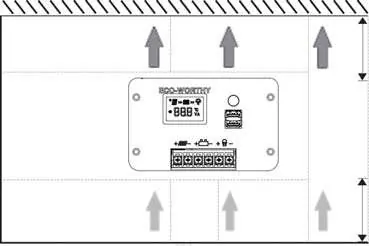
Choose a location protected from wet, flammable, or corrosive environments. Avoid severe shock and vibration. Drill 4x6mm holes in the wall, insert the provided plastic expansion tubes, and secure the controller using the M4x30 crosshead self-tapping screws. Ensure adequate space around the unit for airflow.
Power-On Instructions
Important: Always connect the battery before connecting the photovoltaic (PV) panel to prevent damage.

- Open the orange transparent cover to access terminals.
- Connect the battery positive and negative terminals to the middle ports (BAT+/BAT-).
- If the battery is powered, the controller will activate.
- Connect the solar panel positive and negative terminals to the left ports (PV+/PV-).
- If a DC load is used, connect it to the right ports (LOAD+/LOAD-).
Operation and Settings
The controller features a button for navigation and parameter modification. Long press the button for 3 seconds to enter settings, single click to adjust options, and long press again to save. The device supports battery type selection (AGM, GEL, LiFePO4) and load switch modes (All-day, Automatic, Manual).
Fault Handling
If a fault occurs, the display will automatically switch to the fault page. Common codes include E01 (Battery Over-voltage), E02 (Battery Under-voltage), E03 (PV Over-voltage), E04 (PV Over-current), E05 (Output Over-current), E06 (Internal High Temperature), E07 (Load Short Circuit), and E08 (PV Short Circuit).
Technical Support
For technical assistance, contact ECO-WORTHY via their official website at www.eco-worthy.com or email [email protected]. Support is also available by phone: 1-866-939-8222 (US/CA), +49 6175 6514 999 (DE), or +44 7553 406988 (UK).
Official resources from the manual
Practical help
Common problems
Battery not charging
Check if the battery is connected first. Ensure PV voltage is sufficient and connections are secure.
Load not turning on
Check if the load switch mode is set correctly (e.g., Manual mode requires double-clicking the button).
E01/E02 Fault Code
Battery voltage is too high or too low. Check battery health and charging status.
Bluetooth not connecting
Ensure the Bluetooth icon is flashing on the controller, then use the ECO-WORTHY app to add the device 'BW0D_XXXX'.
Before use
- Verify battery voltage (12V or 24V) matches the controller requirements.
- Ensure solar panels, batteries, and loads are in good condition.
- Confirm the installation site is dry and well-ventilated.
- Have a screwdriver ready for terminal connections.
- Download the ECO-WORTHY app if remote monitoring is required.
Specs in practice
- Max. PV Input Voltage
- The maximum voltage the controller can handle from solar panels (25V for 12V systems, 50V for 24V systems).
- Max. Charging Current
- The maximum current (30A) the controller can deliver to the battery.
- Protection Class IP32
- Protected against solid objects over 2.5mm and against vertically falling water drops.
Images and diagrams
- Terminals 1 & 2: PV Input (+/-)
- Terminals 3 & 4: Battery Connection (+/-)
- Terminals 5 & 6: Load Output (+/-)
Model compatibility
- Supports 12V/24V AGM, GEL, and LiFePO4 batteries.
- LiFePO4 batteries must be manually selected in settings.
- For 24V battery systems, all voltage settings must be doubled compared to 12V values.

Manual page author
Emily Carter
User documentation editor
Prepares concise manual descriptions and highlights the most useful setup, operation, and maintenance information for readers.