Home / Security
User Manual for Solight 1L56 Wireless Doorbell
Quick guide for the Solight 1L56 and 1L56B wireless doorbell. Learn how to install batteries, pair transmitters, adjust volume, and troubleshoot signal issues.
Quick answers from the manual
Quick answer
- To pair a new transmitter, press and hold the volume button on the doorbell while pressing the button on the transmitter. Release the bell button when you hear 'Dong Dong', then release the transmitter button. p. 1
Key actions
- Pairing transmitters/receivers p. 1
- Unpairing transmitters p. 2
First start
- Insert 12V/23A battery into the transmitter and plug the receiver into an AC 230V socket. p. 1
Problems and fixes
Receiver does not ring
Check battery capacity, distance between units, and signal interference.
p. 2Technical specifications
| Parameter | Value | Meaning | Pages |
|---|---|---|---|
| Frequency | 433MHz | Operating frequency | p. 1 |
| Range | 120m | Maximum range in open area | p. 1 |
Where to find it in the PDF
- Product description and installation p. 1
- Pairing diagrams and troubleshooting p. 2
Table of contents
Manual images
Click an image to enlargeQuick guide from the manual
The Solight 1L56 wireless doorbell operates at 433MHz with a maximum range of 120m in open areas. Key operations include battery installation in the transmitter, pairing multiple transmitters or receivers (up to 4), and adjusting volume or melody settings. Ensure the receiver is plugged into an AC 230V socket and the transmitter is mounted approximately 1.5m above the ground.
Product description
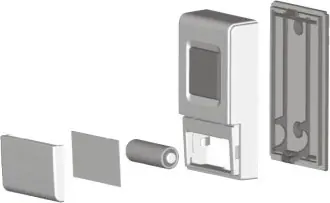
The system consists of a receiver (plugged into a wall socket) and a transmitter (battery-operated). The transmitter features a bell button with an LED indicator, a nameplate cover, and a rear cover opening latch. The receiver includes buttons for volume control and melody selection.
Battery installation
To install the battery in the transmitter, grasp the nameplate and battery cover with two fingers and pull it open. Insert a 12V/23A alkaline battery, ensuring correct polarity, and close the cover.
Transmitter and receiver location
Before permanent installation, test the doorbell by plugging the receiver into the desired socket and pressing the transmitter button. Choose a location for the transmitter that is clearly visible, such as on or near a door frame, about 1.5m above the ground. While the transmitter is waterproof, it is recommended to protect it from direct water and excessive heat.
Doorbell control
Melody selection: Press the melody change button to play and cycle through available melodies. The selection is saved automatically after playback finishes.
Volume control: Press the volume change button to cycle through three volume levels. The current melody will play at the selected volume when the button is pressed.
Learning code function (Pairing)
The learning code function allows you to pair multiple bells and buttons into one group (max 4). To assign a new transmitter to a receiver:
- Press and hold the volume button on the doorbell.
- While holding the volume button, press and hold the button on the transmitter.
- When the "Dong Dong" tune sounds, release the button on the bell.
- A second later, release the button on the transmitter.
Follow a similar procedure to assign a new receiver to a transmitter.
Unpairing the button
To unpair a transmitter from the receiver:
- Press and hold the button to change the bell volume.
- After three seconds, you will hear the "Dong Dong" melody.
- Continue holding the button until you hear the ringing sound again.
Troubleshooting
If the receiver does not ring, check the following:
- Battery capacity: Ensure batteries in both the transmitter and receiver are charged.
- Distance: Verify that the distance between the transmitter and receiver is not too large.
- Interference: Ensure there are no strong sources of signal interference, such as radio/wireless networks, large metal objects, or reinforced concrete walls.
Practical help
Common problems
Receiver does not ring
Check battery levels in both units, reduce distance between units, or remove sources of signal interference (metal objects, concrete walls).
Before use
- Insert a 12V/23A alkaline battery into the transmitter.
- Test the connection by plugging the receiver into the target socket before mounting.
- Ensure the transmitter is mounted approximately 1.5m above the ground.
- Verify the transmitter is protected from direct water and excessive heat.
Images and diagrams
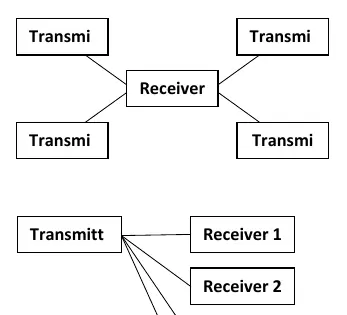
- Figure 1: Pairing multiple transmitters to a single receiver.
- Figure 2: Pairing a single transmitter to multiple receivers (up to 4).
Model compatibility
- Supports pairing multiple bells and buttons into one group (max 4 devices).

Manual page author
Emily Carter
User documentation editor
Prepares concise manual descriptions and highlights the most useful setup, operation, and maintenance information for readers.