Home / Security
Solight Wireless Doorbell 1L69 / 1L69B User Manual
Quick guide for Solight 1L69 and 1L69B wireless doorbells. Learn how to pair transmitters, adjust volume, install the button, and replace the battery.
Quick answers from the manual
Quick answer
- The Solight 1L69/1L69B is a wireless doorbell with a 200m range. It supports pairing up to 8 transmitters to one receiver and 20 receivers to one transmitter. p. 1
Key actions
- Pairing the button p. 1
- Replacing the battery p. 2
First start
- Plug the receiver into a 230V socket and pair the transmitter. p. 1
Problems and fixes
Receiver does not ring
Check distance and signal interference from metal objects or concrete walls.
p. 2Maintenance and reset
- Clear memory by holding the pairing button while plugging the receiver into power. p. 2
Technical specifications
| Parameter | Value | Meaning | Pages |
|---|---|---|---|
| Transmission range | 200m | In open space | p. 1 |
Where to find it in the PDF
- Specifications and Pairing p. 1
- Installation and Maintenance p. 2
Table of contents
Manual images
Click an image to enlargeQuick Guide
The Solight 1L69 and 1L69B are wireless doorbells designed for indoor use. The system consists of a receiver (plugged into a 230V socket) and a battery-powered transmitter button. The system supports pairing up to 8 transmitters to one receiver and up to 20 receivers to one transmitter.
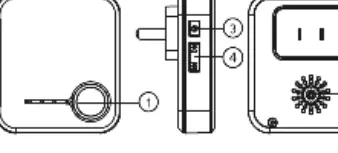
Pairing the Button
To pair a new transmitter with the receiver:
- Plug the doorbell receiver into a 230 V AC/50 Hz socket.
- Long press the pairing button on the receiver for approximately 5 seconds.
- Release the button when the indicator light on the receiver turns on.
- The receiver enters pairing mode for 25 seconds. During this time, press the button on the transmitter.
- The doorbell will sound a melody when successfully paired.
To delete all paired buttons from memory, hold the pairing button on the receiver while plugging it into the electricity. Wait for the LED to light up after 5 seconds, then release the button. The memory is cleared when the LED goes off.
Installation
Before permanent installation, test the range and reliability of the device in the chosen location. The transmitter button is weatherproof, but it is recommended to place it in a protected area, such as a recess in the wall.
- Attach the installation pad to the wall using double-sided tape or screws.
- Insert the button tabs on the back into the holes of the installation pad.
- Push in sideways to secure the button position.
Note: Do not place the button directly on metal objects or materials containing metal (e.g., steel posts, metal-framed doors), as this may interfere with the signal.
Volume and Ringtone
Use the buttons on the receiver to select a ringtone. Press the volume button repeatedly to cycle through four volume levels ranging from 25 to 110 dB.
Battery Replacement
The transmitter uses a 3V CR2032 battery.
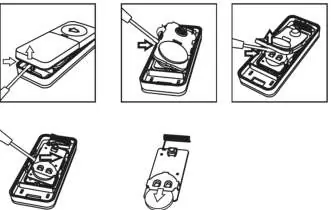
- Open the transmitter cover using a flathead screwdriver.
- Push gently between the side handles and lift the cover off.
- Remove the gasket.
- Tilt the battery plate and slide the old battery out.
- Insert a new battery, ensuring the polarity is correct.
- Close the button by reversing the procedure.
Troubleshooting
If the receiver does not ring when the transmitter button is pressed, check the following:
- Ensure the distance between the transmitter and receiver is not too great.
- Check for strong sources of signal interference between the units, such as radio/wireless networks, large metal objects, or reinforced concrete walls.
Technical Specifications
- Transmission range: Up to 200m in open space
- Transmission frequency: 433.92 MHz
- Ringtone volume: 4 levels (25 - 110 dB)
- Number of melodies: 64
- Receiver power supply: AC 230V/50Hz
- Transmitter power supply: 1x 3V (CR2032) battery
- Receiver protection class: IP56
- Operating temperature (Receiver): -10 °C to +40 °C
- Operating temperature (Transmitter): -20 °C to +50 °C
Practical help
Common problems
Receiver does not ring
Check if the distance is too great or if there are signal interferences like metal objects or reinforced concrete walls.
Before use
- Plug the receiver into a 230V AC socket.
- Test the range before permanent installation.
- Avoid mounting the transmitter on metal surfaces.
- Ensure the battery is installed in the transmitter.
Specs in practice
- Transmission frequency
- 433.92 MHz (standard for wireless doorbells)
- Receiver protection class
- IP56 (protected against dust and water jets)
- Transmitter battery
- CR2032 3V coin cell
Images and diagrams
- The pairing process involves holding the receiver button for 5 seconds.
- Battery replacement requires opening the transmitter cover with a flathead screwdriver.
Model compatibility
- Maximum 8 transmitters per receiver.
- Maximum 20 receivers per transmitter.

Manual page author
Emily Carter
User documentation editor
Prepares concise manual descriptions and highlights the most useful setup, operation, and maintenance information for readers.