Furniture / Storage Shelving
Style Selections 1-Cube Organizer Assembly and Care Guide
Assembly and care guide for the Style Selections 1-Cube Organizer. Includes step-by-step assembly instructions, safety warnings, load limits, and maintenance tips.
Table of contents
Manual images
Click an image to enlargeQuick Guide
The Style Selections 1-Cube Organizer is designed for simple home storage. The estimated assembly time is 15 minutes. Please ensure all parts are present before beginning assembly.
Safety Information
- Anti-Tip Warning: Serious or fatal crushing injuries can occur from furniture tip-over. Never allow children to climb or hang on drawers, doors, or shelves.
- Load Limits: This unit is designed to support a maximum load of 15 lbs per shelf. Exceeding these limits could cause sagging, instability, product collapse, or serious injury.
- Placement: Always place the heaviest items on the lowest level. Keep the product on level surfaces to prevent instability.
- Usage: Do not alter the product in any manner. Do not place TVs or other heavy objects on top unless specifically designed for them.
Assembly Instructions
Before starting, verify all parts against the package contents list. You will need a screwdriver for assembly.
- Preparation: Ensure all hardware (AA, BB, CC, DD, EE) and panels (A, B, C) are present.
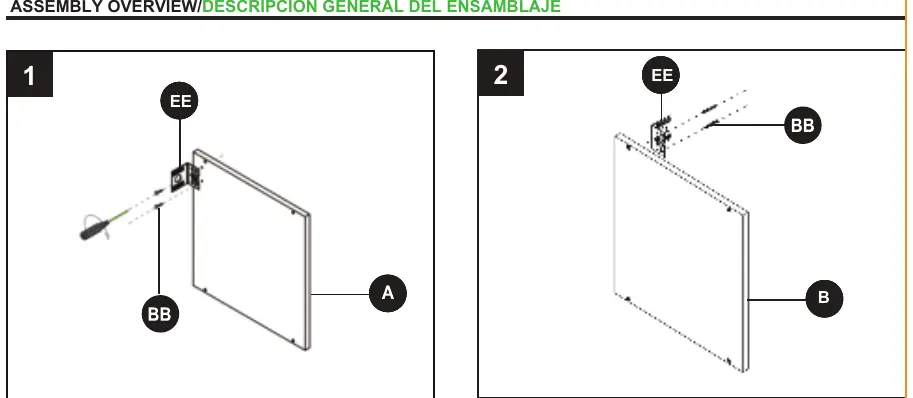
- Step 1-2: Attach hardware EE to panels A and B.
- Step 3-4: Assemble panels A, B, and C using hardware AA and BB.
- Step 5-6: Secure the structure using hardware CC and DD.
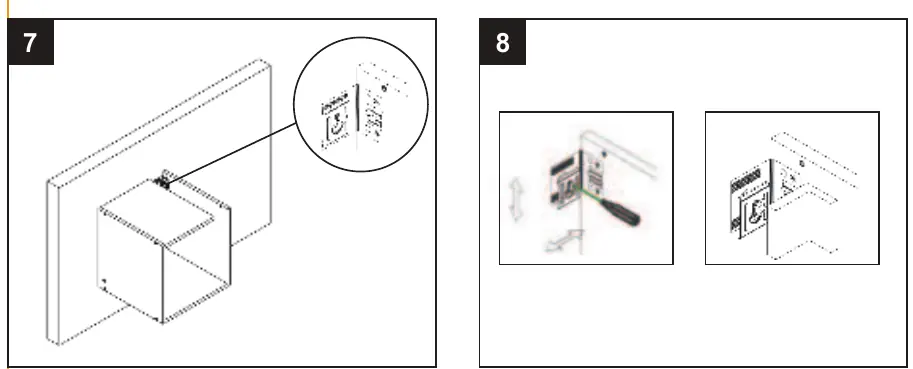
- Step 7-8: Finalize the assembly by ensuring all bolts and screws are tightly fastened.
Care and Maintenance
- Use a soft, clean cloth that will not scratch the surface when dusting.
- Never use water to clean the furniture, as it may damage the finish.
- Do not use any kind of solvent on the furniture, as it may damage the surface.
- Clean up liquid spills immediately.
- Check bolts and screws periodically and tighten them if necessary.
- If the furniture is stained or damaged, contact a professional for repair.
Warranty
This limited warranty covers the original purchase for normal commercial, personal, or household use for a period of one (1) year from the date of purchase. It covers defects in materials and workmanship. Proof of purchase is required. This warranty applies only to the U.S. and Canada.
Practical help
Common problems
Product instability
Ensure the unit is placed on a level surface and all bolts/screws are tightly fastened.
Surface damage
Do not use water or solvents for cleaning; use only a soft, clean cloth.
Risk of tipping
Place heaviest items on the lowest level and never allow children to climb on the unit.
Before use
- Verify all parts are present against the package contents list.
- Ensure you have the required tools (screwdriver).
- Check that all bolts and screws are tightly fastened before use.
- Confirm the surface where the unit will be placed is level.
Specs in practice
- Assembly Time
- Approximately 15 minutes required for setup.
Images and diagrams
- Steps 1-2: Initial hardware attachment to side panels.
- Steps 3-4: Connecting main panels using screws.
- Steps 5-8: Final assembly and securing of the unit.
Model compatibility
- Warranty applies only to the U.S. and Canada.

Manual page author
Michael Turner
Technical manual editor
Reviews PDF manuals for structure, safety notes, and practical product details so readers can find the right information quickly.