Lighting / Fixtures
Sunco LED Center Basket Troffer Light Installation Guide
Comprehensive installation guide for the Sunco LED Center Basket Troffer Light. Includes safety precautions, wiring diagrams, step-by-step mounting instructions, and environmental operating conditions.
Table of contents
Manual images
Click an image to enlargeImportant Installation Information
This document provides essential safety and installation procedures for the Sunco LED Center Basket Troffer Light. Please note that this product requires professional installation by a licensed electrician to ensure safety and compliance with electrical codes.
Safety Instructions
- Professional Installation: This fixture must be installed and maintained by a licensed electrician.
- Power Supply: Always disconnect the power supply before beginning any installation or maintenance work.
- Dedicated Driver: The LED Troffer must be powered by a dedicated external LED driver.
- Heat Dissipation: Ensure the product has adequate space for heat dissipation. Never cover the luminaire with heat insulation mats or similar materials.
- Environment: Suitable for damp locations. The operating ambient temperature range is -13°F to 113°F. Avoid direct sunlight.
- Storage: Store in cool and dry conditions.
Installation Procedure
- Preparation: Switch off the power supply before starting. Ensure the mounting surface or structural member can support the weight of the LED Troffer.
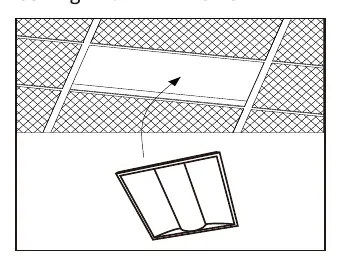
- Removal: Remove the existing lighting fixture from the ceiling.
- Brackets: Install the protective brackets for safety.
- Access: Unscrew the driver cover to access the wiring compartment.
- Wiring: Connect the wires separately. Ensure all connections are secure before powering on the device.
- Settings: If your model includes adjustable features, select the desired Wattage and CCT (Correlated Color Temperature) settings.
- Finalization: Replace the driver cover and secure it with the screw.
- Testing: Switch on the power only after the installation is complete and the circuit has been examined.
Wiring Details
The wiring compartment includes connections for the following:
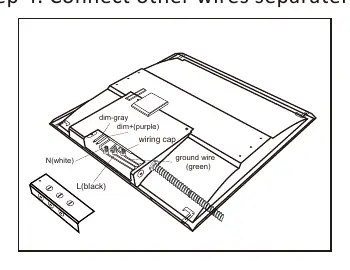
- L (Black): Line wire
- N (White): Neutral wire
- Ground (Green): Ground wire
- Dim+ (Purple): Positive dimming wire
- Dim- (Gray): Negative dimming wire
Practical help
Common problems
Fixture does not turn on
Verify that the power supply is connected correctly and that the circuit breaker is on. Ensure all wire connections (Line, Neutral, Ground) are secure.
Dimming function not working
Check the connections for the Dim+ (purple) and Dim- (gray) wires to ensure they are properly connected to the dimming control system.
Overheating
Ensure the fixture is not covered by insulation or other materials and that there is sufficient space around the unit for heat dissipation.
Before use
- Ensure the power is disconnected at the source.
- Verify the mounting surface can support the fixture weight.
- Confirm the ambient temperature is between -13°F and 113°F.
- Ensure a licensed electrician is performing the installation.
- Check that all necessary tools for unscrewing and wiring are available.
Specs in practice
- Ambient Temperature
- The fixture is rated to operate safely between -13°F and 113°F.
- Damp Locations
- The fixture is suitable for installation in areas with high humidity, but not direct water exposure.
Images and diagrams
- The wiring diagram illustrates the connection points for Line (black), Neutral (white), Ground (green), and the dimming control wires (purple/gray) inside the driver cover.
Model compatibility
- Requires a dedicated external LED driver.
- Not compatible with heat insulation mats or slim layer covering materials.

Manual page author
David Miller
Documentation analyst
Organizes user manual content into clear summaries, with attention to model details, product context, and everyday usability.