Sports / Fitness
User Manual for Sunny SF-B020026 Magnetic Mini Exercise Pedal Cycle
Quick guide for the Sunny SF-B020026 Magnetic Mini Exercise Pedal Cycle. Includes assembly instructions, battery replacement, meter operation, and tension adjustment.
Table of contents
Manual images
Click an image to enlargeImportant Information
This manual provides instructions for the Sunny SF-B020026 Magnetic Mini Exercise Pedal Cycle. Please read all safety information before use. Do not stand on the unit; it is designed for use in a sitting position only. Ensure the equipment is placed on a solid, flat surface with at least 2 feet (60 cm) of free space around it.
Assembly Instructions
Step 1: Stabilizers
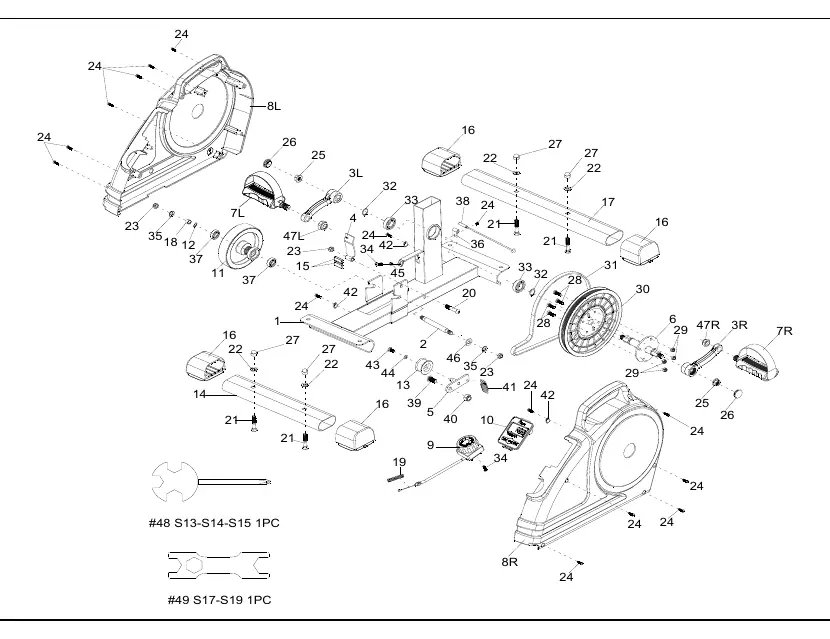
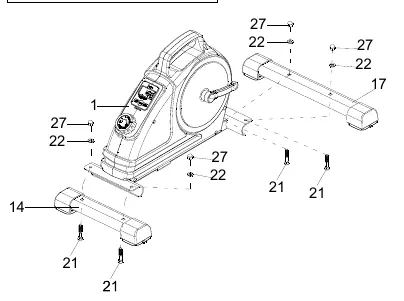
- Attach the Rear Stabilizer (No. 14) to the Main Frame (No. 1) using 2 Carriage Bolts (No. 21), 2 Washers (No. 22), and 2 High Cap Nuts (No. 27). Tighten with Spanner (No. 48).
- Attach the Front Stabilizer (No. 17) to the Main Frame (No. 1) using 2 Carriage Bolts (No. 21), 2 Washers (No. 22), and 2 High Cap Nuts (No. 27). Tighten with Spanner (No. 48).
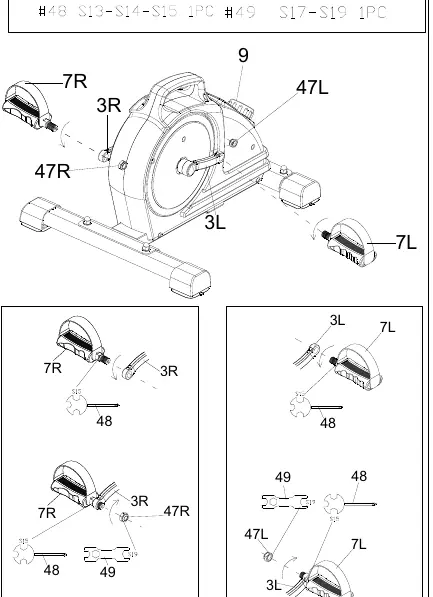
Step 2: Pedals
- Identify the Left (L) and Right (R) pedals.
- Remove the Nylon Nuts (No. 47L & 47R) from the pedals.
- Align the Left Pedal (No. 7L) with the Left Crank (No. 3L) at 90 degrees. Insert and turn the pedal counter-clockwise to tighten by hand, then secure with Spanner (No. 48).
- Tighten the Left Nylon Nut (No. 47L) clockwise using Spanners (No. 48 and 49).
- Align the Right Pedal (No. 7R) with the Right Crank (No. 3R) at 90 degrees. Insert and turn the pedal clockwise to tighten by hand, then secure with Spanner (No. 48).
- Tighten the Right Nylon Nut (No. 47R) counter-clockwise using Spanners (No. 48 and 49).
Battery Installation & Replacement
The exercise meter requires 1 AAA battery.
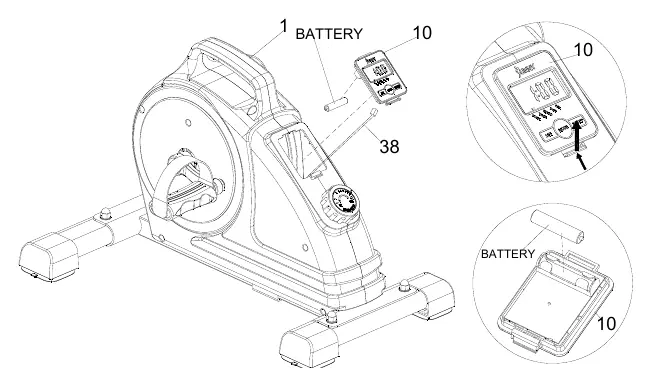
- Remove the Meter (No. 10) from the Main Frame.
- Disconnect the link wire of the Inductor (No. 38).
- Install 1 AAA battery into the case on the back of the meter, ensuring correct polarity (+/-).
- Reconnect the link wire and reattach the meter to the frame.
Exercise Meter
The meter tracks your workout progress. It powers on automatically when pedals are in motion or the MODE key is pressed.
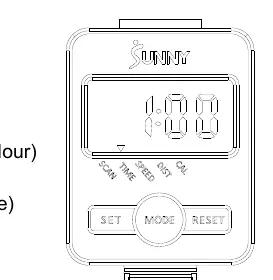
- Functions: Scan, Time, Speed, Distance, Calories.
- Mode: Press to select functions. Hold to reset Time, Distance, and Calories.
- Set: Set values for Time, Distance, and Calories when not in scan mode.
- Reset: Reset Time, Distance, and Calories.
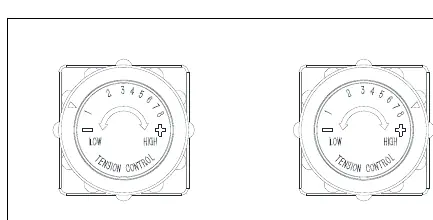
Adjustments
Adjust the resistance by rotating the Tension Control Knob (No. 9). Rotate clockwise to increase resistance (up to level 8) and counter-clockwise to decrease resistance (down to level 1).
Practical help
Common problems
Abnormal display on the meter
Replace the AAA battery.
Unusual noises during exercise
Check for defective components or loose parts; discontinue use until the problem is rectified.
Pedal assembly difficulty
Ensure pedals are marked L and R. The Left pedal is threaded counter-clockwise, and the Right pedal is threaded clockwise.
Before use
- Ensure all nuts and bolts are securely tightened.
- Place the unit on a solid, flat, level surface.
- Ensure at least 2 feet (60 cm) of free space around the unit.
- Check that the battery is installed correctly in the meter.
- Wear suitable clothing to avoid entanglement.
Specs in practice
- Tension Levels
- Level 1 is the lowest resistance, Level 8 is the highest.
- Meter Functions
- Scan (rotates through all), Time, Speed, Distance, Calories.
Images and diagrams
- Exploded Diagram: Shows all parts and hardware for assembly reference.
- Assembly Steps: Visual guide for attaching stabilizers and pedals.
Model compatibility
- Indoor and home use only.
- Not for commercial or therapeutic use.
- Do not stand on the unit.

Manual page author
David Miller
Documentation analyst
Organizes user manual content into clear summaries, with attention to model details, product context, and everyday usability.