Electronics / Speakers & Soundbars
Quick Start Guide for Tannoy QFlex 16LS-WP Loudspeaker
A comprehensive quick start guide for the Tannoy QFlex 16LS-WP digitally steerable powered column array loudspeaker. Includes instructions for unpacking, mounting, cable connections, software configuration, and technical specifications.
Quick answers from the manual
Quick answer
- The QFlex 16LS-WP is a digitally steerable powered column array loudspeaker. Setup requires mounting the unit, connecting power and audio via the rear access panel, and configuring the system using BeamEngine and VNET software. p. 1, 6, 8
Key actions
- Mounting the loudspeaker p. 7
- Accessing connections p. 6
First start
- Download software and configure p. 8
Technical specifications
| Parameter | Value | Meaning | Pages |
|---|---|---|---|
| Weight | 36.3 kg | Total weight including hardware | p. 9 |
| Frequency range | 150 Hz - 15 kHz | Operating frequency range | p. 9 |
Where to find it in the PDF
- Safety Instructions p. 2, 3, 4, 5
- Connections p. 6
- Mounting p. 7
- Specifications p. 9
Table of contents
Manual images
Click an image to enlargeQuick Guide
The Tannoy QFlex 16LS-WP is a digitally steerable powered column array loudspeaker designed for life safety and high-performance audio applications. This guide provides the essential steps for installation, connection, and software setup. Always ensure the mounting surface can support the weight of the unit (36.3 kg) and that all electrical connections are performed by qualified personnel.
Unpacking and Inspection
Upon receiving your QFlex loudspeaker, inspect the carton and the unit for any exterior physical damage. Save the carton and packaging materials in case the unit needs to be shipped in the future. If damage is found, notify your dealer immediately. Each carton is marked to indicate the position of the modules within the array.
Connections
All connections, including AC power, network, and signal, are located at the bottom of the QFlex column. This design allows for neat cable management. To access the connectors, remove the lower rear access plate using a Philips screwdriver.
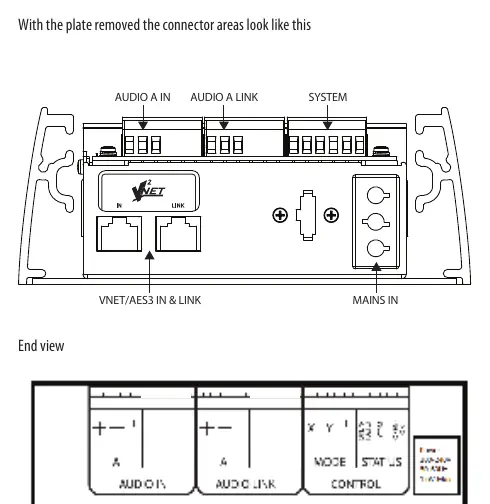
- Audio A In / Audio A Link: Used for signal input and linking.
- System: VNET/AES3 In & Link connectors.
- Mains In: Power input.
The system utilizes high-quality Neutrik Ethercon connectors, which are compatible with standard RJ45 plugs and CAT5 cable.
Mounting and Assembly
The QFlex 16LS-WP is designed for fixed, vertical mounting. The assembly process involves joining the modules and securing them to the mounting structure.
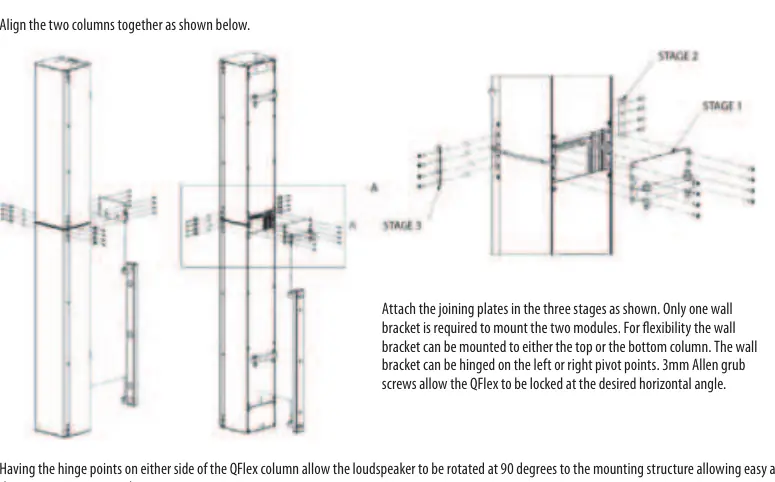
- Module Assembly: Place each module in its position, keeping them slightly spaced. Connect the multipin connectors as shown in the assembly diagram.
- Joining Plates: Attach the joining plates in the three stages specified in the manual.
- Wall Bracket: Only one wall bracket is required to mount the two modules. It can be mounted to either the top or bottom column and hinged on the left or right pivot points.
- Angle Adjustment: Use the 3mm Allen grub screws to lock the QFlex at the desired horizontal angle.
The hinge points on either side of the column allow the loudspeaker to be rotated 90 degrees for easy access to the input connector panel.
Software Configuration
The QFlex system requires specific software for operation and configuration:
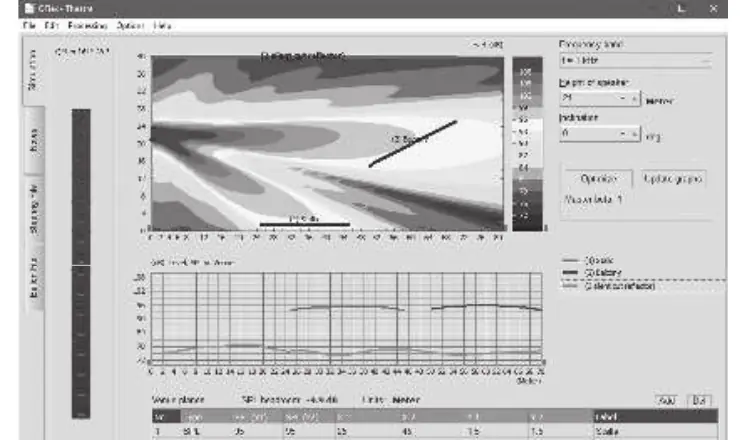
- BeamEngine: Used for accurate adjustment of the coverage area from a fixed mounting location.
- VNET (Podware): Used for system commissioning, real-time diagnostics, and ongoing venue network control.
Visit tannoy.com to download the latest versions of these applications and associated documentation.
Specifications
- Frequency Range: 150 Hz - 15 kHz
- Vertical Dispersion: 5 - 100 degrees (symmetrical or asymmetrical, single or multiple beams)
- Horizontal Dispersion: 120 degrees
- Weight: 36.3 kg (incl. hardware)
- Mains Supply: 100 - 240 V~ 50/60 Hz
- Power Consumption: 140 W @ 1/8 max power
- Weather Protection: IP54 standard
Safety Instructions
This apparatus must be connected to a MAINS socket outlet with a protective earthing connection. Do not remove the top cover or rear section, as there are no user-serviceable parts inside. Refer all servicing to qualified personnel. Do not install the unit in confined spaces or near heat sources.
Official resources from the manual
Practical help
Common problems
No sound or device not detected
Verify VNET/AES3 network connections and ensure the software (BeamEngine/Podware) is correctly configured.
Mechanical instability
Ensure the mounting surface is capable of supporting 36.3 kg and that the wall bracket is securely fastened.
Cable management difficulties
Remove the lower rear access plate to route cables neatly through the bottom of the column.
Before use
- Inspect the unit for physical damage upon unpacking.
- Verify that the mains voltage matches your local requirements.
- Ensure the mounting surface can support 36.3 kg.
- Download the BeamEngine and VNET (Podware) software from tannoy.com.
- Use high-quality professional speaker cables.
Specs in practice
- Vertical Dispersion
- 5-100 degrees, steerable (symmetrical or asymmetrical, single or multiple beams).
Images and diagrams
- The connector layout diagram identifies the locations for Audio A In/Link, System, VNET/AES3, and Mains In.
- The assembly diagram illustrates the three-stage process for attaching joining plates and mounting the modules.
Model compatibility
- Compatible with standard RJ45 plugs and CAT5 cable for network connections.
- Compatible with VNET subwoofer systems.

Manual page author
David Miller
Documentation analyst
Organizes user manual content into clear summaries, with attention to model details, product context, and everyday usability.