Automotive / Navigation
User Manual for Teltonika FMB001 OBDII Tracker
Quick guide for the Teltonika FMB001 OBDII tracker. Learn how to install the SIM card, connect to a PC, configure settings via SMS or software, and understand LED indicators.
Table of contents
Manual images
Jump to the sectionQuick Start Guide
The Teltonika FMB001 is an easy-to-use OBDII tracker. To begin, you must insert a Micro-SIM card and connect the internal battery. The device is configured primarily using the Teltonika Configurator software on a Windows PC or via SMS commands. Ensure the device is powered by a 10-30 V DC source through the vehicle's OBDII port.
Device Overview
The FMB001 features an OBDII connector for vehicle integration, a Micro-USB port for PC connection, and a Micro-SIM slot. It includes two LED indicators: a Status LED and a Navigate LED, which provide real-time feedback on the device's operation and GNSS signal status.
Installation and Setup
To prepare the device for use:
- Gently remove the FMB001 cover using a plastic pry tool.
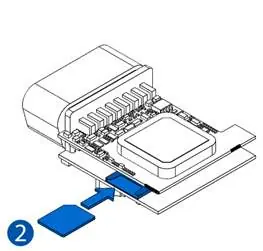
- Insert the Micro-SIM card into the slot, ensuring the cut-off corner points forward.
- Connect the internal battery to the socket, positioning it so it does not obstruct other components.
- Attach the device cover back securely.
- Locate the OBDII connector in your vehicle and plug the device in.
Configuration
The device comes with default factory settings. To customize these:
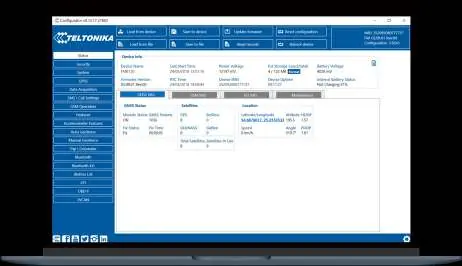
- Teltonika Configurator: Download the software for Windows. Connect the device via Micro-USB or Bluetooth (default password: 5555). Use the 'Load from device' button to read current settings and 'Save to device' to apply changes.
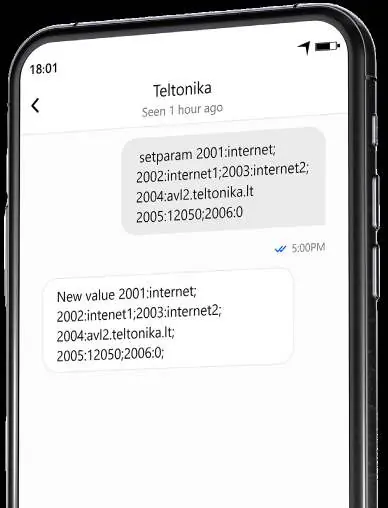
- SMS Configuration: You can send SMS commands to the device for quick setup. Ensure two space symbols are inserted before the SMS text. The format is: setparam 2001:APN;2002:APN_username;2003:APN_password;2004:Domain;2005:Port;2006:0.
LED Indications
Navigation LED: Permanently on indicates no GNSS signal. Blinking every second indicates normal operation. Fast blinking indicates firmware flashing.
Status LED: Blinking every second indicates normal mode. Blinking every two seconds indicates sleep mode. Fast blinking indicates modem activity.
Technical Specifications
- Input Voltage: 10-30 V DC with overvoltage protection.
- GNSS: Supports GPS, GLONASS, GALILEO, BEIDOU, SBAS, QZSS, DGPS, AGPS.
- Bluetooth: Version 4.0 + LE.
- Operating Temperature: -40 °C to +85 °C (without battery).
- Dimensions: 67.2 x 49.6 x 25 mm.
Safety Information
Always ensure the vehicle ignition is off before unmounting the device. The device is susceptible to water and humidity. Do not disassemble the device if damaged. Ensure the device does not distract the driver or interfere with vehicle operation.
Practical help
Common problems
Device not detected by PC
Ensure the USB drivers are installed and the device is powered via the OBDII port.
SIM card not working
Ensure the PIN request is disabled or configured correctly in the Teltonika Configurator.
Configuration changes not saved
Click the 'Save to device' button in the Configurator after making changes.
Before use
- Insert Micro-SIM card with cut-off corner facing forward.
- Connect the internal battery.
- Attach the device cover.
- Ensure vehicle ignition is off before installation.
- Download and install Teltonika Configurator for Windows.
Specs in practice
- Input Voltage
- 10-30 V DC with overvoltage protection.
Images and diagrams
- Top view shows OBDII connector, Status LED, and Navigate LED.
- Top view without cover shows battery socket, Micro-USB port, and Micro-SIM slot.
- Pinout diagram details the 16 pins of the OBDII connector.
Model compatibility
- Configurator software requires Microsoft Windows OS and MS .NET Framework 4.6.2.
- Device is compatible with vehicles having an OBDII port.
- Bluetooth connection default password is 5555.

Manual page author
Emily Carter
User documentation editor
Prepares concise manual descriptions and highlights the most useful setup, operation, and maintenance information for readers.