Electronics / Monitors
User Manual for Terra 2427W HA Monitor
Quick guide for the Terra 2427W HA monitor. Includes setup instructions, OSD menu navigation, stand adjustments, technical specifications, and troubleshooting tips.
Quick answers from the manual
Quick answer
- The Terra 2427W HA is a 23.8-inch Full HD monitor. To set it up, connect the power cord and the video cable (HDMI or DisplayPort) to your computer, then power on both devices. Use the front panel buttons to access the OSD menu for adjustments. p. 6
Key actions
- Connect the monitor to a PC p. 6
- Adjust OSD settings p. 10, 11, 12
First start
- Connect cables and power on p. 6
Show 4 more answers Show less
Problems and fixes
No power
Check power cord connection and wall outlet.
p. 16
No screen image
Check video cable connection and brightness.
p. 16Maintenance and reset
- Reset to factory settings p. 13
Technical specifications
| Parameter | Value | Meaning | Pages |
|---|---|---|---|
| Resolution | 1920 x 1080 | Full HD maximum resolution | p. 15 |
| Refresh Rate | 75Hz | Maximum vertical frequency | p. 15 |
| Power Input | DC 12V 2.5A | Required power supply | p. 15 |
Where to find it in the PDF
- Safety Precautions p. 4
- Quick Installation p. 6
- OSD Functions p. 10, 11, 12, 13
- Technical Specifications p. 15
Table of contents
Manual images
Click an image to enlargeQuick guide from the manual
This guide provides essential information for setting up and operating your Terra 2427W HA monitor. Always ensure the monitor is placed on a stable surface and connected to a grounded power outlet. If you encounter issues, refer to the troubleshooting section before contacting support.
Installation and Setup
Follow these steps to connect your monitor:
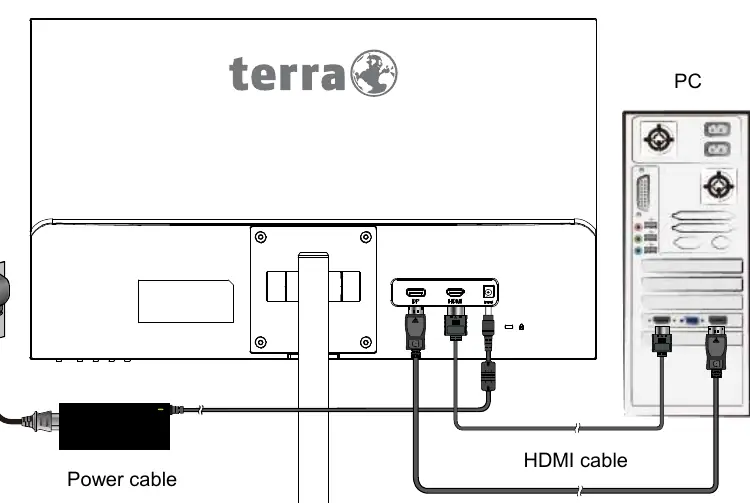
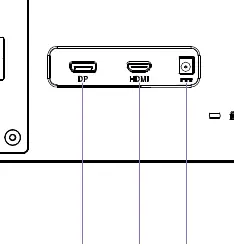
- Power Off: Ensure both the monitor and computer are turned off.
- Video Connection: Connect the HDMI cable from the computer's HDMI output to the monitor's HDMI input. Alternatively, use a DisplayPort cable if available.
- Power Connection: Connect the power cord to a properly grounded AC outlet, then connect it to the monitor.
- Power On: Turn on the computer first, then the monitor.
- Configuration: For Windows users, right-click the desktop, go to Display Settings, and set the resolution to 1920 x 1080. Adjust the refresh rate as needed (up to 75Hz).
Stand Adjustments
The monitor stand allows for ergonomic adjustments:
- Tilt Angle: Tilt up to 20° or down to -5°.
- Lift Range: The height can be adjusted within a 120mm range.
- Swivel Angle: The monitor can swivel 45° to the left or right.
Using the OSD Menu
The monitor features an On-Screen Display (OSD) menu for adjusting settings. Use the buttons on the front panel:
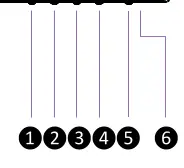
- 1 (Menu): Opens the main menu or exits. Long-press to lock/unlock OSD.
- < (Left): Selects items or directly opens the Brightness menu.
- > (Right): Selects items or directly opens the Anti-Blue Light menu.
- 2 (Select): Confirms selection or adjusts modes.
- Power: Turns the monitor on/off. Long-press to lock/unlock power.
Key settings include Brightness, Contrast, DCR (Dynamic Contrast Ratio), Over Drive (OD), ECO mode, Aspect Ratio, Picture Mode (Standard, Text, Game, Movie), and Color Temperature.
Troubleshooting
If you experience issues, check the following:
- No Power: Ensure the power cord is securely connected to the adapter and the monitor. Verify the outlet is working.
- No Image: Check that the video cable is tightly secured to both the computer and the monitor. Adjust the brightness settings.
- Abnormal Colors: Check the video cable connection for loose or broken pins. Try connecting to another computer or reset the monitor to default settings using the OSD menu.
Technical Specifications
- Panel Size: 23.8" (60.5 cm)
- Resolution: 1920 x 1080 (Full HD)
- Refresh Rate: Up to 75Hz
- Power Input: DC 12V 2.5A
- Operating Temperature: 0°C to 40°C
- Speaker: 2W x 2
Practical help
Common problems
No power
Ensure the AC power cord is securely connected to the power adapter and the monitor. Verify the wall outlet is providing power.
No screen image
Ensure the video cable is tightly secured to the video output port on the computer. Adjust the brightness settings.
Wrong or abnormal colors
Check the video cable for loose or broken pins. Connect the monitor to another computer to isolate the issue, or reset to factory settings.
Before use
- Ensure the monitor is placed in a clean, dry, and well-ventilated environment.
- Keep the monitor away from magnetic objects, motors, and transformers.
- Use a grounded power supply cord.
- Use the provided shielded video interface cable.
- Ensure the power source matches the label on the rear of the monitor.
Show more Show less
Specs in practice
- Refresh Rate
- Supports up to 75Hz; ensure your graphic card settings match this to avoid damage.
- Operating Temperature
- The monitor should be used in environments between 0°C and 40°C.
Images and diagrams
- Front buttons: 1 (Menu), 2 (Down/Decrease), 3 (Up/Increase), 4 (Confirm/Select), 5 (Power), 6 (LED Indicator).
- Rear ports: DisplayPort input, HDMI input, Power input.
Model compatibility
- Supports HDMI and DisplayPort connections.
- VESA DPMS compatible power management.

Manual page author
Michael Turner
Technical manual editor