Electronics / Monitors
User Manual for Philips 242S1 S line Monitor
Quick guide for the Philips 242S1 S line monitor. Includes setup, base installation, OSD menu navigation, image optimization, and troubleshooting steps.
Quick answers from the manual
Quick answer
- The Philips 242S1 is a 23.8-inch IPS monitor. Setup involves attaching the base stand, connecting the power and signal cables (HDMI/DP/VGA/DVI), and adjusting settings via the OSD menu. p. 5, 7, 8
Key actions
- Assemble the base p. 7
- Adjust OSD settings p. 9
First start
- Connect power and signal cables, then turn on the monitor. p. 8
Show 4 more answers Show less
Problems and fixes
No picture
Check power connection and power button status.
p. 24Maintenance and reset
- To reset OSD settings, press the Menu/OK button, then select 'Setup' > 'Reset'. p. 26
Technical specifications
| Parameter | Value | Meaning | Pages |
|---|---|---|---|
| Resolution | 1920 x 1080 | Native resolution | p. 17 |
Where to find it in the PDF
- Installation p. 5, 7, 8
- OSD Menu p. 9, 10
- Technical Specifications p. 17, 18
Table of contents
Manual images
Click an image to enlargeQuick guide from the manual
This guide provides essential information for setting up and operating your Philips 242S1 S line monitor. For detailed warranty and service information, please refer to the full documentation.
Safety precautions
- Keep the monitor away from direct sunlight, heat sources, and excessive moisture.
- Ensure the power plug and outlet are easily accessible.
- Use only the approved power cord provided by Philips.
- Do not block ventilation holes on the cabinet.
- Avoid applying excessive pressure to the LCD panel.
Installation
Base Assembly:
- Place the monitor face down on a smooth surface to avoid scratching the screen.
- Attach the base to the stand.
- Tighten the screw at the bottom of the base using your fingers, then secure it tightly with a screwdriver.
- Attach the stand to the VESA mount area until the latch locks.
Connecting to PC:
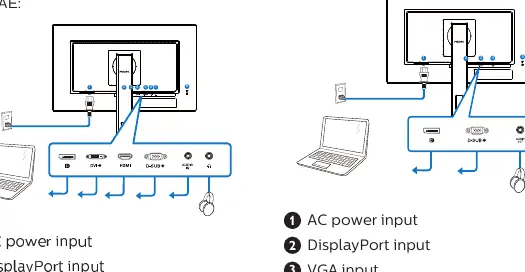
- Connect the power cord firmly to the back of the monitor.
- Turn off your computer and unplug its power cable.
- Connect the signal cable (HDMI, DisplayPort, VGA, or DVI depending on your model) to the video connector on your computer.
- Plug the power cords of your computer and monitor into a nearby outlet.
- Turn on your computer and monitor.
Operating the monitor
The monitor features an On-Screen Display (OSD) menu for adjusting settings. Use the control buttons on the front bezel to navigate:
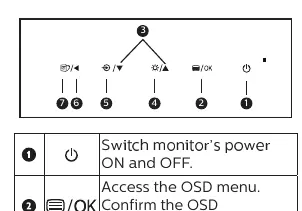
- Power button: Switches the monitor ON and OFF.
- Menu/OK button: Accesses the OSD menu and confirms adjustments.
- Up/Down buttons: Adjust the OSD menu.
- Brightness button: Adjusts the brightness level.
- Input button: Changes the signal input source.
- SmartImage button: Selects display presets (EasyRead, Office, Photo, Movie, Game, Economy, LowBlue Mode, Off).
Image Optimization
SmartImage: Provides presets that optimize display for different content types by dynamically adjusting brightness, contrast, color, and sharpness.
SmartContrast: Dynamically analyzes content to optimize the contrast ratio for maximum visual clarity.
Troubleshooting
- No Picture (Power LED not lit): Check if the power cord is plugged in and the power button is ON.
- No Picture (Power LED is White): Ensure the computer is on and the signal cable is properly connected. Check for bent pins on the cable.
- Image not centered: Use the "Auto" function in the OSD menu or adjust Phase/Clock (valid in VGA mode).
- Vertical flicker: Use the "Auto" function or adjust Phase/Clock (valid in VGA mode).
Technical Specifications
- Panel Size: 23.8" (60.5 cm)
- Native Resolution: 1920 x 1080 @ 60 Hz
- VESA Mount: 100mm x 100mm (M4 screws)
- Operating Temperature: 0°C to 40°C
- Humidity: 20% to 80% RH
Manufacturer information
Philips
Practical help
Common problems
No picture (Power LED not lit)
Check power cord connection and ensure the power button is in the ON position.
Image not centered
Use the 'Auto' function in OSD Main Controls or adjust Phase/Clock settings (VGA mode only).
Vertical flicker
Use the 'Auto' function or adjust Phase/Clock settings (VGA mode only).
Before use
- Ensure the monitor is placed on a stable, smooth surface.
- Connect the power cable firmly to the monitor and power outlet.
- Connect the appropriate signal cable (HDMI, DP, VGA, or DVI) to your PC.
- Turn on the computer and then the monitor.
Show more Show less
Specs in practice
- Native Resolution
- 1920 x 1080 @ 60Hz is the recommended setting for best display quality.
Images and diagrams
- Base installation: Place monitor face down, attach stand, tighten screw, and lock latch.
- OSD buttons: Located on the front bezel for power, menu navigation, and input selection.
Model compatibility
- Compatible with standard PCs, Macs, and workstations.
- Plug-and-Play compatible with Windows 10/8.1/8/7 and Mac OS X.

Manual page author
David Miller
Documentation analyst