Automotive / Electric Vehicles
User Manual for Tesla Model 3 12V/LV Power Disconnect and Connect
A comprehensive guide for disconnecting and connecting the 12V/LV power system in Tesla Model 3 vehicles. This manual covers safety precautions, torque specifications, and specific procedures for Original, Heat Pump, and Li-Ion battery...
Table of contents
Manual images
Click an image to enlargeImportant Safety Information
Before performing any work on the 12V/LV power system, ensure you are wearing proper Personal Protection Equipment (PPE). This procedure disables 12V power but does not verify that high voltage power is no longer available to high voltage components (such as the PTC heater, A/C compressor, or inverters). Always perform the Vehicle Electrical Isolation Procedure before servicing high voltage components.
Warning: Failure to follow the exact order of steps in this procedure may cause permanent damage to the car computer.
Preparation
Before disconnecting 12V power, complete the following steps:
- Disconnect any charging cable.
- Power off the climate control system via the touchscreen and wait at least 30 seconds for it to completely shut down.
- Ensure the vehicle is in Park.
- Fully lower all door windows to avoid glass shatter and door lockout conditions.
- Open the LH and RH rear doors and pass a shop towel halfway through each door striker to prevent the latch from securing.
Torque Specifications
When reassembling, use the following torque specification:
- (Lead acid) positive/negative cable to the battery terminal: 6 Nm (4.4 lbs-ft)
Disconnecting 12V Power (Original Model 3)

- Complete the preparation steps listed above.
- On the touchscreen, touch Controls > Safety & Security > Vehicle Power > Power Off.
- Loosen the nut that attaches the 12V battery negative cable to the battery and disconnect the cable.
- Remove the foam cover from the RH side of the penthouse.
- Disconnect the electrical harness from the high voltage controller connector.
- Install the logic connector cap onto the high voltage controller connector to protect it.
- Wait 2 minutes for the electrical system to fully discharge.
Disconnecting 12V Power (Heat Pump Model 3)
- Complete the preparation steps.
- On the touchscreen, touch Controls > Safety & Security > Vehicle Power > Power Off.
- Loosen the nut that attaches the 12V battery negative cable to the battery and disconnect the cable.
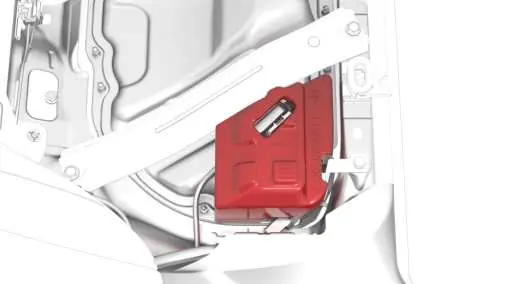
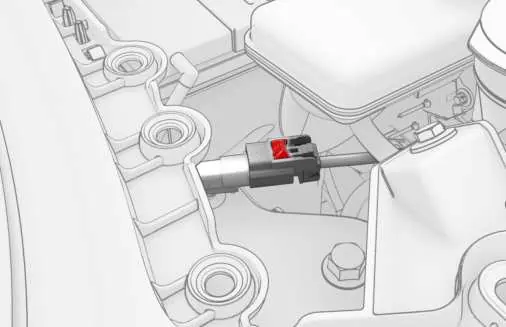
- Locate the first responder loop next to the RH side of the 12V auxiliary battery.
- Slide the red locking tab back, press the black tab, and disconnect the first responder loop.
- Wait 2 minutes for the electrical system to fully discharge.
Disconnecting 12V Power (Li-Ion Battery)
- Open the LH front door and lower the LH front window.
- Power off the vehicle from the center display.
- Remove the rear apron.
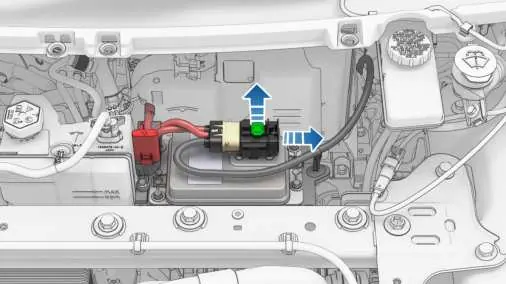
- Disconnect the LV battery connector from the LV battery: lift up to release the green locking tab, pull the black connector lock outwards, and pull up to disconnect.
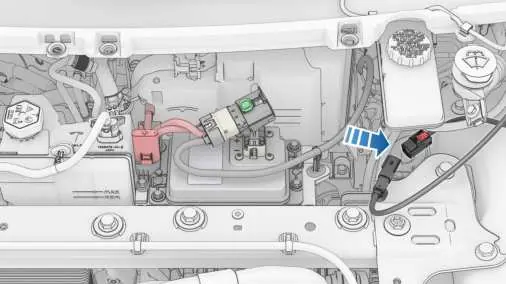
- Disconnect the first responder loop.
- Wait 2 minutes for the electrical system to fully discharge.
Connecting 12V Power
To reconnect, perform the disconnection steps in reverse order. Ensure the 12V battery negative cable is firmly seated on the battery post before tightening the nut to 6 Nm (4.4 lbs-ft). For Heat Pump models, ensure the first responder loop is connected before reconnecting the 12V negative terminal. For Li-Ion models, connect the first responder loop BEFORE connecting the LV battery connector.
Practical help
Common problems
Climate control system still active
Do not proceed until the climate control system has been powered off for at least 30 seconds.
High voltage components still energized
This procedure only disables 12V power. Perform the Vehicle Electrical Isolation Procedure before servicing high voltage components.
Electrical system not fully discharged
Wait 2 minutes after disconnecting power before continuing with service.
Before use
- Ensure vehicle is in Park
- Power off climate control system
- Lower all door windows
- Disconnect any charging cable
- Wear proper Personal Protection Equipment (PPE)
Images and diagrams
- The manual provides diagrams for locating the 12V battery, first responder loop, and high voltage controller connector.
Model compatibility
- Procedures differ based on battery type (Lead Acid vs Li-Ion) and vehicle configuration (Original vs Heat Pump).

Manual page author
David Miller
Documentation analyst
Organizes user manual content into clear summaries, with attention to model details, product context, and everyday usability.